How to Resize an Image on Adobe Illustrator: 10 Essential Techniques for Stunning Results
Hello, fellow artists! Have you ever opened Adobe Illustrator and observed that your photograph is both too huge or too small for your project? Learning how to resize an image on Adobe Illustrator is an easy yet essential ability that could make a massive difference in your layout work.
Whether you’re creating a brand, designing a commercial, or adjusting photographs for a website, understanding how to resize well facilitates your work faster, hold picture nice, and make your ideas stand out.
In this entire guide, we’ll walk you through the whole lot — from the basics to the advanced strategies experts use — so you can examine the way to resize an image on Adobe Illustrator like a pro without any trouble.
Ready to start?
Table of Contents
Why Mastering Resizing in Illustrator Makes All the Difference
It’s crucial to talk about why resizing pictures in Adobe Illustrator is so important before we get into the info of how to do it. Illustrator is an effective vector-based photo designer that is one of a kind compared to others. When you resize a photo in Illustrator, you’re normally working with scalable pictures that stay sharp and clear irrespective of how a whole lot you change their size.
For instance, imagine you’re working on a branding task. Your client’s image needs to be resized to suit perfectly on an enterprise card, but it has to stay crisp and expert-looking. On the other hand, you might be creating pics for social media, in which every pixel truly matters.
In that case, understanding how to resize an image in Adobe Illustrator can make your designs look more polished and professional. It additionally saves you time and enables you to avoid having to redo your work, giving you extra freedom to focus on creativity instead of corrections.
Illustrator additionally offers you an effective tool that lets you do more than make images bigger or smaller — you may modify proportions, keep quality sharp, and fit photos perfectly into your layout. You can also use them to change images in creative ways that keep their proportions.
In what comes next, I’ll walk you through the many strategies, common mistakes, and insider tips that will be discussed. You can learn something beneficial right here, whether you are a newbie who desires to understand a way to resize a photograph in Illustrator or an experienced user who wishes to get better. Before you start resizing, it’s essential to understand the sort of picture you’re working with.
The Fundamentals: Vector vs. Raster Images Explained
Illustrator works with both vector and raster images — but it’s typically built for vectors. Knowing the difference between the two will assist you in resizing correctly and maintain pleasant to your designs.
Let’s take a better look at how vector and raster photographs fluctuate and why that matters whilst resizing.
What Makes Vector Images So Special?
Components of vector pictures are lines, points, and curves that are set by mathematical equations. In particular, think of logos, illustrations, or icons that were made in Illustrator. What is the beauty? You can change the size of images in Illustrator style because vectors can be scaled up or down without losing quality.
For instance, if you used the Ellipse Tool to make an easy form like a circle, you may keep its sharpness with the help of dragging the circle’s corners to make it larger or smaller. This is because Illustrator does a few math operations behind the scenes.
Decoding Raster Images: The Pixel Challenge
Raster photographs, however, are made from grids of pixels and include pictures you are taking with your camera. You can area in Illustrator with the help of going to File > Place. Resizing it won’t be a good concept. If you shrink it too much, the info will disappear, and if you stretch it too far, it’ll appearance really blocky.
Embedded photos are constructed into your project, at the same time as related pictures are taken from a specific record. When you change the scale of an image in Illustrator, it doesn’t change the original.
Key Differences and Best Use Cases
- Vectors for scalability are the best way to go for print jobs where the sizes change, like business cards and billboards.
- Rasters for Realism: These work great on photos, but you should start with high-resolution images so that you don’t have any issues when you change the size of the image in Illustrator.
Use the Image Trace tool (Object > Image Trace > Make) to convert raster images into vectors, giving you greater control over scaling. To experiment with presets, first choose an image. Then, go to the Object menu and select Trace Image. Finally, choose Make. Even though it’s no longer perfect for all photographs, it’s a lifesaver for making easy graphics.
If you understand this basis, you may be capable of attaining your desires. Now let’s get to the practical parts of the training.
10 Essential Techniques: Step-by-Step Ways to Resize Images
We will cross over the simple steps for resizing photos in Illustrator in this section.
Technique 1: Quick Resizing with the Selection Tool

With Adobe Illustrator, the very best way to change the size of a picture is to apply the Selection Tool (V). It’s short and clean to understand.
Start up your Illustrator file and, if it is not already there, use the File > Place menu to position your photograph where you want it.
With the Selection Tool, click on the photograph to make a selection of it. There will be a box with handles in front of you.
Drag a corner handle to change the size. Keep the sizes in check so that your picture does not get squished.
For better control in case you hold down the Alt key (or the Option key on a Mac) and drag to change the dimensions from the center.
If you need to make modifications immediately, this concept is best. I’ve used it lots to create mockups of layouts, and it continually works fast each time.
Technique 2: Precise Control Using the Transform Panel
Because it gives you genuine measurements, the Transform Panel will become your quality buddy. In Illustrator, do you want to understand a way to change the size of an image using the millimeter system? By this means:
Pick out the photograph you want to use.
You can get to the Transform Panel with the help of going to Window > Transform.
You should enter values for the width (W) and height (H). Please use the chain icon to attach them so that the sizes can be modified efficiently.
You only need to press the Enter key to change the size of your picture right away.
From this point, you can also rotate or cut the image, which lets you make scaling and other changes at the same time.
Technique 3: Advanced Scaling with the Scale Tool

For more advanced control over the project, use the Scale Tool (S).
Pick out the photograph you need to apply.
When you double-click on the Scale Tool within the toolbar, the dialog box will appear.
It is important to enter a percent (as an example, 50% for half size) or exact measurements.
To stretch, you may pick Non-Uniform, and to scale proportionally, you could select Uniform.
If you need to scale a lot of things at once or a lot of images at once in Illustrator (you have to select all the objects first), this is a great tool to use.
For eighty percent of your resizing needs, these basics should be enough. You should work on them on a sample file so that they become second nature.
Technique 4: Lock Proportions with the Shift Key
One of the most traumatic things about design is when pictures are messed up, like when faces are stretched out or logos are squeezed together.
As was shown, you can lock the aspect ratio by holding down the Shift key and dragging the handles. You should make this a habit. You could end up with a version of what was once a perfect square that is wide and flat if you don’t have it.
Technique 5: Quick Aspect Ratio Lock in the Properties Panel
More current versions of Illustrator have a quick lock for proportions that can be found within the Properties Panel (Window > Properties). Select the picture you want to change the size of, then turn on and off the aspect ratio lock.
Technique 6: Precision Resizing Using Guides
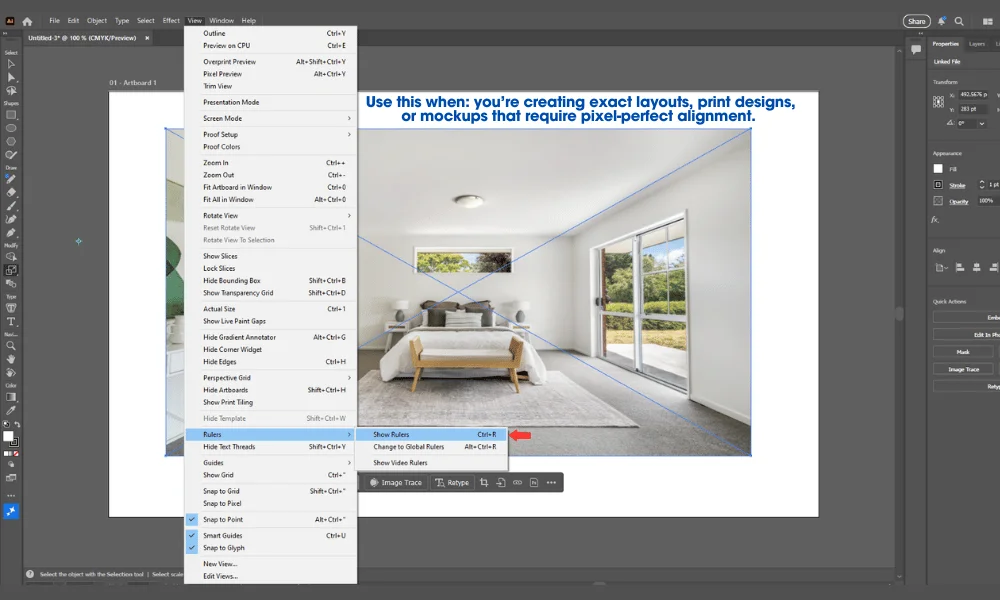
You can make guides by going to View > Rulers > Show Rulers, after which dragging from the rulers.
This will ensure that your resized photograph is the right length.
With this, it is clear to line up a variety of portions.
If you need to look for any pixels left after adjusting a raster, don’t forget to always zoom in at 100% (Cmd/Ctrl + 1).
Technique 7: Resizing Linked Images (Keep Original File Safe)

When you upload an image to a document, Illustrator will ask you if you want to host it or link to it.
In the related pics, there’s a hyperlink to the source file on your computer. When you change the sizes of a photo in Illustrator, it doesn’t change the source, which is high-quality for making the file smaller.
Use any of the above ways to change the size.
In the event that the source is changed, the Link Panel (Window > Links > Relink) will let you know.
Con: If you move the file, you will get an error message about a lost link.
Technique 8: Resizing Embedded Images (All-in-One File)
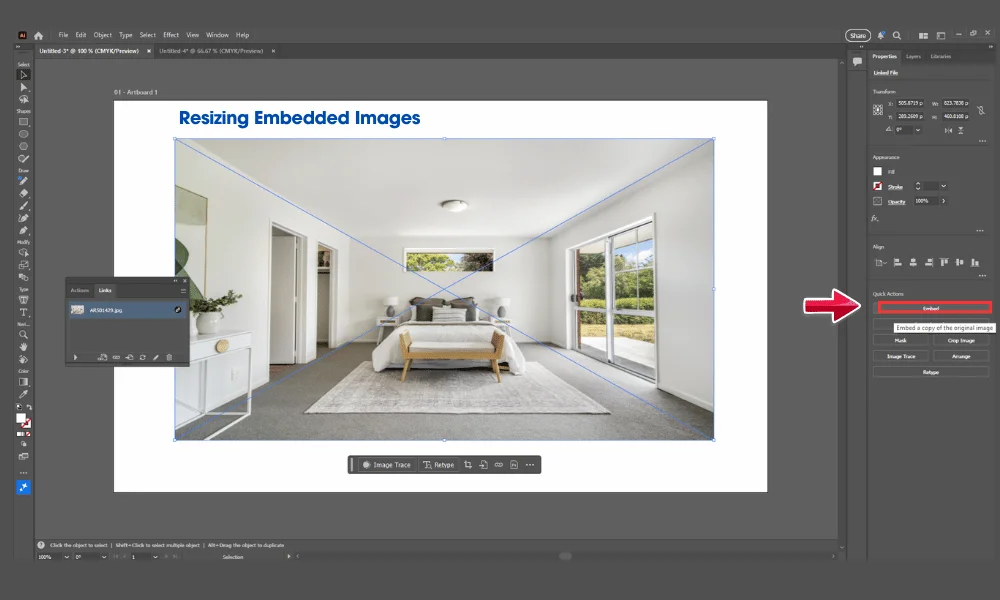
Embedded images are a convenient way to do more than one thing at once.
When you upload a photograph, it becomes part of your AI document and does not need to be downloaded from some other place.
Take a look at the Links Panel, choose the picture, and then click the Embed button.
Sharing files without having to think about broken links is the best way to use this.
It’s possible to switch between them. Linked helps me keep things light, so I always use it for big projects.
Technique 9: Fitting Images Perfectly to Artboards
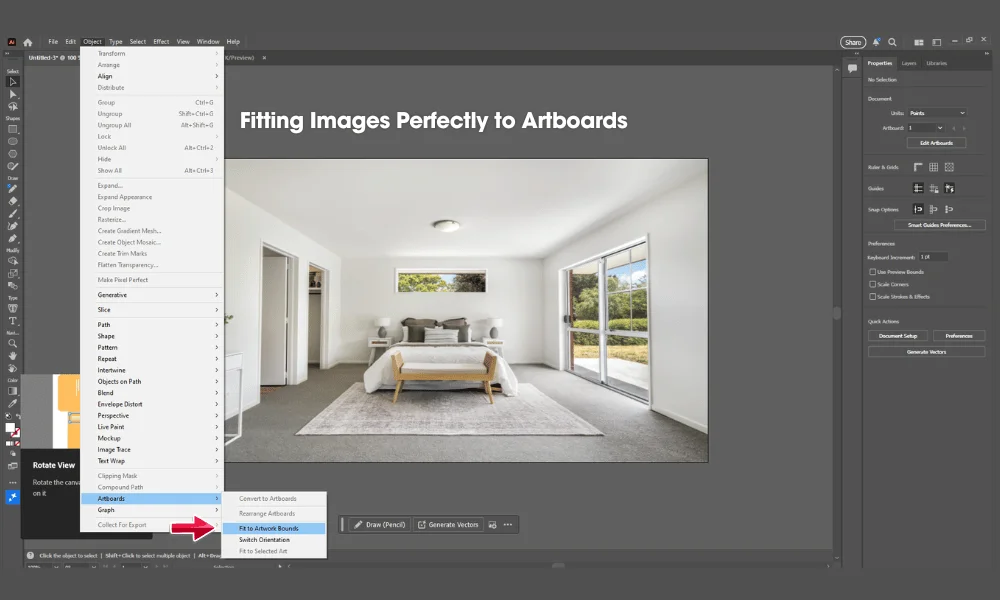
Once you already know the way to play the s game well enough, it is time to level up. With those pointers, you can change the size of images in Adobe Illustrator in more complex scenarios.
To change a photo’s size so that it can fit on an artboard:
Select the picture.
To get to the menu bar, type Object > Artboards > Fit to Artwork Bounds.
You can make changes by hand by moving or by pressing Shift and O to use the Artboard Tool.
This changes everything about exporting versions or documents with many pages.
Technique 10: Batch Resizing Multiple Images at Once
Illustrator doesn’t natively support full batch resizing of placed raster files via Actions. You can, however, batch process using File > Scripts (custom JavaScript) or Adobe Bridge + Illustrator Actions.
Batch resizing works best with vector objects or via scripts, not directly with placed raster images.
Additional Advanced Methods: Creative Freedom with the Free Transform Tool
Use the free tool to change things.
With the Free Transform Tool (E), you could scale, rotate, and transform all in one tool.
To exchange the scale, click and maintain at the handles, then drag them.
Try these if you want to make your ideas more interesting.
Tailoring Resizes for Print and Web Outputs
It’s vital to know what you’re doing while you change the dimensions of a photo in Illustrator. When it involves print and online, the regulations are different.
Getting Print-Ready Results
Resolution (no less than 300 DPI for raster images) is very crucial for making suitable pics.
You can change the sizes by means of using the Transform Panel and both inches and centimeters as the measuring units.
Check the Document Raster Effects Settings by going to Effect > Document Raster Effects Settings to make sure the quality is good enough.
When you publish as a PDF, use settings with a high resolution.
Optimizing for Web and Digital Use
Change the scale of the picture to the pixel size, like 1200×800 for posters.
Going to File > Export > Save for Web will take you to Save for Web (Legacy). Choose JPEG or PNG, and then look at how big the file is.
You can add more compression after exporting with tools like TinyPNG, however, the fundamental trimming should still be carried out in Illustrator.
Your photos will look brilliant in any medium, so long as you change how you are taking them.
Common Pitfalls and Quick Fixes
We all make errors, even pros. Here’s what you can do to keep away from getting headaches.
Mistake 1: Forgetting Aspect Ratio
Always maintain the shift key or lock the measurements. If the bounding field is off, pick out it out and visit the menu that says Object > Transform > Reset Bounding Box.
Mistake 2: Over-Enlarging Low-Res Rasters
Fix: Start with sites that have a lot of detail. It’s best to retrace or replace a picture that has pixels.
Mistake 3: Link/Embed Oversights
Check the Links Panel regularly.
Additional Traps to Avoid
If you want to preserve the originals, go to the File menu and pick Save As.
Ignoring alignment: To change the alignment, use the Align Panel (Window > Align) after adjusting.
10 Expert Tips: How to Resize an Image on Adobe Illustrator
To wrap up the useful tips I just gave, here are some of my best ideas for making resizing pictures in Illustrator even easier:
- Press Cmd or Ctrl + T to transform or resize an picture on the fly freely.
- Go to View > Smart Guides to turn on the Smart Guides tool so that you can take exact shots.
- Patterns and Symbols: Go to Window > Symbols to turn pictures that repeat into symbols before you resize them. This will make sure they grow perfectly.
- You can change the scale of photographs’ internal shapes without changing the shape itself by means of going to Object > Clipping Mask > Make.
- When you press Cmd/Ctrl+Z, you can undo past. If you want to go back further, you should look at the past Panel.
- Making changes to the preferences: To make scaling easier, go to Edit > Preferences > Units and set the unit setting to the usual measurement.
- You can find many useful third-party plugins for advanced scaling tools at Astute Graphics.
- With the Adobe Capture app, you can bring pictures into your phone and change their size while you’re on the go.
- Layer management (Window > Layers) should be used to lock layers that aren’t being resized so that they don’t get changed by accident.
- To work on your skills without putting yourself at risk, you should make a “resize playground” file.
These gems have saved me hours, so you should give them a try.
Troubleshooting Resizing Problems
Sometimes things don’t go as planned. First ensure it is not locked by going to Object > Unlock All. Not clean outcomes? It may be a low-resolution image; use the Place settings to enhance the quality.
When working with huge documents, it is best to use the Object > Path > Clean Up command to get rid of any needless facts. Also, autosave will save you if Illustrator crashes even as you’re adjusting (Preferences > File Handling).
Integrating Resizing into Your Everyday Workflow
A complete design process includes adjusting as one of its steps. It starts with the first import and ends with the last change.
For instance, when designing a name, you should import the sketch, resize it so that it fits on the artboard, and then vectorize it before making changes for different sizes.
When making charts, using the Align tools to resize photos to the same size can give them a more professional look.
Using these parts to build routines is a smooth integration.
Get Creative: Fun Ways to Use Resizing
Resizing something is not only useful, but it’s also fun! Put it to use for results such as:
- To make warping, go to Object > Envelope Distort > Make with Warp and connect it to the envelope distortion.
- Scaling in three dimensions involves extruding and resizing for depth (Effect > 3D > Extrude & Bevel).
- In order to prepare images for export in Adobe Animate, resize the frames.
Keep Learning: Great Resources to Level Up
You can improve your skills by:
- The Adobe Help Center: To get official tutorials, look for “resize image Illustrator” in the search bar.
- Channel names on YouTube such as ‘Dansky’ or ‘PiXimperfect’ are suggested.
- The book “Adobe Illustrator Classroom in a Book” covers the utilization of scaling in various tasks.
- Reddit’s r/AdobeIllustrator is a community that offers advice from actual users.
Learn new things; design is constantly changing.
Final Thoughts: Resize Confidently and Creatively
We’ve covered a ton—from the basics of how to resize an image on Adobe Illustrator all the way through advanced fixes and creative ideas. Practice these steps on your own files, and you’ll see your designs improve fast. If you have questions or extra tips, share them below!