
How to Remove Glare in Lightroom: Enhancing Real Estate Photos
Glare can be a common issue when capturing real estate photos, but fortunately, with the help of powerful photo editing software like Lightroom, you can easily remove glare and enhance the overall quality of your images. In this article, we’ll guide you through various methods to remove glare in Lightroom, ensuring that your real estate photos look professional and visually appealing.
Table of Contents
I. Advantages of Removing Glare in Real Estate Photos
- Enhanced Visual Appeal: Glare-free photos are visually appealing and provide a clear view of the property’s features. By removing glare, you can showcase the space in its best light, capturing the attention of potential buyers and increasing the chances of a successful sale.
- Accurate Representation: Glare can distort colors and details, leading to an inaccurate representation of the property. By removing glare, you can ensure that your photos accurately depict the true colors, textures, and architectural elements of the space, fostering transparency and trust with potential buyers.
- Highlighting Key Selling Points: Glare often occurs around reflective surfaces like windows, mirrors, or glossy countertops. By removing glare, you can highlight important selling points such as scenic views, natural light, or stylish finishes, drawing the viewer’s attention to the property’s unique features.
- Professionalism and Branding: Presenting high-quality, glare-free images reflects professionalism and attention to detail. By consistently delivering polished and visually stunning real estate photos, you establish a strong brand identity, setting yourself apart from competitors and attracting clients who value exceptional presentation.
- Better Online Engagement: In today’s digital age, most potential buyers start their property search online. Glare-free photos significantly improve the online viewing experience, capturing the viewer’s interest and encouraging them to explore further. This can lead to increased engagement, inquiries, and ultimately, more potential buyers visiting the property in person.
II. How to Remove Glare in Lightroom
Lightroom provides photographers with a range of powerful tools specifically designed to address glare issues. By leveraging features like the Adjustment Brush, Radial Filter, and Spot Removal tool, you can precisely target and eliminate glare in your real estate photos, ensuring that the final images are polished and free from distractions
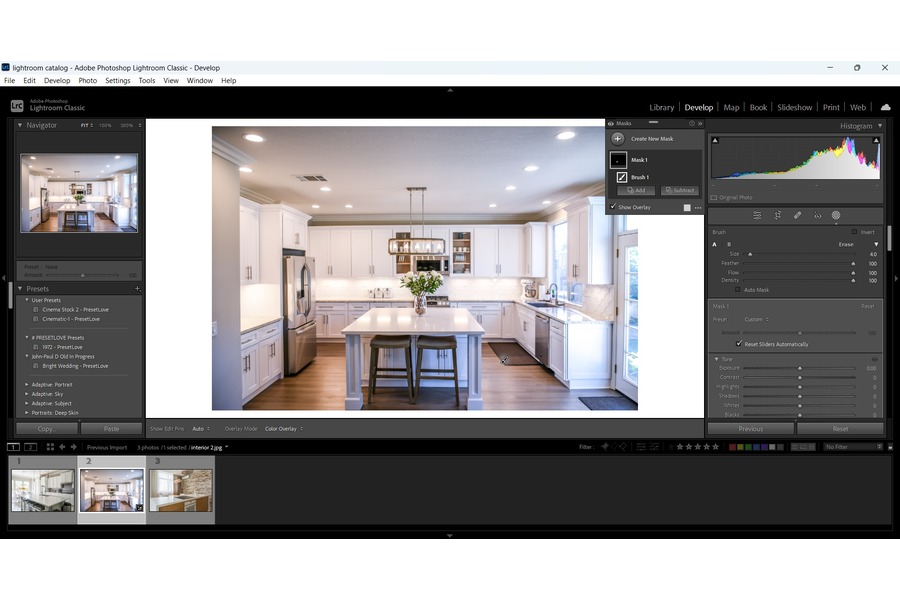
Remove Glare Using the Adjustment Brush:
One effective way to tackle glare in Lightroom is by utilizing the Adjustment Brush tool. This tool allows you to selectively apply adjustments to specific areas of your image, making it ideal for targeting and eliminating glare. Follow these steps:
- Open your image in Lightroom and switch to the Develop module.
- Locate the Adjustment Brush tool and select it.
- Adjust the brush settings to suit your needs, such as reducing exposure or increasing clarity.
- Carefully brush over the areas affected by glare, ensuring a precise selection.
- Fine-tune the adjustment settings as necessary to achieve the desired result.
- Repeat the process if there are multiple glare spots in the image.
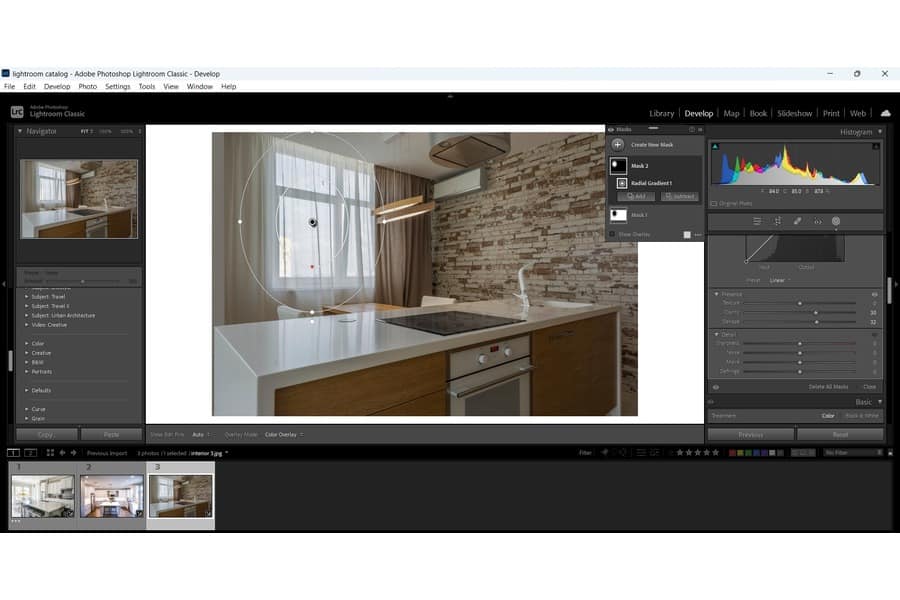
B. Remove Glare Using the Radial Filter:
Another useful technique for removing glare is by utilizing the Radial Filter tool. This tool allows you to create circular or oval-shaped selections to apply specific adjustments. Here’s how to use it:
- Open your image in Lightroom and switch to the Develop module.
- Locate the Radial Filter tool and select it.
- Create a circular or oval-shaped selection around the glare area.
- Adjust the desired settings, such as reducing highlights or increasing clarity, within the selected area.
- Fine-tune the adjustments until the glare is effectively reduced or eliminated.
- Repeat the process if there are multiple glare spots in the image.
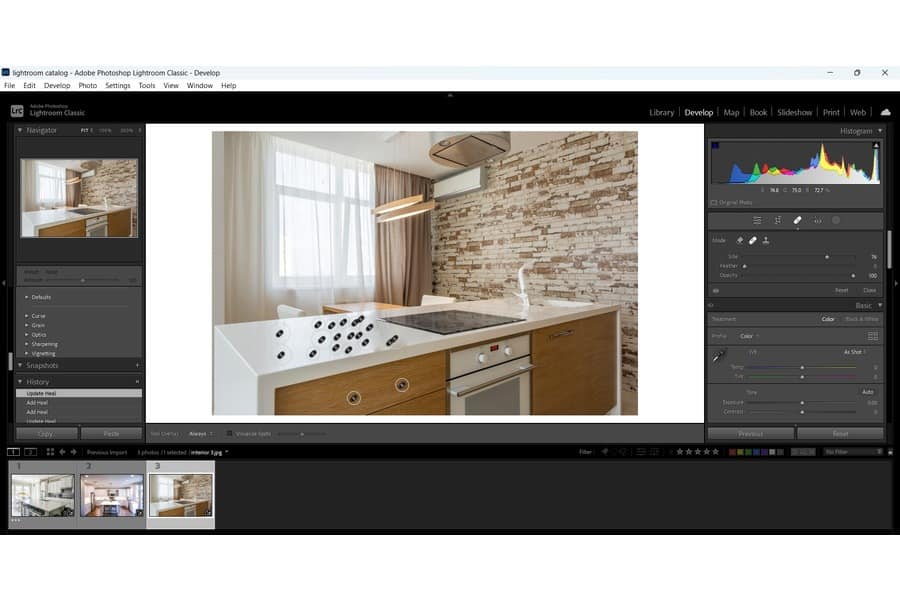
C. Remove Glare Using the Spot Removal Tool:
The Spot Removal tool in Lightroom can be handy for removing smaller, localized glare spots. Follow these steps to use the Spot Removal tool:
- Open your image in Lightroom and switch to the Develop module.
- Locate the Spot Removal tool and select it.
- Adjust the brush size to match the size of the glare spot.
- Click on the glare spot, and Lightroom will automatically select a nearby area to replace it.
- Adjust the opacity or feathering of the spot removal, if needed, to ensure a seamless blend with the surrounding area.
- Repeat the process for each individual glare spot in the image.
D. Enhancing Glare Removal with Tone Curve Adjustments:
In addition to the previous techniques, utilizing the Tone Curve tool in Lightroom can further enhance the removal of glare and improve overall image quality. Follow these steps:
- Open your image in Lightroom and switch to the Develop module.
- Locate the Tone Curve panel and click on the Point Curve dropdown menu.
- Choose the “Linear” option to start with a straight line curve.
- Click on the midpoint of the curve and drag it slightly downward to darken the mid-tones.
- Create two additional anchor points on the curve, one slightly to the left and one slightly to the right of the midpoint.
- Adjust the position of these anchor points to fine-tune the contrast and brightness of the image.
- By adjusting the curve, you can further reduce the visibility of any remaining glare and enhance the overall tonal balance.
III. Frequently Asked Questions
As you navigate the world of real estate photography and strive for glare-free images, it’s natural to have questions about the causes of glare and how to prevent it. In this section, we address some commonly asked questions to provide clarity and guidance.
For what reason Do We Get Glare in Photographs?
Glare can occur in real estate photos due to various factors. Understanding these causes will empower you to take preventive measures during the shooting process. Some common reasons for glare in real estate photos include:
- Direct Sunlight: When sunlight directly enters the frame, it can cause unwanted reflections and glare on surfaces like windows, mirrors, or glossy finishes.
- Artificial Lighting: Harsh or poorly positioned artificial lighting sources can also contribute to glare, particularly when they are in the frame or reflect off reflective surfaces.
- Improper Shooting Angles: The angle at which you capture a scene can affect the presence of glare. Shooting directly towards a light source or at extreme angles can increase the likelihood of glare.
How Can Glare Be Prevented When Photographing Properties?
Preventing glare starts with careful planning and attention to detail during the photo shoot. Here are some practical tips and techniques to minimize glare and capture stunning, glare-free real estate photos:
- Adjust Shooting Angles: Be mindful of the angles at which you photograph the property. Position yourself in a way that minimizes direct light sources and reflections.
- Diffuse Natural Light: If you’re shooting during daylight hours, consider using diffusers or sheer curtains to soften and scatter sunlight entering the space, reducing the risk of glare.
- Control Artificial Lighting: Ensure that artificial lighting fixtures are positioned and directed in a way that minimizes glare. Use soft, diffused lighting sources and avoid having them directly in the frame.
- Use Polarizing Filters: Attach a polarizing filter to your camera lens to help reduce reflections and glare caused by sunlight or artificial light sources.
- Adjust Exposure Settings: Experiment with exposure settings to find the right balance that minimizes glare. Avoid overexposing areas prone to glare, such as windows or shiny surfaces.
By implementing these preventive measures, you can significantly reduce the occurrence of glare and capture high-quality real estate photos from the start, saving time and effort during the editing process.
IV. Final thought
In the competitive world of real estate, presenting visually appealing and accurate property photos is essential to attract potential buyers and make a lasting impression. Glare can be a common issue that detracts from the overall quality of real estate images. However, with the powerful editing capabilities of Lightroom, removing glare has become easier than ever.
By utilizing tools such as the Adjustment Brush, Radial Filter, Spot Removal tool, and Tone Curve adjustments, you can effectively eliminate glare and enhance the visual appeal of your real estate photos. Whether it’s reducing reflections on windows, minimizing glare on glossy surfaces, or enhancing the natural light in a room, Lightroom provides the necessary tools to achieve outstanding results.
By investing time and effort into removing glare, you can showcase the property’s features accurately, highlight key selling points, and elevate the overall professionalism of your brand. Glare-free images provide a clear view of the property, allowing potential buyers to visualize themselves in the space and make informed decisions.
Furthermore, with the ever-increasing importance of online engagement in the real estate market, glare-free photos significantly improve the online viewing experience. They capture the attention of viewers, encourage further exploration, and ultimately drive more inquiries and property visits.