A Step-by-Step Guide Mastering HDR Real Estate Photo Editing for Stunning Results
In the competitive world of real estate marketing, high-quality images can make all the difference. The right photographs can capture the essence of a property, showcasing its best features and drawing in potential buyers. One powerful technique that can take your real estate photos to the next level is High Dynamic Range (HDR) photography. In this comprehensive guide, we’ll walk you through the step-by-step process of HDR real estate photo editing, ensuring your images stand out and leave a lasting impression.
Table of Contents
Step 1. Exploring the Fundamentals of HDR Photography
What is HDR Photography?
HDR, or High Dynamic Range, photography is a technique that involves capturing a series of photos at varying exposure levels and then blending them together during the editing process. The goal is to create an image that showcases a broader range of light and shadow, resulting in more detail and vividness. This method is particularly advantageous in real estate photography, as it allows you to highlight the full spectrum of a property’s lighting conditions.
Why Use HDR in Real Estate Photography?
Using HDR in real estate photography is a game-changer for several reasons. It enables you to capture the intricate details of both well-lit areas and those in shadow, making the property’s features stand out. In essence, HDR helps you present a property in its best possible light, creating a compelling visual representation that attracts potential buyers.
How Does HDR Enhance Real Estate Images?
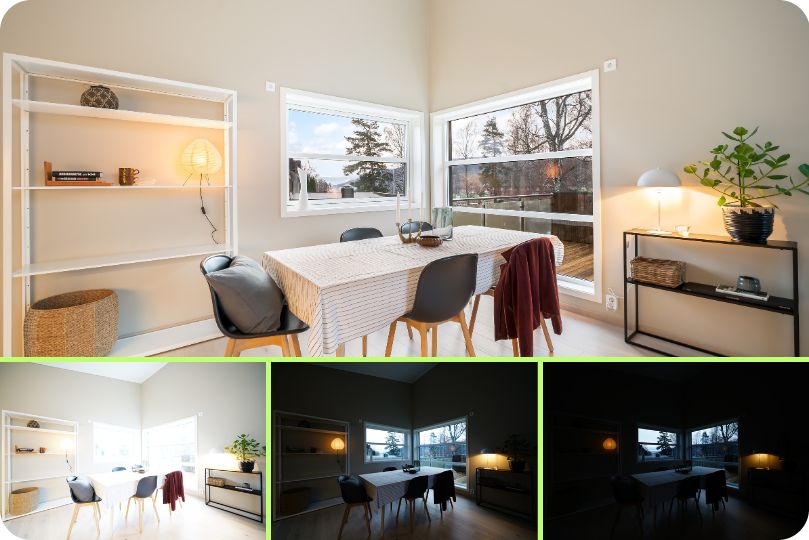
HDR enhances real estate images by achieving a balanced exposure throughout the photo. Traditional single-exposure images may struggle to capture the nuances of both bright exterior scenes, such as sunlight streaming through windows, and dimly lit interior spaces. HDR addresses this challenge by blending multiple exposures, ensuring that every part of the image is adequately exposed. As a result, HDR images exhibit stunning clarity and a lifelike quality that draws viewers into the property, making it an invaluable tool in the real estate photographer’s arsenal.
Step 2. Key Gear for HDR Real Estate Photography
Camera Essentials
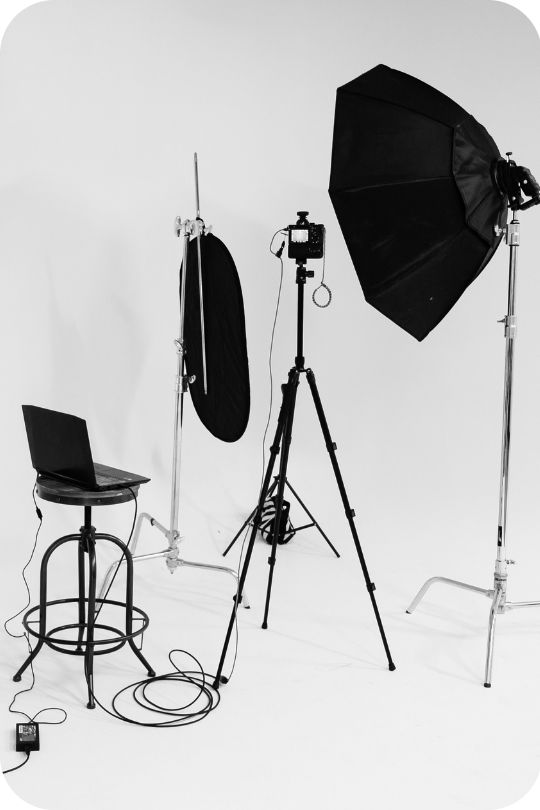
The foundation of HDR real estate photography starts with your camera. Opt for a camera with manual exposure settings, as this gives you precise control over the bracketing process, a fundamental aspect of HDR. Look for a camera with strong low-light performance, ensuring you can capture beautifully detailed shots even in challenging lighting conditions.
Tripods and Stability
A sturdy tripod is a must-have accessory. It ensures your camera remains stable during the bracketed exposures, resulting in perfectly aligned shots that are essential for successful HDR merging. Investing in a high-quality tripod is a smart move for any real estate photographer aiming for top-notch results.
Optional Tools: Remote Shutter Release and Polarizing Filters
Consider adding a remote shutter release to your toolkit. This accessory further minimizes any potential camera shake during the shooting process, enhancing the overall sharpness of your images. Polarizing filters are another valuable addition, particularly when dealing with reflective surfaces. They help manage unwanted reflections and boost the overall image quality, providing that extra touch of professionalism to your real estate photographs.
By having the right camera, stable tripod, and potentially using remote shutter releases and polarizing filters, you’re arming yourself with the essential equipment necessary for mastering HDR real estate photography. These tools form the basis for capturing the exceptional images that will set your real estate marketing materials apart.
Step 3. Crafting HDR Real Estate Images
Selecting Optimal Scenes and Lighting Conditions
Begin by choosing scenes with a wide dynamic range, such as exteriors with a mix of bright sunlight and shaded areas or interior spaces with expansive windows. The interplay of light and shadow in such scenes provides the perfect canvas for HDR real estate photography, allowing you to capture the property’s full potential.
Preparing Your Camera for HDR
Set your camera to manual exposure mode. Adjust the aperture and ISO settings to your liking, considering the scene’s characteristics and your desired outcome. This control ensures consistency across the bracketed shots, a critical aspect of the HDR process.
Capturing Bracketed Exposures
The essence of HDR lies in capturing bracketed exposures. Take a series of shots, each with different exposure levels. The usual bracketing involves taking an underexposed shot to capture details in the brightest areas, a normally exposed shot, and an overexposed shot for the shadowed regions. These bracketed exposures provide the raw material for the compelling final image.
Composing with Excellence
Composition plays a pivotal role in real estate photography. Pay attention to framing, leading lines, and the placement of key elements within the frame. A well-composed image enhances the property’s appeal and creates a visually pleasing experience for potential buyers.
By mastering these steps, you’re well on your way to crafting remarkable HDR real estate photos that leave a lasting impression.
Step 4. The HDR Real Estate Photo Editing Workflow
Organizing and Selecting Bracketed Photos
Begin by organizing your bracketed shots. Review each series, focusing on alignment, composition, and overall quality. Select the series that best captures the property’s highlights and showcases its unique features.
HDR Merging Software Options
Choose reliable HDR merging software that suits your editing style and workflow. Popular choices include Adobe Lightroom, Photomatix, and Aurora HDR. These tools streamline the merging process, creating a single HDR image from your bracketed exposures.

Adjusting Tone Mapping for a Natural Look
During the merging process, explore tone mapping settings. Aim for a natural look that brings out the property’s characteristics while avoiding overly dramatic or artificial effects. A well-executed tone mapping process enhances details, making the image pop.
Balancing Exposure, Contrast, and Color
Fine-tune the overall image by adjusting exposure, contrast, and color. Ensure that the final photo maintains balanced highlights and shadows, allowing viewers to appreciate the property’s beauty without distractions.
Dealing with Common Issues (Halos, Noise, etc.)
Address common issues that may arise during HDR editing. Watch out for halos, which are bright outlines around objects, and manage noise, particularly in shadowed areas. Utilize advanced editing techniques to resolve these challenges while preserving a natural appearance.
Adding Final Touches
Apply finishing touches to your HDR real estate photo. Sharpen the image, correct lens distortions, and perform any necessary minor retouching to ensure a polished and professional result. This step elevates the overall quality of the photo, readying it for presentation.
By following this comprehensive editing process, you’ll transform ordinary bracketed exposures into stunning HDR real estate photos that captivate and inspire.
Additional Advice on Editing Professional HDR Real Estate Photos
Here are some additional tips to elevate your HDR real estate photo editing skills:
- Maintain a Natural Look: While HDR can create stunning effects, it’s essential to strike a balance. Avoid over-processed images that look unrealistic, as this can turn potential buyers away.
- The Importance of a Calibrated Monitor: A calibrated monitor ensures that the colors and tones you see while editing are accurate. This is crucial for producing high-quality images.
- Batch Processing for Efficiency: If you’re editing multiple real estate photos, consider using batch processing to apply similar adjustments to all images. This saves time and ensures consistency across the entire set.
- Keep the Client’s Needs in Mind: Understand your client’s preferences and the intended use of the images. Adjust your editing style to match their branding and target audience.
Conclusion
Mastering HDR real estate photo editing is a valuable skill that can set you apart in the competitive real estate market. By following this step-by-step guide and applying the additional tips provided, you’ll be well on your way to creating stunning images that captivate potential buyers and showcase properties in the best possible light. Continuously practice and refine your HDR editing skills to achieve consistent, impressive results that will leave a lasting impression on your clients.