Professional Tips for Real Estate Floor Plans
In the world of real estate, a picture is worth 1000 phrases, however, a nicely-crafted floor plan may be well worth even more. Floor plans are vital tools inside the actual estate enterprise, helping shoppers visualize the layout and go with the flow of a property. A professionally designed floor plan can make a good-sized distinction in attracting capability shoppers and final offers. In this article, we are able to discover the way to create professional real estate floor plans, recollect essential layout elements, and delve into the strategies utilized by architects and designers. Additionally, we will discover the fascinating world of 3D floor plans and the way they are revolutionizing the real estate advertising and marketing panorama.
Table of Contents
How do you make floor plans look professional?
Creating professional-looking floor plans calls for interest to detail, the right tools, and a eager eye for design. Let’s dive into the key elements that can help you make your real estate floor plans stand out:
1. Use professional software software and tools
One of the primary steps in creating professional real estate floor plans is selecting the right software program and gear for the process. There are various software alternatives available, ranging from basic to superior, every providing unique capabilities and abilities.
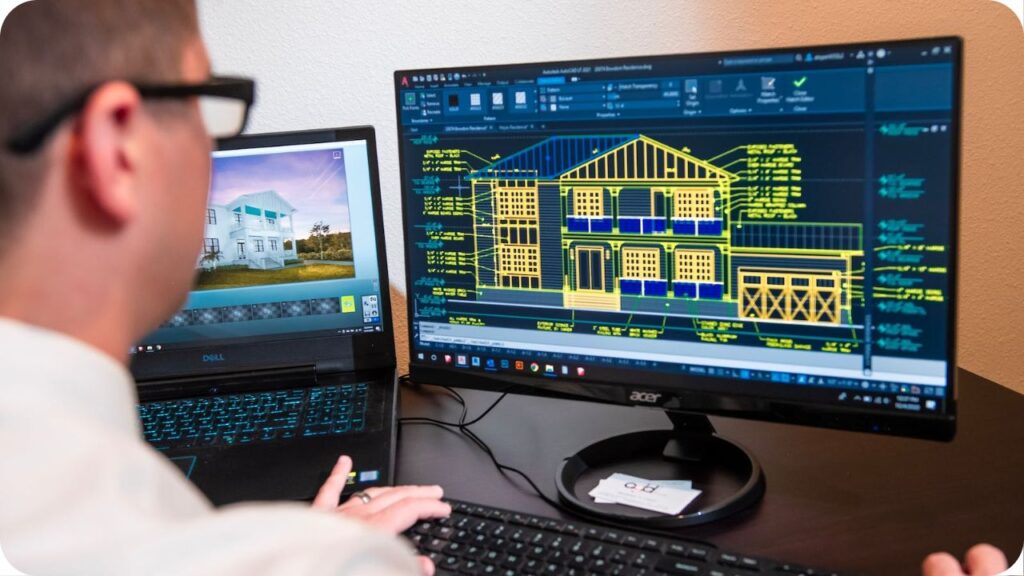
- AutoCAD: AutoCAD is a widely used software within the architectural and design industry. It affords particular measurements, customizable templates, and 2D drafting tools.
- SketchUp: SketchUp is known for its person-pleasant interface and 3D modeling competencies. It’s an extraordinary choice for creating both 2D and 3D floor plans.
- Floor making plans apps: Several consumer-pleasant apps are in particular designed for growing floor plans. These apps often include pre-made templates, drag-and-drop functions, and actual-time measurements.
Choose software program or tools that align along with your degree of expertise and the complexity of the challenge. High-pleasant software program guarantees accuracy and professionalism in your floor plans.
2. Ensure accurate measurements and scale
Accurate measurements are the backbone of any professional floor plan. Before starting the design process, it’s crucial to measure the property accurately. Use laser measuring devices or traditional measuring tape, depending on the level of precision required.
Scaling is equally important. Decide on a suitable scale for your floor plan, such as 1/4 inch to 1 foot. Stick to this scale consistently throughout your design to maintain accuracy and clarity.
3. Maintain consistency in style and formatting
Consistency is key when it comes to professional floor plans. Keep the following elements consistent throughout your designs:
- Text and labeling: Use the same font, size, and color for labels and text throughout the floor plan. This results in a polished and unified appearance.
- Symbols and icons: If you use symbols or icons to represent objects, fixtures, or furniture, ensure they are consistent in style and size.
- Line styles: Maintain uniformity in line thickness and style for walls, doors, windows, and other architectural features.
- Colors: If you use color-coding to differentiate areas or highlight specific elements, stick to a consistent color scheme.
Consistency not only makes your floor plan look more professional but also enhances its readability and user-friendliness.
4. Optimize for clarity and readability
A professional floor plan should be easy to understand at a glance. Here are some tips to optimize clarity and readability:
- Simplify the design: Avoid clutter by keeping the floor plan clean and uncluttered. Remove unnecessary details that can confuse viewers.
- Use clear labels: Ensure that labels for rooms and spaces are legible and placed logically.
- Provide a key or legend: If you use symbols or color-coding, include a key or legend to explain their meaning.
- Add dimensions: Include dimensions for rooms and important features to give viewers a sense of scale.
- Consider viewer perspective: Think about how the floor plan will be viewed. Ensure that it looks good both digitally and in print.
5. Utilize color coding and labeling effectively
Color coding and labeling can add depth and context to your floor plans. Here’s how to use them effectively:
- Color-coded areas: Use different colors to distinguish between various areas or zones within the property. For example, you can use one color for living spaces, another for bedrooms, and a different one for outdoor areas.
- Labels and annotations: Label rooms, doors, windows, and other architectural elements clearly. Annotations can provide additional information, such as room dimensions or special features.
- Highlight focal points: Use color or shading to highlight key areas of interest, such as a spacious kitchen or a luxurious master suite.
Now that we’ve covered how to make floor plans look professional, let’s explore three essential factors to consider when designing a floor plan.
What are 3 things to consider when designing a floor plan?
Designing a floor plan is not just about arranging rooms and spaces; it’s about creating a functional and aesthetically pleasing layout that meets the needs of the occupants. Here are three critical factors to consider when designing a floor plan:
1. Purpose and functionality
The first and foremost consideration when designing a floor plan is the purpose of the space. Ask yourself questions like:
- What is the primary function of this room or area?
- How will people use this space on a daily basis?
- Does the layout align with the lifestyle and preferences of the potential occupants?
For example, in a residential property, the kitchen is often the heart of the home, so it should be designed for easy access and functionality. In an office space, the floor plan should facilitate productivity and collaboration among employees. Understanding the purpose of each space is essential for creating a floor plan that meets the occupants’ needs.
2. Flow and spatial organization
The flow of a floor plan refers to how spaces are connected and how people move through them. A well-designed floor plan should have a logical and efficient flow that minimizes wasted space and promotes convenience.
Consider the following aspects of flow and spatial organization:
- Traffic patterns: Examine the anticipated flow of people within the area. Ensure that there are clear pathways and minimal obstructions.
- Zoning: Group related spaces together. For instance, bedrooms should be clustered in one area, and the kitchen, dining, and living areas should be conveniently located for daily activities.
- Open vs. closed spaces: Determine if open layouts or enclosed rooms are more suitable for the property. Open layouts can create a sense of spaciousness, while closed rooms offer privacy.
- Transitions: Pay attention to transitions between different floor levels, such as stairs or ramps. Guarantee they are secure and readily reachable.
3. Incorporating the client’s needs and preferences
When designing a floor plan, it’s essential to consider the specific needs and preferences of the client or potential occupants. Engage in clear communication with your clients to understand their requirements and desires. This includes:
- Room sizes: Determine the ideal sizes for rooms based on the client’s lifestyle and expectations. Some may prefer larger bedrooms, while others prioritize spacious living areas.
- Special features: If the client has specific features in mind, such as a walk-in closet, a home office, or a media room, incorporate these into the design.
- Aesthetic preferences: Take into account the client’s aesthetic preferences, such as architectural styles, color schemes, and materials. Ensure that the floor plan aligns with their vision.
- Future considerations: Think about potential future needs of the occupants. Is there room for expansion or renovation if necessary?
By considering these three factors—purpose and functionality, flow and spatial organization, and the client’s needs and preferences—you can create a floor plan that not only looks professional but also serves its intended purpose effectively.
How do you make a realistic floor plan?
Creating a realistic floor plan is essential for providing an accurate representation of a property. Whether you’re a real estate agent, an architect, or a designer, here are the steps to make a floor plan as realistic as possible:
1. Include accurate room dimensions
Precision is key when it comes to room dimensions. Measure each room meticulously and record the measurements accurately. Include dimensions for:
- Length and width of rooms
- Ceiling height
- Doorways and windows
- Closets and storage spaces
- Any alcoves or irregularities in the room shape
Including precise dimensions ensures that potential buyers or renters have a clear understanding of the available space and can plan their furniture placement accordingly.
2. Pay attention to architectural details
Architectural details add authenticity to a floor plan. When creating a realistic floor plan, consider the following architectural elements:
- Walls: Accurately represent the thickness of walls. This can impact the available floor space within a room.
- Doors and windows: Show the swing of doors and the size and placement of windows accurately. Include any trim or moldings around doors and windows.
- Flooring and finishes: Indicate the type of flooring in each room, whether it’s hardwood, tile, carpet, or another material. Note any patterns or textures.
- Ceilings: Depict ceiling designs accurately, including any coffered ceilings, beams, or decorative elements.
By paying attention to these architectural details, you can create a floor plan that reflects the property’s unique character and design.
3. Represent fixtures, furniture, and other features realistically
To make a floor plan truly realistic, consider including fixtures, furniture, and other features that are present in the property. While it’s not necessary to include every detail, adding key elements can help potential buyers or renters visualize the space more accurately. Here’s how to do it:
- Furniture placement: Indicate the placement of essential furniture items like sofas, dining tables, beds, and kitchen appliances. This gives viewers a sense of scale and functionality.
- Bathroom fixtures: Show the location of sinks, toilets, bathtubs, and showers in bathrooms. Include fixtures like towel racks and mirrors.
- Kitchen appliances: Depict the position of stoves, ovens, refrigerators, and kitchen sinks. Include kitchen cabinets and countertops.
- Lighting fixtures: If unique or decorative lighting fixtures are present, include them in the floor plan.
Remember that while these additions enhance realism, they should not clutter the floor plan or make it difficult to read. Use symbols or simplified representations to maintain clarity.
4. Choose the right perspective (2D vs. 3D) for the purpose
The choice between a 2D or 3D floor plan depends on the purpose of the plan and the preferences of the audience. Here’s when to use each perspective:
- 2D floor plans: 2D plans are the traditional choice for most property listings and architectural drawings. They provide a clear and straightforward representation of room layout and dimensions. Use 2D plans for standard property listings and real estate marketing materials.
- 3D floor plans: 3D plans offer a more immersive and visually appealing experience. They are ideal for showcasing high-end properties, luxury developments, or properties with unique architectural features. 3D plans provide viewers with a realistic sense of the space’s depth and layout.
By following these steps and considering the purpose of the floor plan, you can create a realistic representation of a property that accurately conveys its features and potential.
How do architects draw real estate floor plans?
Architects play a crucial role in designing floor plans for buildings and properties. Their expertise ensures that floor plans are not only aesthetically pleasing but also structurally sound and compliant with building codes. Here’s an overview of how architects draw floor plans:
1. Site analysis and client consultation
The process begins with a thorough site analysis and a consultation with the client. Architects visit the property to assess its surroundings, topography, and any existing structures. They also discuss the client’s requirements, preferences, and budget constraints.
2. Preliminary sketches and concept development
Based on the site analysis and client input, architects create preliminary sketches and concepts for the floor plan. These sketches explore various design ideas and spatial arrangements. In this phase, architects take into account elements like:
- Zoning regulations and building codes
- Sustainability and energy efficiency
- Accessibility and circulation
- Aesthetic and functional goals
3. Schematic design
Once a concept is chosen, architects develop a more detailed schematic design. This includes creating a basic floor plan that outlines the layout of rooms, circulation paths, and key architectural features. Schematic design also includes initial design decisions regarding materials, building systems, and structural considerations.
4. Design development
In the design development phase, architects refine the floor plan and develop it further. They work on resolving structural and mechanical systems, finalizing materials and finishes, and addressing any challenges that may arise. The floor plan becomes more detailed, and additional drawings, such as elevations and sections, are created to provide a comprehensive view of the design.
5. Construction documents
Once the design is fully developed and approved, architects create detailed construction documents. These documents include highly detailed floor plans, elevations, sections, and specifications that contractors and builders will use to construct the building. The floor plans in this phase are precise and include exact measurements, specifications for materials, and technical details for construction.
6. Building permits and approvals
Architects assist clients in obtaining necessary permits and approvals from local authorities. This may involve submitting the floor plans and other documents for review and compliance with building codes and zoning regulations.
7. Construction administration
Throughout the construction phase, architects maintain their pivotal role. They work closely with contractors to ensure that the floor plan and design specifications are implemented correctly. This includes conducting site visits, addressing any issues that arise during construction, and making necessary adjustments.
Architects’ expertise in design, space planning, and building systems ensures that floor plans are not only visually appealing but also functional, safe, and compliant with all regulations. Their comprehensive approach to floor plan design contributes to the successful execution of construction projects.
How to create a 3D floor plan?
In recent years, 3D floor plans have gained popularity in the real estate industry due to their ability to provide a more immersive and realistic view of properties. Creating a 3D floor plan involves specialized software and techniques. Here’s a step-by-step guide on how to create a 3D floor plan:
1. Choose 3D modeling software
To create a 3D floor plan, you’ll need 3D modeling software. Some popular options include:
- SketchUp: Known for its user-friendly interface, SketchUp allows you to create 3D models and floor plans easily.
- AutoCAD 3D: AutoCAD offers 3D modeling capabilities in addition to its 2D drafting features.
- Revit: Revit is a powerful BIM (Building Information Modeling) software that specializes in creating 3D models and floor plans for architecture and construction projects.
Choose the software that aligns most effectively with your requirements and proficiency level.
2. Import or create a 2D floor plan
Start with a 2D floor plan of the property you want to convert into a 3D floor plan. You can either import an existing 2D floor plan or create one from scratch using your chosen software. Ensure that the 2D plan is accurate and includes all necessary measurements and details.
3. Extrude the floor plan into 3D
Using the 3D modeling tools in your software, extrude the 2D floor plan to create a 3D representation of the building. This process involves pulling the walls and architectural features upward to give them depth. Pay attention to accurate scaling and proportions to maintain realism.
4. Add textures and materials
To make the 3D floor plan realistic, apply textures and materials to surfaces. This includes adding textures for walls, floors, ceilings, and any other surfaces in the space. Many 3D modeling software options offer libraries of pre-made materials, or you can create custom textures to match the property’s finishes.
5. Insert furniture and fixtures
Enhance the 3D floor plan by adding furniture, fixtures, and other interior elements. This step allows viewers to visualize how the space can be furnished and decorated. Most 3D modeling software includes libraries of 3D models for furniture and fixtures, making it easy to populate the space.
6. Set up lighting and rendering
Lighting plays a crucial role in creating a realistic 3D floor plan. Adjust the lighting settings in your software to simulate natural or artificial lighting conditions. Explore various lighting angles and intensities to attain the ambiance you desire.
Rendering is the process of generating a high-quality image or animation from your 3D model. Configure the rendering settings for the best results, considering factors like resolution and image quality.
7. Fine-tune and review
Take the time to fine-tune your 3D floor plan by adjusting details, refining textures, and optimizing lighting. Review the model from various angles to ensure accuracy and realism. Consider any required modifications based on feedback and your personal observations.
8. Save and export
Once you’re satisfied with your 3D floor plan, save the project in your 3D modeling software and export it in a suitable format. Common formats for sharing 3D floor plans include JPEG, PNG, or PDF.
9. Present and share
Share your 3D floor plan with clients, potential buyers, or renters. You can present it on your website, in marketing materials, or during property viewings. 3D floor plans offer a unique and engaging way to showcase properties and help viewers visualize the space in greater detail.
By following these steps and leveraging 3D modeling software, you can create stunning and immersive 3D floor plans that set your real estate listings apart and provide a more realistic experience for potential buyers or tenants.
Conclusion
Professional real estate floor plans are essential tools for marketing properties and helping buyers or renters visualize the space. To create floor plans that look professional, use the right software, ensure accuracy, maintain consistency, optimize for clarity, and employ effective color coding and labeling.
When designing a floor plan, consider the purpose and functionality of the space, the flow and spatial organization, and the needs and preferences of the client or potential occupants. These factors contribute to a well-designed and functional floor plan.
Creating a realistic floor plan involves accurate measurements, attention to architectural details, and the representation of fixtures and furniture. The choice between 2D and 3D floor plans depends on the project’s purpose and the desired level of immersion.
Architects play a vital role in the design of floor plans for buildings, ensuring they are not only aesthetically pleasing but also structurally sound and compliant with regulations. They follow a comprehensive process from site analysis to construction administration.
The rise of 3D floor plans has added a new dimension to real estate marketing, offering viewers a more immersive experience. Creating 3D floor plans involves using specialized software, extruding 2D plans into 3D, adding textures and furniture, setting up lighting and rendering, and fine-tuning the model.
In today’s competitive real estate market, the ability to create professional and realistic floor plans, whether in 2D or 3D, can make a significant difference in attracting buyers and closing deals. By applying the tips and techniques discussed in this article, you can elevate your floor plan designs and provide a valuable service to your clients in the real estate industry.