
The Science of Color Correction in Real Estate Photography
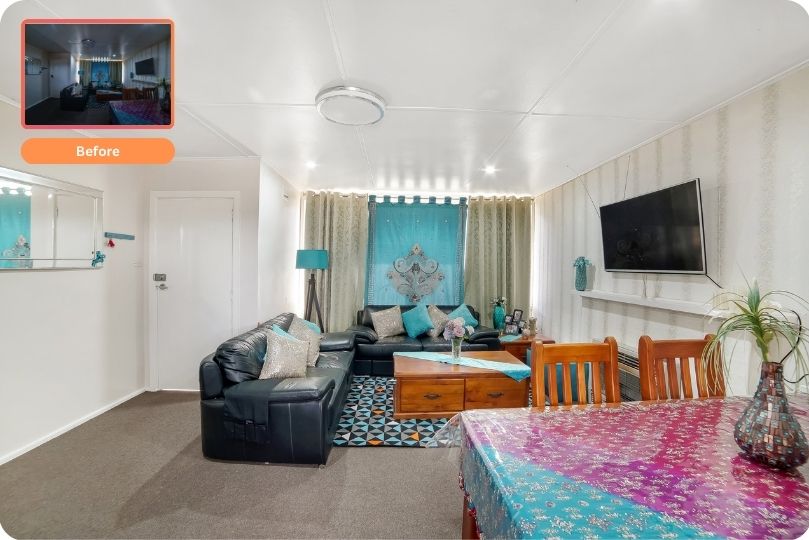
Real estate photography performs a pivotal role in attracting capacity consumers and making houses appearance their fine. A vast element of this discipline is shade correction, a system that can flip lackluster images into alluring, vibrant showcases. In this article, we delve into the technology behind color correction in real estate photography, exploring the standards, techniques, and tools that photographers use to decorate their images.
Table of Contents
I. Introduction
In the competitive international of real estate, first impressions are remembered. Potential buyers often browse online listings before finding out to go to a property in individual. High-satisfactory images are vital for making a assets stand out. This is in which color correction comes into play. But what’s color correction, and why is it so crucial?
A. The Importance of Color Correction
Color correction is the method of changing the colors in a photograph to ensure they seem accurate, appealing to the eye, and constant. In real estate images, this approach can make a world of difference. When ability shoppers browse assets listings, they need to peer images that as it should be constitute the space and evoke a sense of heat and livability. Correcting colors is crucial in accomplishing this intention.
II. The Fundamentals of Color Correction
Before delving into the nitty-gritty details of color correction, it’s essential to understand the fundamentals.
A. Definition of Color Correction
Color correction, in photography, refers to the process of adjusting and fine-tuning the colors in an image to achieve a desired look. This can include correcting color casts, enhancing natural colors, and achieving color consistency across a series of photos.
B. The Science Behind Color Perception
Color is a fascinating aspect of human perception. It’s not just about the hues we see but also the emotions and associations these colors trigger. Understanding color theory and the psychology of color can help photographers make informed decisions during the color correction process.
C. Common Color Issues in Real Estate Photography
Real estate photographers often encounter specific color issues, such as color casts from various light sources, inconsistent color temperatures, and challenges posed by mixed lighting. Addressing these issues requires a blend of science and art.
III. Tools and Software for Color Correction
To execute effective color correction, you need the right tools. Fortunately, there are numerous software options available.
A. Overview of Essential Tools and Software
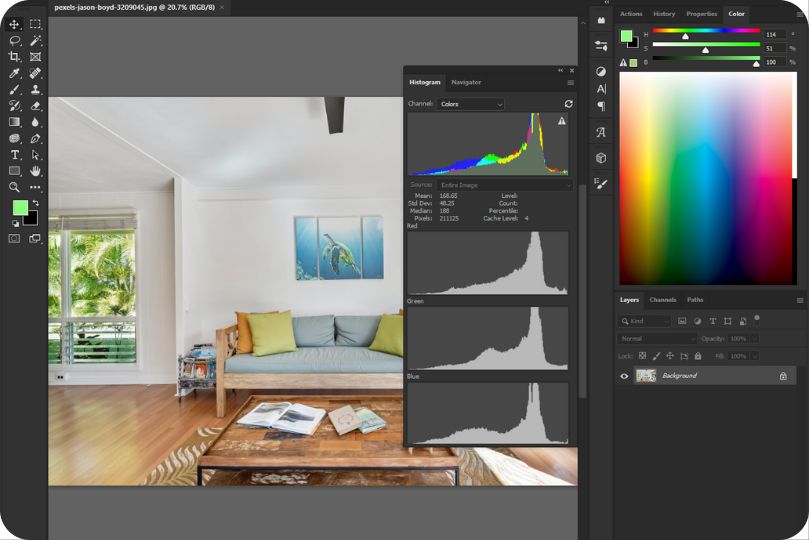
Professional photographers have access to a range of software for color correction, including Adobe Lightroom, Adobe Photoshop, Capture One, and various other specialized tools. Each software has its strengths and is suited to different needs and workflows.
B. Brief Introduction to Popular Software
Adobe Lightroom and Photoshop are two of the most popular choices for photographers. Lightroom is renowned for its non-destructive editing capabilities and user-friendly interface, making it a top choice for real estate photographers. Photoshop, on the other hand, offers advanced editing options for more intricate color correction tasks.
C. Discussion of Alternative Options
While Adobe’s products are widely used, there are alternatives to consider. Capture One, DxO PhotoLab, and other specialized software cater to specific niches within photography. Delving into these choices can aid you in discovering the most suitable solution for your specific requirements.
IV. Color Correction Process
Now, let’s dive into the step-by-step process of color correction.
A. Step-by-Step Guide to the Color Correction Process
- Import and Organize: Start by importing your photos into your chosen software and organizing them into collections or folders for easy access.
- Adjust White Balance: The first step in color correction is to correct the white balance. Adjust the temperature and tint to neutralize any color casts.
- Correct Exposure: Ensure that the exposure is balanced, neither too dark nor too bright. This step sets the foundation for accurate color correction.
- Correcting Color Casts: Identify and address color casts caused by various light sources. This often involves removing unwanted color tints.
- Enhancing Natural Colors: Make colors appear more vibrant and true to life while avoiding over-saturation.
- Tone and Contrast Adjustments: Fine-tune the image’s tonal range and contrast for a more appealing look.
- Color Consistency: Ensure that all images in a series have a consistent color palette to maintain a cohesive look.
B. Tips and Best Practices for Effective Color Correction
Color correction can be a nuanced process, and mastering it takes practice. Consider these guidelines and optimal practices for your reference:
- Work with RAW Files: Shooting in RAW format provides more data to work with during color correction, offering greater flexibility and control.
- Use a Reference Image: If color consistency is crucial, use a reference image to match the colors in all photos within a series.
- Monitor Calibration: Regularly calibrate your monitor to ensure that the colors you see on your screen are accurate.
- Non-Destructive Editing: Opt for non-destructive editing to preserve the original image data and easily make adjustments as needed.
- Export in the Right Color Profile: When exporting images, use the appropriate color profile to ensure they look their best on various devices.
V. Understanding White Balance
White balance plays a pivotal role in color correction. Let’s explore it in more detail.
A. Explanation of White Balance and Its Significance
White balance pertains to the color temperature within an image. It’s a critical element in photography because it ensures that white objects appear truly white. The color temperature is measured in Kelvins, with lower values appearing warmer (more yellow) and higher values appearing cooler (more blue).
B. How to Set Proper White Balance in Different Shooting Conditions
Setting the correct white balance is crucial to achieving accurate and pleasing colors. Here are some tips for setting white balance in various shooting conditions:
- Auto White Balance (AWB): This mode lets the camera determine the white balance automatically. It’s suitable for quick shots, but it may not always produce the desired results.
- Preset White Balance: Use predefined settings like daylight, cloudy, tungsten, and flash for accurate results in specific lighting conditions.
- Custom White Balance: In challenging lighting situations, create a custom white balance by photographing a neutral gray or white card and using it as a reference for setting white balance.
- Adjusting White Balance in Post-Processing: During post-processing, you can fine-tune white balance using software tools like Lightroom or Photoshop.
C. The Impact of Temperature and Tint Adjustments
Temperature and tint adjustments are essential in setting white balance accurately. Temperature controls the warmness or coolness of the image, while tint controls the magenta or green tint. Fine-tuning these settings can remove color casts and create a more neutral look.
VI. Correcting Color Casts
Color casts can significantly affect the overall look of real estate photographs. Let’s dive into techniques for addressing them.
A. Identifying and Addressing Color Casts
Color casts occur when the lighting conditions in a photo introduce unwanted color tints. Common types of color casts include:
- Warm Color Cast: Often caused by incandescent or tungsten lighting, resulting in a reddish or yellowish tint.
- Cool Color Cast: Usually due to fluorescent lighting, creating a bluish or greenish tint.
- Magenta or Green Cast: These color casts can result from mixed lighting sources or specific camera settings.
B. Techniques for Removing Unwanted Color Tints
There are several techniques to remove color casts and restore natural colors:

- Using a White Balance Tool: Most photo editing software offers a white balance tool. Select a neutral area in the image, and the software will adjust the white balance accordingly.
- Manual Adjustment: For precise control, manually adjust the temperature and tint sliders until the image appears neutral.
- Selective Color Correction: In cases where certain areas have more pronounced color casts, use selective color correction to target those areas.
- Advanced Color Correction: For complex color casts, consider using advanced tools like the curves adjustment to fine-tune the colors.
Addressing color casts is a critical step in the color correction process. It ensures that the colors in your real estate photos accurately represent the property’s true appearance.
VII. Enhancing Natural Colors
In real estate photography, enhancing natural colors can make a property more appealing and inviting.
A. Techniques for Making Colors More Vibrant and Natural
Enhancing natural colors involves techniques to make them more vibrant while maintaining a sense of realism:
- Saturation Adjustments: Increase or decrease the saturation of specific colors to make them more or less vibrant.
- Hue Adjustments: Fine-tune the hues of specific colors to achieve a particular look.
- Clarity and Vibrance: Use tools like clarity and vibrance to add depth and intensity to colors.
- Selective Color Correction: Target specific areas or objects in the image to enhance their colors.
- Dodge and Burn: Use dodge and burn tools to selectively brighten and darken areas to enhance color contrast.
B. Avoiding Over-Saturation and Maintaining Realism
While it’s tempting to push the saturation to the maximum, it’s essential to strike a balance. Over-saturated colors can appear unrealistic and turn potential buyers off. The key is to enhance natural colors while ensuring they still represent the property’s true appearance.
The art of color correction lies in achieving a harmonious balance between enhanced colors and a realistic representation of the property.
VIII. Achieving Consistency
Consistency is crucial when presenting a series of real estate photos.
A. Importance of Maintaining Color Consistency
In real estate photography, consistency ensures that all images within a series have a uniform color palette. This consistency is essential for creating a cohesive and professional presentation.
B. Strategies for Creating a Uniform Color Palette in Real Estate Portfolios
Achieving color consistency involves the following strategies:
- Custom White Balance: Use consistent white balance settings for all photos within a series.
- Reference Images: Use a reference image to match colors across the series.
- Presets and Profiles: Create and apply presets or profiles that ensure a uniform look.
- Batch Editing: Use batch editing to apply the same adjustments to all photos in a series.
- Quality Control: Review all photos in the series to ensure they share a consistent color palette.
Maintaining color consistency is essential, as it helps create a polished and professional image for the property.
IX. Special Considerations for Real Estate Photography
Real estate photographers often face unique challenges related to lighting conditions and property characteristics.
A. Addressing Unique Challenges
- Mixed Lighting: Real estate properties often have a mix of lighting sources, including natural light, artificial light, and external light. Addressing these mixed lighting situations requires a deep understanding of color correction.
- Interior vs. Exterior: The color correction process may differ between interior and exterior shots due to variations in lighting and color temperature.
- Property Characteristics: Some properties may have specific color challenges, such as unique architectural features or materials. Adapting the color correction process to these characteristics is crucial.
X. Final Touches and Quality Control
Once you’ve gone through the color correction process, it’s time for final touches and quality control.
A. Reviewing the Color-Corrected Images
Take the time to review each color-corrected image carefully. Pay attention to details like color accuracy, contrast, and overall appearance. Make any necessary fine-tuning adjustments.
B. Quality Control and Fine-Tuning
Quality control involves checking for any remaining color issues, such as color casts, inconsistencies, or oversaturation. Fine-tune the images to ensure they meet the highest standards of quality.
C. Preparing Images for Final Presentation
Before presenting the images, prepare them for their intended use. This might involve exporting in different formats, resolutions, or color profiles to suit various platforms, such as websites, print materials, or social media.
XI. Conclusion
Color correction is an essential aspect of real estate photography, and understanding its science and techniques can transform your images. By grasping the fundamentals, mastering the use of tools, and following best practices, you can create captivating, true-to-life photographs that make properties shine.
A. Recap of the Importance of Color Correction
Color correction ensures that your real estate photos accurately represent the properties, create a sense of warmth and livability, and grab the attention of potential buyers.
B. Encouragement for Photographers
If you’re a real estate photographer, embrace the art and science of color correction. It’s a skill that can set your work apart and lead to better results in a competitive market.
C. Final Thoughts and Call to Action
Don’t hesitate to experiment, practice, and refine your color correction skills. The more you understand the science behind it and the more experience you gain, the more confident and proficient you’ll become. It’s time to apply the knowledge you’ve gained and elevate your real estate photography game.