I still remember how I messed up a sunset for the first time. Sedona was where I was, and the sky looked like it was on fire. I was sure I got it. Put the meter in the middle and fire one shot. When I got back to the hotel, I opened the file and had to decide whether to keep the sky but turn the red rocks black, or to keep the rocks but make the sky white.
A guy next to me at the lookout point saw my face and asked, “You don’t bracket?”
I did not. How I shoot everything has changed since that night.
It might sound complicated, but bracketing your photos is the easiest form of insurance you can get. You take the same shot over and over, only this time the brightness is different. You can then choose the best one or mix them together to make something your eye saw.
Let’s take our time and go through it all as if we’re setting up together.
Table of Contents
What Is Bracketing Photography?
Leave the books behind. When you bracket, you don’t trust any of your guesses.
It’s built into your camera. It checks out the scene and tries to make everything about it grey. For someone in open shade, that works great. A bright window in a dark room, a sunset, or snow are all things that it doesn’t work at all.
So you take a range instead of a single picture.
Most people use exposure bracketing, which is also known as picture bracketing, image bracketing, photo bracketing, or just bracketing. You shoot:
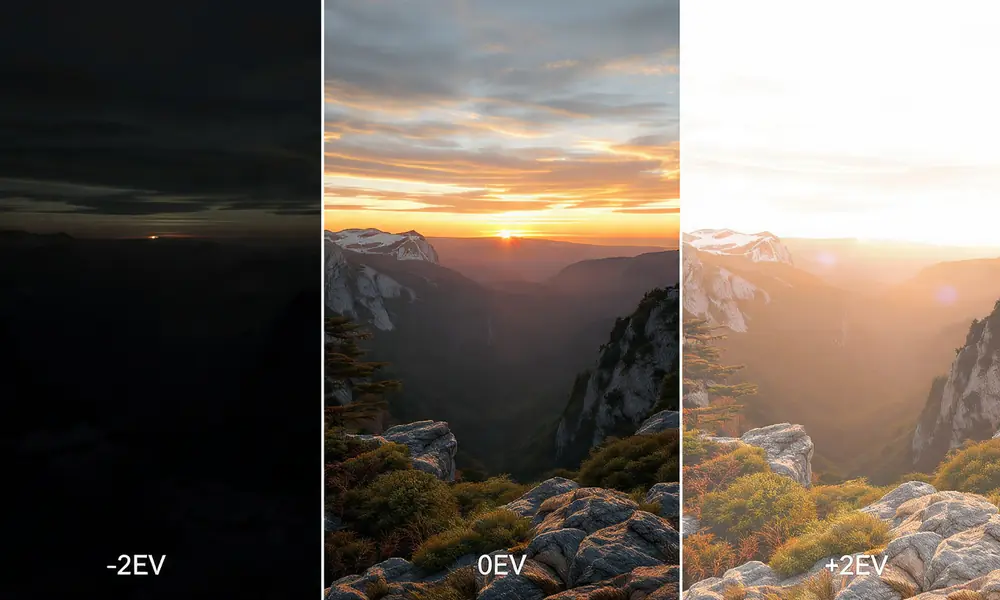
- “One at the reading” (0)
- To the dark side (-2 EV)
- One brighter (+2 EV)
Three different images for the same frame and moment — these are your classic bracketing pictures. People who look for “bracketing photography,” “bracketed photography,” “bracket photography,” “photography bracketing,” or “exposure bracketing” all come up with the same thing: this is what people do.
You haven’t made any HDR art yet. Your only job is to gather information. It’s like making notes with three different pencils so you don’t miss anything.
Why One Photo Isn’t Enough: Dynamic Range
Your eyes are always changing. When you look at a lamp, your pupil gets smaller. When you look at the shadow under the table, it starts to move. It’s put together in real time by your brain.
A sensor in a camera takes one reading and stores it. One RAW file from even the best full frame camera today can hold about 13 to 14 stops of light from black to white. Your eye can handle about 20 stops, and it does this in real time.
Bracketing lives in that space.
The highlights are kept by the dark frame in your bracket. The edge of the sun, the clouds, light signs, and the view out of a window. Shades are kept safe by the bright frame. It’s the feel of a black jacket, the look of wood grain in a dark room, or the way rocks look at dusk. You can see natural colour and contrast in the middle picture.
There is no more risk when you merge them or even just choose the best shot from the set.
The 6 Types of Bracketing You Should Know
For the most part, people learn exposure bracketing and then stop. You’ll use the last five more than you think once you know them.
1. Exposure Bracketing
This is the main machine. You only change the shutter speed and not the lens or ISO.
What is shutter speed? As the aperture changes, so does what is in focus. If you change the f-stop from f/5.6 to f/16, the depth of field will change, and the pictures won’t line up straight. When you change the ISO, noise gets worse. It’s clean that shutter speed only changes how much light comes in.
A standard three-shot bracket: your camera reads 1/125 at f/8 and ISO 100. You shoot at 1/500 for -2 stops, 1/125 for 0 stops, and 1/30 stops for +2 stops.
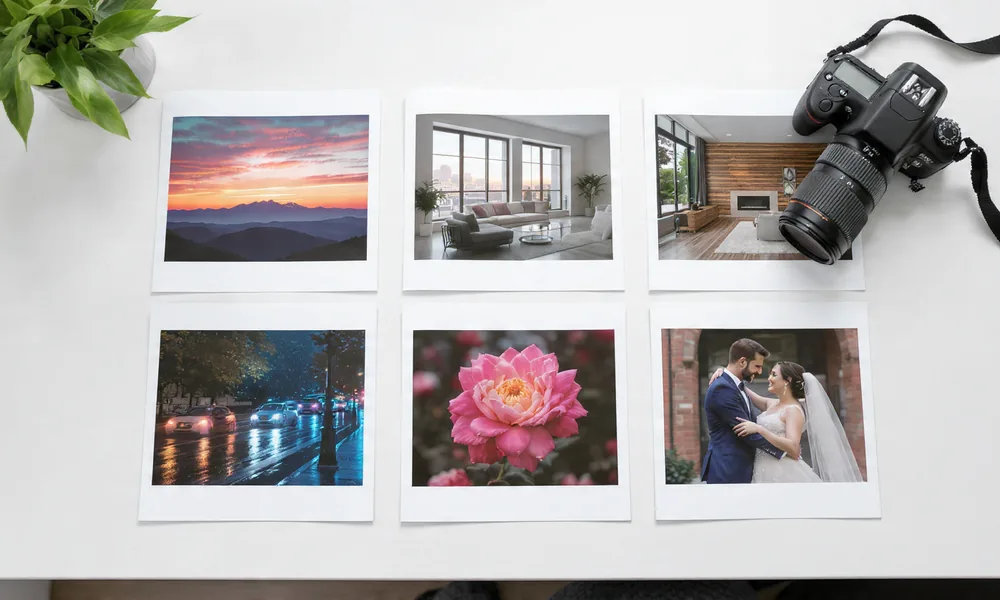
You can use this for sunrises and sunsets, real estate, scenery, and interiors. When the sky is very bright compared to the ground.
2. HDR Bracketing (Bracket HDR)
When you use exposure bracketing with a plan to join, you get HDR bracketing. Hi-D range is what HDR stands for. For software like Lightroom, Photoshop, or Aurora HDR to mix the best parts, you shoot the bracket in a certain way.
The main difference is how devoted they are. Between shots, you can’t move, and you have to shoot quickly enough that the clouds don’t move too much. Ghosts show up when something moves.
You don’t have to use the 2012 over-the-top HDR look. These days, blending is subtle. It looks like what you remember.
3. Focus Bracketing (Focus Stacking)
You can change the viewing distance here, but not the brightness.
Picture a flower that’s six inches away from your lens and mountains in the background. Because of how things work, you can’t get both sharp even at f/16. You take ten pictures. Frame one is all about the front petal. There is a millimetre of focus shift in frame two. You keep going until the mountains get rough.
You stack them in post. The software takes each picture and picks the best part to blend.
You can use this to take close-ups of jewellery, food, macro photos, and landscapes with a strong foreground. You can find this built in to most new digital cameras. The start and end points and the number of shots are up to you.
4. ISO Bracketing
The aperture and shutter speed stay the same, and ISO 100, 400, and 1600 are used. Now that RAW files are so fluid, it’s not as useful, but it’s still got its place.
ISO bracketing lets you see the noise trade-off right away if you shoot JPEG quickly, like at an event where you need to give right away. Seeing how far you can push your camera is also a great way to learn.
5. White Balance Bracketing
There are three JPEGs saved: one with cool colours, one with neutral colours, and one with warm colours. Black and white is just data in RAW, so you don’t need it. But some street shooters who only shoot JPEG still use it to get a warm and cool look without having to edit.
6. Flash Bracketing (FEB)
Changes only the flash power, not the background brightness. You can take one shot at -1 flash, one at 0, and one at +1. The subject gets lighter or darker while the background stays the same.
This is perfect for parties and weddings. As you bounce the flash, the pair gets closer and then farther away. If you fire a three-shot flash bracket in a row, your face will look great.
Manual Bracketing vs. Auto Bracketing
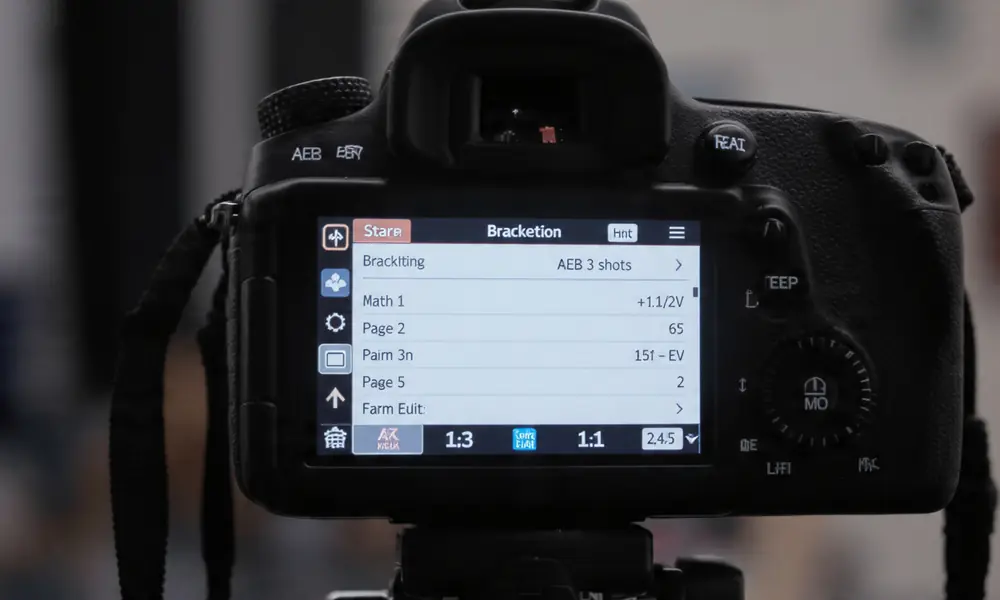
In the menu of every camera made after about 2010, you can find Auto Exposure Bracketing, also written as AEB or BKT — this is auto bracketing.
It’s turned on, set to Aperture Priority, 3F 2.0 (three frames, two stops apart), and the shutter button is held down. It fires instantly in dark, normal, and bright.
Pros: it works every time, is quick, and doesn’t cause the camera to shake between shots.
Cons: You can only take three shots with most brands, and some won’t let you do it in full Manual mode. Sony can be picky, but Canon and Nikon do better here.
To use manual bracketing, you have to stay in Manual setting and turn the shutter dial by hand. Shoot at 1/250, then spin to 1/60, shoot, and spin to 1/1000, shoot.
Pros: range is endless. Nine frame brackets for rooms with lots of windows let in a lot of light. AEB can’t handle scans that are too long.
Cons: It’s slower, and you might bump into the frame.
For 90% of daily work, use auto. When it’s dark, inside, or you need more than three shots, switch to manual mode.
How to Shoot a Bracket: The Whole Process
Canon, Nikon, Sony, Fujifilm, and Panasonic can all use this. However, the idea does not move.
Step 1: Make it stable
Mount the camera on a stand. If you use a tripod, turn off lens stabilization because it hunts and blurs the picture. Set a timer for two seconds or use a control. If you have to shoot with your hands, brace yourself against something and use high-speed burst. Handheld brackets can be aligned with modern software, but a tripod is always cleaner.
Step 2: Decide which aperture to use
Pick your aperture to get the right depth of field. f/8 to f/11 for scenery. For homes, use f/7.1. Base ISO should be set to 100 or 64. Allow the camera to change the picture speed. The best way to bracket is this way.
Step 3: Pay attention and lock
Once the image is in focus, you can switch the lens to manual focus. This keeps the attention from moving between frames. When you’re focus bracketing, leave AF on and let the camera pick the right point.
Step 4: Measure the middle tones
Do not measure the sky. Point at a medium-brightness object, like grass, concrete, or a grey rock. To make that your zero, half-press it.
Step 5: Turn on the brackets
- Canon: go to Q > Exposure comp/AEB > spin dial to set +/-2
- Nikon: press and hold the BKT button, then turn the back dial to see how many shots you have and the front dial to see how many more you want
- Sony: Press BRK and pick 3.0EV3 or 5.0EV2 from the menu
- Fujifilm: Turn the switch to BKT and set AE BKT in the menu
Start with three shots, each one two stops apart. That’s enough for most scenes.
Step 6: Shoot and look at the histograms
Start the set. Check now. Check out the histogram of the darkest picture. The right side shouldn’t be slammed against the edge. And that means you saved the best. You should not see a slam on the left side of the histogram for the brightest picture. That means you kept the shadows. If either is cut off, make the frame bigger so it fits five shots.
That’s it. As soon as you practise, thirty seconds.
What to Do and When Not to Do
Place the bracket when the scene is brighter than your camera can handle.
Without a doubt, bracket:
- Sunrise and sunset with details in the backdrop
- Cityscapes at blue hour with lights on
- Rooms inside with windows in the picture
- Twilight shots of real estate
- Sand, snow, and white houses in the sun
- Scenes at night with lights
- There is one time in your life when you can’t reshoot something
Perhaps a bracket:
- Portraits lit from behind at golden hour
- Sunlight in the forest
- Cars at dusk
Don’t use brackets:
- Running fast, running with animals, and running with kids. Moving from one frame to the next stops the merge
- Flat, cloudy light. It’s enough to have one good RAW
- In street photos, speed is more important than accuracy
Putting Together Bracketed Photos Without Making Them Look Fake HDR
You only need to be a Photoshop pro to make one of these three choices.
Lightroom
Right-click on three to five pictures, choose “Photo Merge,” and then “HDR.” Make sure that Auto Align and Auto Settings are checked. If there was wind or water, turn Deghost down to “Low.” Press “Merge.” The DNG file you gets can be edited like a normal RAW file, but it has a lot more room for change. It stays clean if you pull the highlights down and the blacks up.
Photoshop
File > Automate > Merge to HDR Pro. Pick 32 bit for the most info. To do this takes longer but gives you more freedom. Good for spaces that are tricky.
Aurora HDR or Luminar Neo
Move the bracket into place, pick the Realistic or Natural setting, and set the strength to around 40. These apps work great to get rid of ghosts and are made to be fast.
It is important to note that you do not need to join. The middle exposure from your bracket isn’t always the best. Sometimes the other two were just extra safety measures. First choose the best single shot. Then, if you need to, merge them.
17 Pro Tips for Bracketing Photography
1. Always shoot RAW.
Each highlight and shadow is saved in RAW. When you save something in JPEG, it gets thrown away. If you use brackets in JPEG, you’ll defeat the point.
2. Use 2-stop gaps.
With three shots at -2, 0, and +2, you can cover four stops of range with fewer files. Five shots at one stop cover the same distance, but there are more options for moving and storing the shots. The best number of stops is two.
3. Lock ISO
Stop Auto ISO. You only want to change the camera speed. If ISO floats, noise changes from frame to frame, and the merge doesn’t look right.
4. Manual focus lock
When there isn’t much light, autofocus can make small changes between shots. Focus once, then switch to MF. For focus bracketing, turn things around.
5. Shoot fast for water
If you want to frame a waterfall, use your camera’s fastest burst setting. As the frames per second go up, the water moves less between dark and bright shots, and there are fewer ghosts.
6. Focus stacking beats diffraction
Diffraction makes everything soft when you shoot a scene at f/22 to get everything sharp. Instead, shoot at f/8 or f/11 and get eight focus brackets. More detail and a sharper finish.
7. Check the sun
No program can fix it if you shoot into the sun and it’s still blown out at -3 EV. It’s not more bracketing that you need, but a graded ND filter.
8. Electronic shutter
Small movements are made by mechanical shutters. The electronic shutter is quiet and doesn’t shake. Great for aligning pixels at the same level.
9. Never change aperture
When you change the f-stop, the depth of field changes, and the pictures won’t stack properly. Between frames, the blur in the background will pulse.
10. Handheld rule for brackets
The fastest shutter speed is in your darkest picture. Make sure the shutter speed is at least 1/(focal length x 2). Keep it faster than 1/100 for a 50mm lens. If you need to, raise the ISO. Noise is better than fuzz.
11. Organize in camera
Each set of brackets can be saved in its own folder by Nikon and Canon. It saves hours of work when you have 800 bracketing pictures to sort later.
12. Real estate window trick
If your window is bright, take three standard shots and then add one extra frame at -4 EV just for the window. In Photoshop, you can blend that window in by hand. Customers love it.
13. Polarizer warning
When it’s fully charged, a polariser makes the sky darker all over. It looks like bands when you join brackets. If you want to bracket the sky, move the polariser back to about halfway.
14. Astro blend
Take a 15-second picture of the Milky Way at ISO 6400, f/2.8. After that, set the stand so that it doesn’t move and paint with light for two minutes at ISO 800, f/4. Mix the two bracketed photography exposures.
15. Single-shot bracketing
ISO doesn’t matter for some cameras, like the Nikon Z line and the Sony A7IV. There is almost no noise loss if you shoot one dark frame and then lift the shadows four stops afterward. For those times when you only have one shot, it’s better than nothing.
16. The 60% opacity trick
First, turn on “Merge to HDR” in Lightroom. Then, open both the center shot and the HDR in Photoshop. Set the opacity to 60% and put HDR on top. The single shot colour is kept, but the HDR texture is added.
17. Know when to stop
You do not need HDR if your single middle exposure has a histogram that does not touch either end. This is just a tool, not a habit. When the light says to, use it.
Common Mistakes That Can Break Brackets
- I messed up by bumping the stand between shots. To fix it, don’t touch the camera and use a remote.
- I made a mistake by leaving the brackets on all day. Fix: Turn off BKT as part of your routine way of ending the day.
- Putting moving people in brackets was wrong. Fix: only bracket still scenes and shoot a single exposure for motion scenes.
- Too many shots were merged when only three would have been enough. To fix it, avoid adding more frames that create ghosting. Do not complicate things.
Q&A About Bracketing Photography
Does HDR mean the same thing as bracketing?
Not at all. Shooting multiple images is what bracketing means. It is HDR that does the joining. No need to join, you can just pick the best frame.
Can I use brackets on my phone?
Yes. Your iPhone Smart HDR and Google Pixel HDR+ will shoot brackets for you every time you press the shutter button. It’s photo bracketing built in.
How many shots do I need?
Start with three. For high contrast, like in sunsets or rooms with windows, set the number to five. You should use seven or nine if you want to shoot straight into the sun or into very dark buildings with stained glass.
Will the brackets fix the bad light?
Not at all. It takes in the light that’s there. It won’t make noon look like the golden hour. It just keeps you from missing something.
Can I bracket handheld?
Yes, as long as there is enough light. Turn on Auto Align in Lightroom and use burst mode. Keep the shutter speed fast. Use a tripod for the best picture.
That being said, bracketing isn’t a trick for newbies or a cheat for pros. This shows that you value the scene in front of you. A lot of the time, the light is too big for one file.
Do it this week. Set up, take a normal picture, and then take a three-frame bracket at +/-2. Go outside at dusk. Take care of both. Check out the shadows and highlights in the dark and light frames.
You’ll start bracketing immediately whenever the sky and ground don’t match once you see that extra information. More time on the pitch gives you more shots you can’t get back.
Read More Blogs
50 Simple Photography Techniques That Will Instantly Make Your Pictures Look Better – From Beginner Basics to Pro-Level Mastery
From Black Frames to Milky Way Magic: 15 Real Tips for Stunning Milky Way Shots