In-Depth Guide to Elevate Your Product Photo Editing Skills: 10 Expert Tips
In the digital world, visual content is king. If that’s true, then product photos are his knights. In the realm of e-commerce, these pictures are like sales reps. And if they’re like sales reps, then there’s no doubt that they need to make a lasting impression on your audience, because no one buys from someone they don’t like. Achieving this objective ultimately hinges on the expertise of professional product photo editing.
You have a lot of people in the industry that go into this with the mindset of “How can I make this look better?” Nevertheless, this strategy does not result in concrete progress. Instead, you should be thinking “How can I make this look amazing?” The idea is akin to purchasing an item at its original price versus acquiring it at a 50% discount. When it looks good and gets their attention then their mind is made up and they just need more convincing.
If you’re reading this chances are you fall into one of these three categories: product photographer, small business owner, or aspiring photography enthusiast. Well whoever you are, you came to the right place. This list has 13 tips that when used correctly will give your images a professional level boost.
Product photography is a cornerstone for anyone trying to sell online and it starts with the photo itself. Even though some shots may be perfect right after being taken there’s always room for improvement. That’s where photo editing comes in. By learning a few techniques and applying some essential tips, your product photos will go from meh to powerful sales tools.
Product Photo Editing Tips
I. Preparing for Editing
A. Pick the Right Software and Tools
Your first order of business is to find the right software. Adobe Photoshop and Adobe Lightroom are commonly used and known for their capabilities, but there are several other options out there depending on your skill level and how complex what you need to do is. Try different ones until you find the one best suited for your needs.
B. Organize Your Workspace and Files
Before diving into the world of editing, creating an efficient workspace is essential. Organize your files in a logical structure, use clear and descriptive file names, and consider implementing a color-coding system to categorize your work. A well-structured workspace not only keeps you organized but also helps you save time and reduce potential confusion.

II. Basic Editing Techniques
A. Crop and Straighten Your Images
The editing process often begins with cropping and straightening. Cropping allows you to remove unwanted elements and focus on the product itself. Straightening corrects any skewing or misalignment, ensuring that your product appears level and professional.
B. Adjust Exposure and White Balance
Proper exposure and white balance are fundamental for realistic color representation in your product photos. Use exposure and white balance adjustments to ensure that your images accurately depict the color and lighting conditions in which the products exist.
C. Correct Color Issues
Color discrepancies can occur due to various factors, including lighting conditions, camera settings, or even the monitor you’re using. Correct these color issues to ensure that your product’s hues and tones look as true to life as possible.
III. Retouching and Enhancing
A. Remove Blemishes and Imperfections
No product is without its imperfections, but your product photos should be flawless. Use retouching tools to eliminate dust, scratches, or any other blemishes that may detract from your product’s appeal. The goal is to showcase your product in its best possible light.
B. Enhance Product Details
To draw attention to your product’s finer details, zoom in and use sharpening tools. This is especially important for small or intricate items where highlighting those subtleties can make a significant difference in the viewer’s perception of quality.
C. Work with Shadows and Highlights
Adjusting the shadows and highlights in your images can create depth and dimension, making even flat products appear more three-dimensional. By fine-tuning these elements, you can bring out the nuances in your product and make it more visually compelling.
IV. Background Editing
A. Remove or Replace Backgrounds
In some cases, you’ll want to isolate your product from its background. Using tools like the Magic Wand or Pen Tool in Photoshop, you can make precise selections and remove backgrounds, leaving your product free-floating on a transparent canvas.
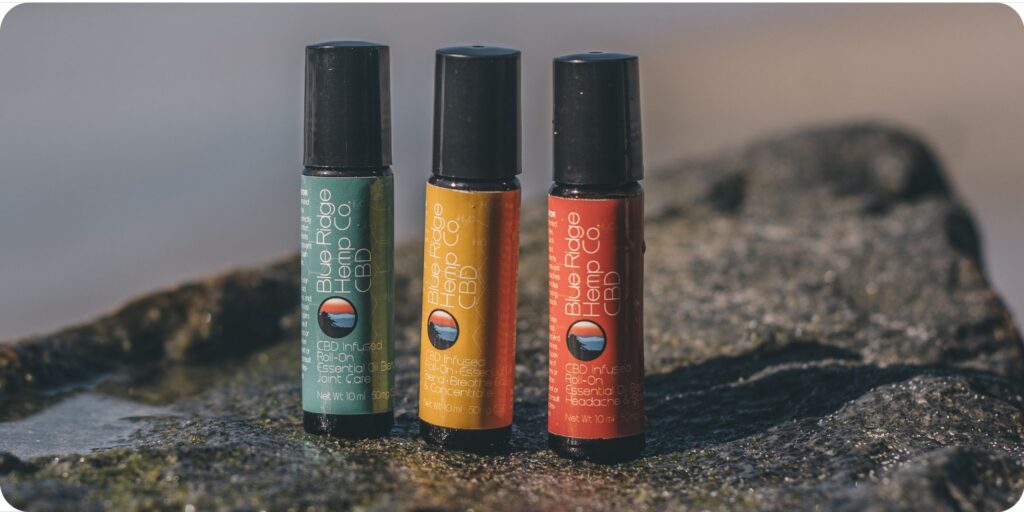
B. Create Clean, Consistent Backgrounds
Maintaining consistency in your product photos is crucial for brand identity and customer trust. You can achieve this by using background templates or by meticulously cleaning up backgrounds to remove any distractions or inconsistencies. Consistency in backgrounds contributes to a polished and professional look across your entire product catalog.
V. Image Resizing and Compression
A. Optimize Images for Different Platforms and Devices
E-commerce platforms, websites, and various devices have different requirements for displaying images. It’s essential to optimize your product photos to ensure they load quickly and look their best on a wide range of screens.
B. Balance Quality and File Size
Achieving a harmonious balance between image quality and file size can be a subtle endeavor. Large file sizes may slow down your website or platform, while poor image quality can deter potential customers. Experiment with different compression techniques to find the right balance for your specific needs.
VI. Adding Text and Watermarks
A. Include Product Descriptions or Captions
Adding text to your product images can provide valuable context and information for potential buyers. Ensure that the text is legible, complements the overall composition, and doesn’t overwhelm the image. Captions or product descriptions can help viewers understand key features, dimensions, or other relevant details.
B. Protect Your Images with Watermarks
To safeguard your product images from unauthorized use, consider adding watermarks. Watermarks can deter theft and protect your intellectual property. However, use them sparingly and thoughtfully, ensuring that they don’t distract from the product itself.
VII. Batch Editing
Efficiency is paramount, particularly if you have a large product catalog. Batch editing is a time-saving technique that allows you to apply the same set of edits to multiple photos simultaneously. This is especially useful when you have multiple product images that require consistent adjustments, such as color correction or background removal.
VIII. Maintaining a Consistent Style
A. Establish a Brand-Specific Editing Style
Consistency is the key to brand recognition. Create a unique editing style that aligns with your brand’s aesthetics and values. Your product photos should reflect a cohesive and recognizable visual identity.
B. Use Presets or Templates for Efficiency
Consistency is not only about the look but also about the workflow. By creating and utilizing presets or templates, you can save time and maintain a consistent editing style across your entire product range. This is especially useful for frequently recurring editing tasks, such as adjusting lighting or applying specific filters.
IX. Quality Control and Proofreading
Before finalizing your edits, conduct a thorough quality control check. Examine each photo meticulously for errors, artifacts, or inconsistencies. Pay attention to details like image alignment, color accuracy, and the absence of stray pixels. To ensure your product images meet the expectations of your audience or clients, consider seeking feedback from colleagues or customers.
X. Using Special Effects and Filters
While the primary goal of product photo editing is to maintain a professional and informative look, there’s room for creative exploration. Special effects and filters can be used strategically to enhance your product images and add a unique touch. However, exercise restraint to avoid overwhelming the viewer and maintain a high-quality, professional appearance.

XI. Final Touches and Exporting
With your edits nearly complete, it’s time for the finishing touches. Take a final pass through your product photos to ensure that they meet your high standards. Pay attention to every detail, from color balance to image alignment. Once you’re satisfied with the results, choose the appropriate export format and settings to meet your specific needs, whether it’s for your e-commerce website, social media platforms, or print materials.
XII. Conclusion
In the fast-paced world of e-commerce, product photos are the linchpin of successful sales. They bridge the gap between a potential customer’s curiosity and their final decision to purchase. By mastering the art of product photo editing, you can elevate your product photography to a level that goes beyond basic representation; it becomes a compelling sales pitch.
The 13 tips provided in this guide offer a comprehensive approach to product photo editing, from the initial preparation to the finishing touches. These techniques are not just about making your products look better; they are about making your brand more trustworthy and appealing to potential customers. Professional photo editing is the means by which you can tell your product’s story, showcase its quality, and leave a lasting impression on your audience.
So, dive into the world of photo editing, experiment, refine your skills, and continually strive for improvement. The results will undoubtedly be well worth the effort, and your product photos will become the catalysts for higher sales and increased brand recognition. Happy editing!