In today’s tough real estate market, floor plan drawings are a great way to get people interested in your home. A well-designed floor plan changes how buyers see a place, whether you’re a real estate agent showing off a cute suburban home, a developer showing off a new condo, or a homeowner getting ready to sell your home.
Zillow research shows that listings with floor plans get 80% more views, which can help homes stand out in markets that are already very crowded.
From homes in the country to penthouses in the city, these pictures make layouts clearer, get more people to interact with your website, and speed up sales. This complete guide shows you how to make floor plans that look like a professional made them.
It covers everything from choosing the right tools to sharing your designs on the best-selling sites. You will learn how to make real estate floor plan drawings that make your listings stand out and surprise buyers with step-by-step instructions and insider tips.
Table of Contents
What Floor Plan Drawings Can Do for You
Floor plans are more than just rough sketches; they help buyers imagine what a house could be like. They make things clear, build trust, and help with marketing. In today’s market, real estate floor plan drawings are very important because:
- Clarity for Buyers: Since 75% of people who want to buy a home start their search online, floor plans help them picture how rooms will flow and work without having to see the house in person. This is very helpful for people who are looking from afar or who are busy and want to browse.
- Competitive Advantage: Listings with floor plans sell faster in markets that move quickly because they remove doubt. A clear plan can be the deciding factor for buyers who are looking at more than one home.
- With the rise of virtual tours. They make listings more engaging, which appeals to tech-savvy buyers who want to be immersed in the experience.
- Versatility: Floor plans can be changed to show off special features like open layouts or custom additions. They can also be used for all types of homes, from starter homes to large farms.
The information in this guide will help you make professional-looking work, whether you’re making a simple 2D plan for a modest sale or a photorealistic 3D rendering for a high-end property.
Step 1: Write down your goals for the floor plan
A clear plan is the first step to making good real estate floor plan drawings. Before you start designing, think about these things:

- Who are the viewers? Are you looking for first-time buyers who want to find cheap homes, families who want homes with lots of space, or high-end clients who expect stunning visuals? The audience shapes the style and amount of detail. A young couple, for instance, might like a clean 2D plan, while high-end buyers might want a 3D tour.
- What kind of property is it? A ranch with only one story needs a different method than a townhouse with multiple floors or a small apartment. Think about the property’s size, layout, and any special features it may have, like a deck on the roof or a porch that goes around the house.
- Do you have a budget? For small businesses or solo real estate agents, free tools work best. At the same time, professional services are best for listings with a lot at stake. Please choose whether you want to spend time on do-it-yourself designs or hire someone else to do them for you.
- What do you want to achieve? Building a floor plan for an MLS ad, a virtual tour, or a sales brochure? Your choice of tool will depend on the output file, such as PDF, JPEG, or interactive 3D.
Insider Tip: Buyers expect to see numbers in square feet and common words like “family room,” “master bedroom,” and “living room.” Make sure your floor plan follows these rules so it looks professional and easy to understand.
Step 2: Choose the Best Tools
Getting the right tool is very important for drawing floor plans for homes. There are a lot of choices out there for homeowners, realtors, and developers, ranging from free apps to paid services.
Here is an in-depth look at the best tools for making floor plans, focused on how easy they are to use, how much they cost, and what features they have that are useful.
1. PixelShouters
- A professional business that edits real estate photos and designs floor plans for homes. They offer high-quality 2D and 3D floor plans as well as services like HDR photo editing and virtual staging.
- Realtors and developers who want professional floor plans and better photos of properties to use in competing listings.
- What matters:
- using modern CAD software, turns hand-drawn sketches, outlines, or photos into accurate 2D and 3D floor plans.
- It gives you exact room sizes, where to put your furniture, and how rooms like kitchens and living rooms connect to each other.
- provides photo editing services, such as fixing colors, removing objects, and virtual staging, to go with floor plans.
- We offer reasonable prices and quick turnaround times, usually within 12 to 24 hours.
- Custom quotes range from $50 to $300 per floor plan, based on how complicated it is. Photo editing starts at $5 per image.
- PixelShouters combines knowledge of floor plans with photo editing to provide a complete answer for real estate agents who need polished images to attract buyers. Their experienced CAD designers and writers promise results that are accurate and ready for the market.
Pro Tip: If you’re new to floor plans, use Floorplanner’s free version to learn the basics. Professional ads should pay for RoomSketcher’s branding and integration tools.
If you need high-end or complicated work, PixelShouters will do the best job. PixelShouters is especially great for people who need to make floor plans and improve photos.
2. RoomSketcher

- RoomSketcher that can be used for both 2D and 3D floor plans. It is known for its fast delivery and branding choices.
- Best for: Real estate agents who need plans for print materials or web listings.
- What’s important:
- Easy-to-use drag-and-drop interface for quick creation.
- Visualizations in 3D and video tours.
- Custom branding with colors and logos from the firm.
- It works with sites like Zillow, Redfin, and MLS.
- The basic plan for simple 2D plans is free. The premium plan for 3D and logos starts at $49 in the first year.
- Why You Should Use It: Busy real estate agents love it because it’s quick and works with all the big listing sites.
3. Floorplanner

- Floorplanner: easy-to-use tool with a free version that’s great for newbies and small businesses.
- Best for: People who want to build their own homes or rent out small houses.
- What’s important:
- An easy-to-use interface with themes that are already made.
- You can send in both 2D and 3D.
- Interactive listings with virtual reality (VR) tours.
- High-quality outputs can be used online or in print.
- Simple 2D plans are free, but 3D renderings cost $5 per job.
- Why You Should Choose It: Its low price and VR features make it appealing to people on a budget who want to add a modern touch.
4. SketchUp Pro

- SketchUp Pro is a strong 3D modeling program for making thorough, personalized floor plans.
- This is the best tool for developers or builders who are making plans for new buildings or renovations.
- What’s important:
- Complex plans can be modeled in more detail.
- A big library full of furniture and fixtures.
- Some plugins add lifelike textures, like tile and hardwood floors.
- There are export choices for business presentations.
- It costs $299 a year.
- Choose It: Because it is accurate and can be changed to fit your needs, it is perfect for high-end or one-of-a-kind homes.
5. Planner 5D

- Planner 5D is a mobile-friendly tool with AI-assisted design that gets things done quickly.
- It works best for independent agents or people who don’t have much experience with design.
- What’s important:
- AI tools that can automatically make layouts from data.
- You can move objects around in 2D and 3D modes.
- There are templates for common home styles, like open-concept plans.
- Access from any platform (web, iOS, Android).
- Cost: Free with restricted features, or $9.99 a month for premium features.
- Why You Should Choose It: It’s easy to get to and is designed to be user-friendly for beginners.
6. AG CAD Designs

- AG CAD Designs is a skilled service that makes custom floor plans for high-end properties.
- Best for: high-end homes or jobs that need to be done quickly.
- What’s important:
- 2D and 3D plans that look like photos.
- Quick response (often the same day).
- Designs that are made to fit high-end marketing materials.
- You can talk directly with artists.
- Price: Quotes are made to order, usually $100 to $500 per plan.
- Why Should You Choose It? Its fast and finished results are perfect for competitive, high-end markets.
Pro Tip: If you’re not used to floor plans yet, use Floorplanner’s free version to learn the basics. The branding and integration tools of RoomSketcher are well worth the money for professional listings. For great results on high-end or complicated projects, think about using SketchUp Pro or AG CAD Designs.
Step 3: Take exact measurements of the property
Professional floor plans for real estate need to be very accurate. In competitive markets, wrong measurements can trick buyers, hurt your reputation, and even get you in trouble with the law. To be sure of the truth, do these things:
- Invest in good tools. Real estate agents love laser measuring tools like the Bosch GLM 50 C ($99 at Home Depot) because they are quick and accurate. A regular tape measure, on the other hand, can be used for smaller areas but needs more care.
- Check for Key Elements:
- Walls: Write down the lengths of the inside and outside walls in feet and inches, as well as their thickness (normal drywall is 6 inches thick).
- Windows and Doors: To make sure they are accessible, measure their widths, heights, and open directions.
- Rooms: Write down the sizes of all the things in each room, like closets, alcoves, and built-ins like stoves or kitchen islands.
- Ceiling Heights: Keep in mind that these can be different, especially in homes with lofts or high ceilings.
- Figure Out Square Footage: Include both the total square footage and the sizes for each room, as this is a key selling point for people who are looking at different homes.
- Take into account the property’s unique features. Draw attention to things like bay windows, skylights, or built-in shelves that give the property character and value.
- Check Measurements: Make sure all the numbers are correct, preferably with a second person, so you can find any mistakes before you start creating.
Pro Tip: Measure more carefully at corners and changes in older homes because the layout is often not straight. Take note of where the stairs and landings are when measuring a home with more than one floor.
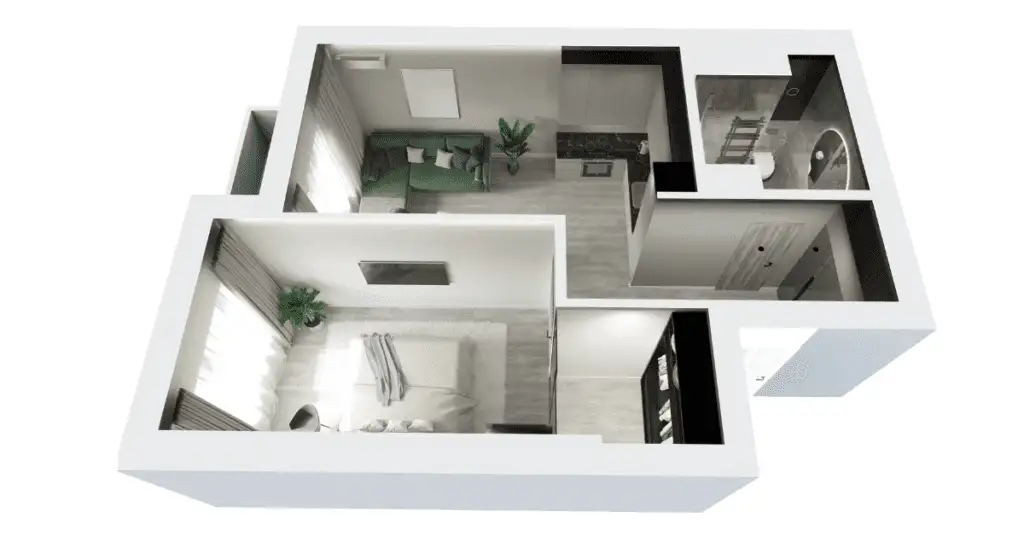
Step 4: Make a plan for your floor
Now that you have your data, you can start drawing your real estate floor plans. These steps will work for Floorplanner, RoomSketcher, SketchUp, and most other tools that do the same thing. To make a business plan, follow these steps:
1. Set up the picture
- Type in the property’s general size to make a scaled outline.
- To make sure you’re right, use gridlines or snap-to-grid tools.
- Standard in the business world is 1/4 inch = 1 foot, so set the size to that.
2. Make lines for walls and doors
- First, add the outside walls and then the inside sections, making sure their thicknesses match what you measured.
- Place the windows and doors so that they are the right size and open in the right direction.
- If it’s important, include structural features like load-bearing walls or columns.
3. Add Rooms and Furniture
- Use common names for the rooms, like “Kitchen,” “Main Bedroom,” and “Guest Bath.”
- Include the following fixtures:
- Sinks, stoves, fridges, and tables in the kitchen.
- Toilets, sinks, showers, and spas are all in bathrooms.
- Other Rooms: Fireplaces, built-in shelves, and washing machines.
- Make sure the pieces are the right size so the plan doesn’t get too crowded.
4. Bring in furniture
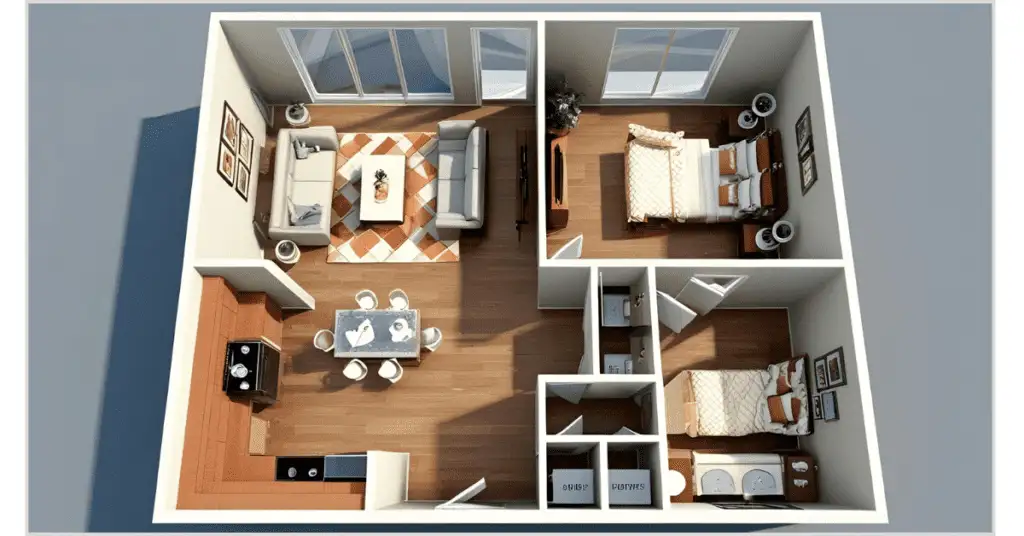
- Add furniture like beds, sofas, and eating tables to show size and ease of use.
- Modern homes often have open floor plans that make the flow between the living, eating, and kitchen areas stand out.
- Please don’t put too much furniture in the room so that it looks crowded.
5. Improve for a more professional look
- Adding your agency’s logo or color scheme will make it look more professional.
- Style: For a standard look, use strong lines on the walls and lighter colors for the furniture.
- Textures (3D Plans): To keep up with the latest design trends, use actual finishes like tile floors, granite countertops, or hardwood floors.
- Labels: Put clearly but not too close to the text the square size of each room and the whole property.
6. Look over the design
- Look for mistakes like walls that aren’t lined up right or missing fixings.
- You can see how easy it is to read the plan by zooming in and out or showing it to a coworker.
- The layout must be easy to understand, with clear paths and room links that make sense.
Pro Tip: Change the lighting and camera views on 3D plans to draw attention to important parts, like a large kitchen or a cozy fireplace. This makes the product more appealing to people who are shopping online.
Step 5: Save and send your floor plan
A great floor plan drawing for a house will only work if it gets seen by people who want to buy it. To get the most out of sharing your work, do it this way:
- Pick the Right File Type:
- PDF: Because it works with everything, it’s great for MLS listings, email attachments, and printed papers.
- JPEG and PNG are the best formats for online ads and social media because they offer high-resolution images.
- Interactive 3D: To make VR walkthroughs for virtual walks, use tools like RoomSketcher or Floorplanner.
- Adding to listing sites:
- You can improve ads by adding them to Zillow, Redfin, Realtor.com, or your local MLS system.
- Add it to the property page of your website so that searching is easy.
- Put together with other media:
- For a full marketing package, add professional photos or videos from a drone.
- Add tools for virtual tours like Matterport to make the experience more real.
- Use social media to promote:
- Post on Facebook, Instagram, or LinkedIn with a description like “Check out this beautiful layout!” or “Look at what your dream home could be.”
- To reach more people, use terms like #HomeDesign or #RealEstateMarketing.
- Give people ways to interact:
- Give buyers a link to a live 3D plan so they can look at the layout whenever they want.
- For open houses or client meetings, include a PDF that can be downloaded.

Pro Tip: Make a short movie that walks through the floor plan and talks about important features like an open kitchen or a flexible bonus room. Please put it on YouTube or TikTok to get people to visit your page.
Advanced Tips for Standout Real Estate Floor Plan
If you want to improve your real estate floor plan drawings, try these ideas:
- Follow the trends in the market: Focus on features that buyers will like, like home offices for people who work from home or big kitchens for homes with families. For homes in cities, focus on efficient layouts and storage options.
- Simplify Complicated Layouts: To make it easier to see how one place leads to the next in homes with multiple floors or odd shapes, use color coding or notes.
- Add Emotional Appeal: Write things like “Perfect for family gatherings” next to a large dining room or “Perfect for morning coffee” next to a sunny patio.
- Stay accessible: Make sure that halls and doorways meet ADA standards, especially for homes that are advertised as “move-in ready.”
- Utilize AI tools: Platforms like Planner 5D use AI to suggest layouts, which saves time on jobs that need to be done over and over again.
- Test on Multiple Devices: Look at your plan on laptops, tablets, and phones to make sure it works and is easy to understand for everyone.
- Regularly Update: If a building is being renovated, the floor plan should be updated to show the changes while still being accurate.
What Not to Do: Common Mistakes

When drawing up a floor plan for a house, even professionals can make mistakes. Keep an eye out for these problems:
- Incorrect Measurements: Mistakes in room or wall sizes can lead buyers astray and hurt trust.
- Designs that are too crowded: Plans that have too much furniture or decoration can be hard to read. Could you keep it simple and clean?
- Ignoring Buyer Preferences: Not showing square space or using strange room names can confuse people.
- Low-Quality Exports: Images or PDFs that are pixelated or blurry don’t look professional. Always use outputs with a high quality.
- Not Branding: Plans that aren’t branded miss a chance to get your agency’s name out there. Put a small brand or watermark on it.
- Not Considering Accessibility: Buyers who need to move around easily may be turned off by narrow doors or unclear paths.
Tools and Resources to Help You Keep Succeeding
Use these tools to make sure your real estate floor plan drawings are the best they can be:
- Training: Platforms like RoomSketcher and SketchUp offer webinars and lessons to improve your skills.
- To share tips with other real estate workers, join real estate forums on LinkedIn or Reddit.
- Software Updates: Check to see if your chosen tool has any new features, like AI improvements or VR features.
- Professional Services: If you want perfect results for important listings, you might want to hire a company like AG CAD Designs.
- Market research: Keep an eye on real estate search sites like Zillow and Redfin to see how the best listings use floor plans. This will give you new ideas.
How Floor Plans Get Things Done in the Real World
To show how real estate floor plan drawings can help, think about these situations:
- A real estate agent in the suburbs uses Floorplanner to make a 2D plan of a three-bedroom house that shows how the kitchen and family room are open to each other. On Realtor.com, the post gets 50% more clicks, which leads to a sale in two weeks.
- Urban Developer: A developer selling a home downtown uses RoomSketcher’s 3D plans to show how the space can be used efficiently. International buyers are drawn to the live tour, which speeds up the closing process.
- Homeowner: A person who is selling their house uses Planner 5D to make a free 2D plan that shows off the large garden. The plan makes more people want to come to the open house, which leads to multiple offers.
These examples show how customized floor plans can meet the needs of a wide range of people, from buyers on a budget to high-end developers.
How to Get Started
No matter how much experience you have, you can make professional real estate floor plan drawings. How to jump in:
- Get a laser measurer and write down the exact measurements of your property.
- Pick a Tool: You can start with Floorplanner’s free version or look into RoomSketcher for custom plans.
- Carefully design: Use the steps above to make a plan that is clear and looks good.
- Share in a smart way: post to listing sites, share on social media, and include in marketing tools.
- Get Feedback: To improve your plan, show it to clients or coworkers.
Professional services like AG CAD Designs offer plans that are made just for you if you are short on time or want the best results. Are you ready to improve your listings? Try out a free tool right now, or ask for a price on a custom design.
Pair floor plans with polished listing photos
Floor plan drawings help buyers understand space, but they should not replace strong photos. The best listing packages use both: clear layout information and polished images that show the property’s condition and feel.
If your listing package includes floor plans, make sure the photos are edited to the same professional standard.