Real Estate HDR Photography EP 13: HDR Editing in Adobe Photoshop
Real estate photography has become an essential part of the real estate industry, as it plays a crucial role in attracting potential buyers and showcasing properties in the best possible light. In today’s digital age, where most home buyers begin their search online, it is crucial to have high-quality photos that stand out from the competition. This is where HDR (High Dynamic Range) photography comes into play and that why we create a full series on real estate HDR photography.
Adobe Photoshop is a powerful tool for real estate photographers and agents looking to enhance their photos and make their properties stand out in a competitive market. HDR photography is a technique that combines multiple images of different exposures to create an image with a greater dynamic range of light and shadow. This technique can be especially useful in real estate photography as it can capture the full range of light in a scene, resulting in images that are more vibrant, detailed, and appealing to potential buyers.
One of the most popular software tools used for HDR editing is Adobe Photoshop. In this article, we will focus on episode 13 of Real Estate HDR Photography, which covers HDR editing in Adobe Photoshop.
The episode begins by discussing the importance of HDR editing in real estate photography and the benefits it can offer. It then goes on to explain the preparation process before starting the editing process, such as selecting photos to use, organizing files, and recommendations for shooting photos for HDR editing.
The article then provides a step-by-step guide on how to use Adobe Photoshop HDR for real estate photo editing. This includes an explanation of each tool and feature used in the editing process, tips on adjusting exposure, color balance, and contrast for optimal results, and best practices for avoiding common mistakes in HDR editing.
Additionally, the article provides a detailed overview of the key features of Adobe Photoshop HDR, including the Merge to HDR Pro command, tone mapping, and adjustment options. It also explains how to use the various tools available in Adobe Photoshop HDR to achieve the desired result, such as the adjustment brush, gradient tool, and the clone stamp tool..
Table of Contents
Preparing your Photos for HDR Editing
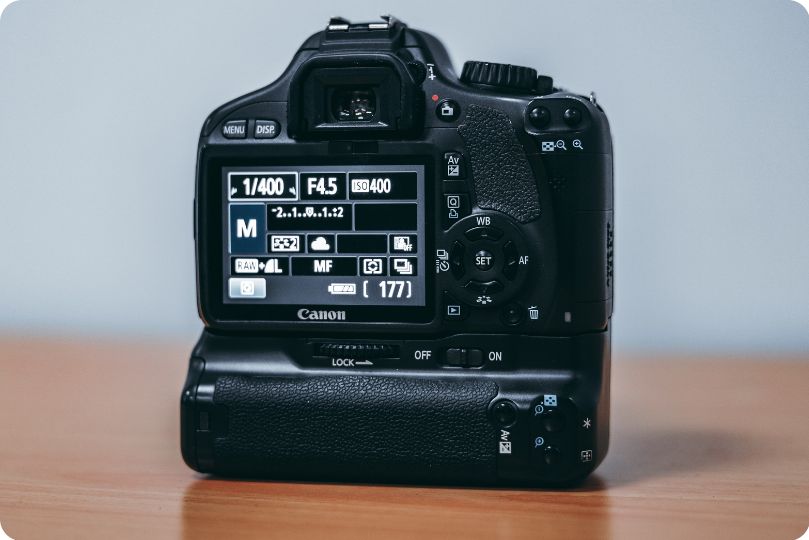
Before you begin the process of HDR real estate photo editing, it’s important to shoot bracketed photos. Bracketing involves taking multiple photos of the same scene with different exposure settings. This will ensure that you capture all the details in the highlights and shadows of the image. Here are some tips for shooting bracketed photos:
- Use a tripod: To ensure that your photos are aligned and there is no movement between shots, use a tripod to keep your camera steady.
- Set your camera to Aperture Priority: This will allow you to keep the aperture constant while changing the shutter speed for each shot.
- Use Auto Exposure Bracketing (AEB): Most cameras have a built-in AEB feature that allows you to take multiple shots with different exposure settings automatically.
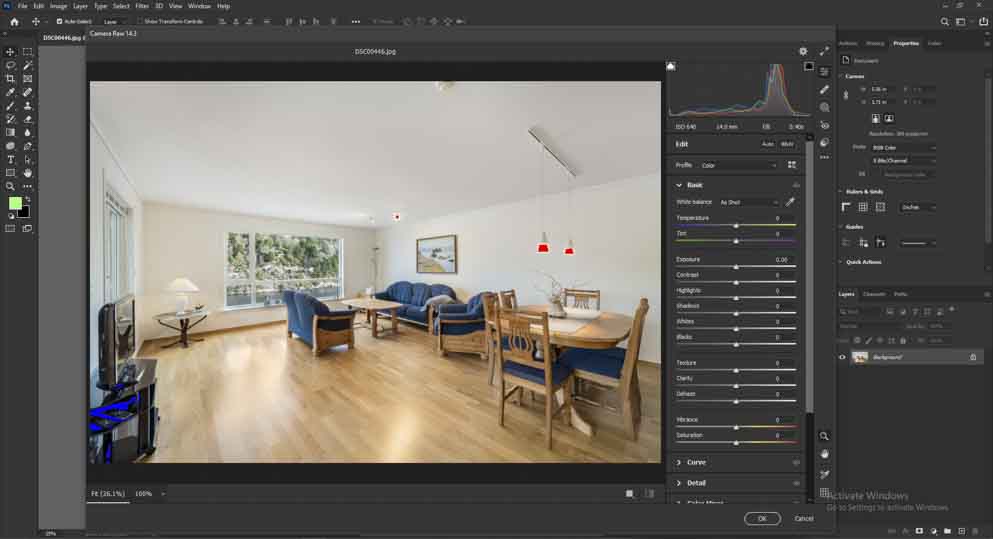
Once you have taken the bracketed photos, import them into Adobe Photoshop by selecting File > Automate > Merge to HDR Pro.
Merging Bracketed Photos in Adobe Photoshop
After importing the bracketed photos into Photoshop, you will be prompted with the Merge to HDR Pro dialog box. Here, you can adjust the settings to merge the photos into a single HDR image. The settings available include:
- Source Images: Select the bracketed photos you want to merge.
- Mode: Choose from either 16-bit or 32-bit mode. 32-bit mode is recommended as it allows for a wider dynamic range.
- Remove Ghosts: This option removes any moving objects in the scene that may appear in different positions in each shot.
- Alignment: This option aligns the images for better merging.
- Deghosting: This option allows you to manually select the areas that need to be removed.
Once you have adjusted the settings, click on the Merge button to create the HDR image.
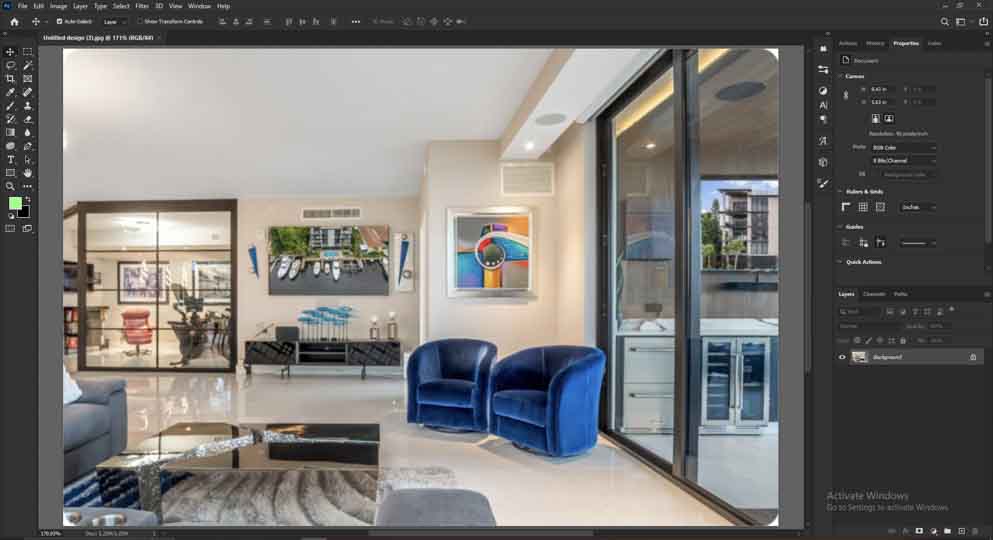
Basic HDR Image Editing in Adobe Photoshop
After merging the bracketed photos, you will have a single HDR image that you can start editing. Here are some basic adjustments you can make in Photoshop to enhance the image:
- Tone Mapping: This option allows you to adjust the exposure and contrast of the image. It is recommended that you start with a low value and increase it gradually until you achieve the desired effect.
- Color: This option allows you to adjust the color balance of the image. You can use the sliders to adjust the Hue, Saturation, and Lightness of each color channel.
- Detail: This option allows you to enhance the details in the image. You can use the sliders to adjust the sharpness, radius, and strength of the details.
Advanced HDR Image Editing in Adobe Photoshop
If you want to further fine-tune your HDR image, you can use the advanced options available in Photoshop. Here are some of the options you can use:
- Curves and Levels: These options allow you to adjust the brightness and contrast of the image. You can use the curves to adjust the tonal range of the image, while the levels option allows you to adjust the highlights, shadows, and mid-tones separately.
- HSL/Grayscale: This option allows you to adjust the color balance of the image in the grayscale mode. You can use the sliders to adjust the Hue, Saturation, and Lightness of each color channel separately.
- Split Toning: This option allows you to add a color tint to the highlights and shadows of the image. You can use the sliders to adjust the Hue and Saturation of each channel separately.
Saving and Exporting the HDR Image
After you have finished editing your HDR image, it’s important to save it in the appropriate file format. Here are some file formats you can use to save your HDR image:
- JPEG: This format is ideal for images that will be used online or for printing at a low resolution. However, it does not support a wide dynamic range.
- TIFF: This format is ideal for images that will be printed at a high resolution. It supports a wide dynamic range and can be edited further in Photoshop.
- PSD: This format is ideal for images that will be edited further in Photoshop. It supports layers and other advanced features.
When exporting your HDR image, it’s important to choose the appropriate settings for your needs. Here are some tips for exporting your HDR image:
- Resolution: Choose a resolution that is appropriate for your intended use. If you’re printing the image, choose a resolution of 300 DPI or higher.
- Color Space: Choose a color space that is appropriate for your intended use. If you’re printing the image, choose a CMYK color space.
- Compression: Choose a compression level that is appropriate for your intended use. For online use, you can use a higher compression level to reduce the file size.
Conclusion
HDR real estate photo editing is a powerful technique that can enhance the beauty and detail of your real estate photos. By following the step-by-step process outlined in this guide, you can create stunning HDR images that will impress your clients and stand out from the competition. Remember to shoot bracketed photos, merge them in Photoshop, and adjust the settings to achieve the desired effect. With a little practice and patience, you can master the art of HDR real estate photo editing in Adobe Photoshop.

[…] the Right Software: There are several software options for processing HDR images, including Photoshop and Lightroom. Choose the one that works best for you and your […]
[…] and exposure of the photographs to enhance their visual appeal. It’s important to learn the basics of editing software like Adobe Photoshop and Lightroom to enhance your photographs. There are many online tutorials and courses that can […]