Most listing photos fail before a buyer reads the first word of the description. Not because the house is bad, but because the edit is. A crooked kitchen, a blue-yellow white balance war, windows blown to white, grass that looks radioactive. Buyers decide in seconds, and editing is what makes those seconds count.
This real estate photo editing checklist was built from 20+ years behind the camera and the screen, working with realtors, Airbnb hosts, architects, and high-volume editing teams. It is not for photographers only. If you touch property marketing images — shoot them, edit them, approve them, or upload them to MLS — this is your field manual.
Why checklists matter: professionally photographed homes sell up to 23 days (or 35%) faster and for up to $11,000 more, according to Redfin’s professional photography analysis. VHT Studios found the same pattern at scale: professionally photographed homes sold 32% faster, spending 89 days on market versus 123 days for others, as reported by PR Newswire. And with online home search now central to buyer behavior in NAR buyer research, your photos are the showing.
Editing affects buyers because eye-tracking research is brutal: buyers spend between one and three seconds on your first photo before deciding to click or scroll, and roughly twenty seconds on that hero image if they do click. You do not get a second chance.
In this guide you will learn the full real estate editing workflow, the room-by-room audit, the final quality control system, and the exact 50-point list professionals use before delivery.
Why most listing photos fail
- No lens correction, so walls lean
- Mixed white balance, so kitchens go blue and bathrooms go yellow
- Over-HDR halos around windows
- Fake skies that do not match reflections
- Inconsistent brightness across the gallery
- Cropping that cuts off selling features
Checklists prevent these costly mistakes because editing is repetitive. Your brain skips steps under deadline. A written real estate photo editing checklist forces consistency
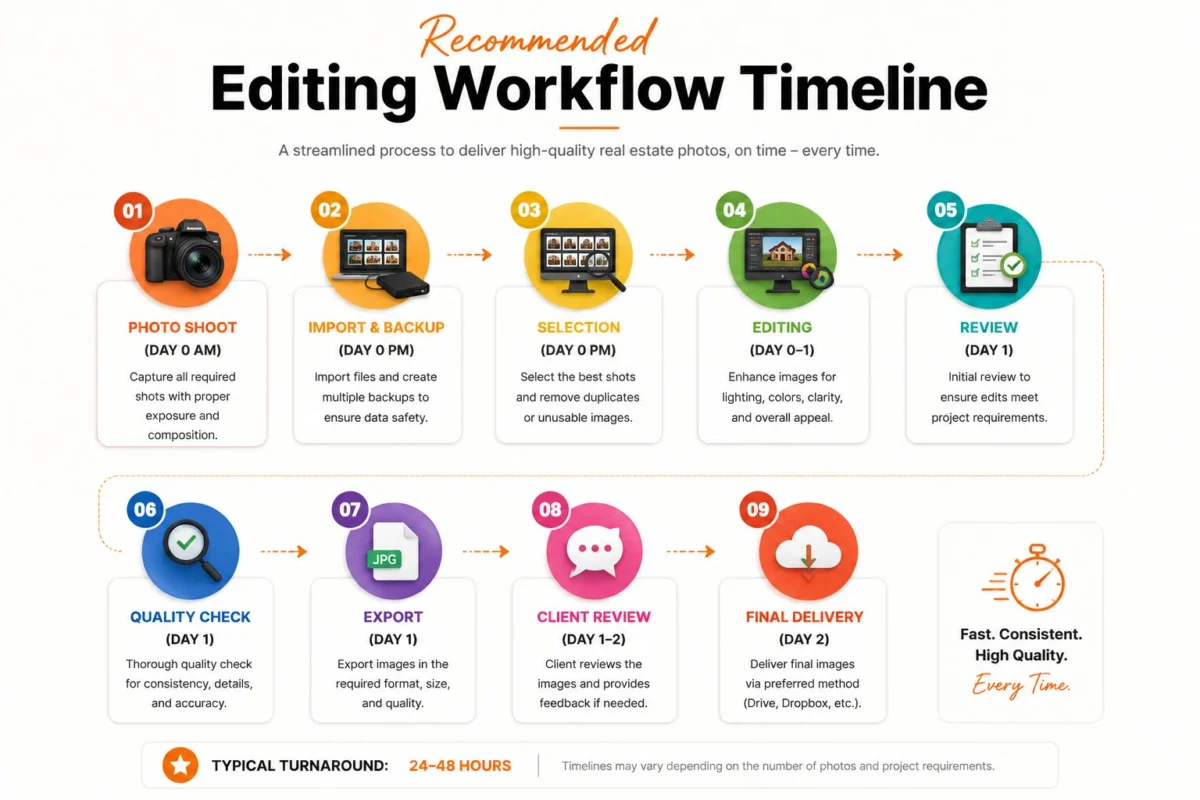
Real Estate Editing Workflow
Pro Tip: Save this flow as a Lightroom preset stack and a Photoshop action set. You will cut editing time by 30%
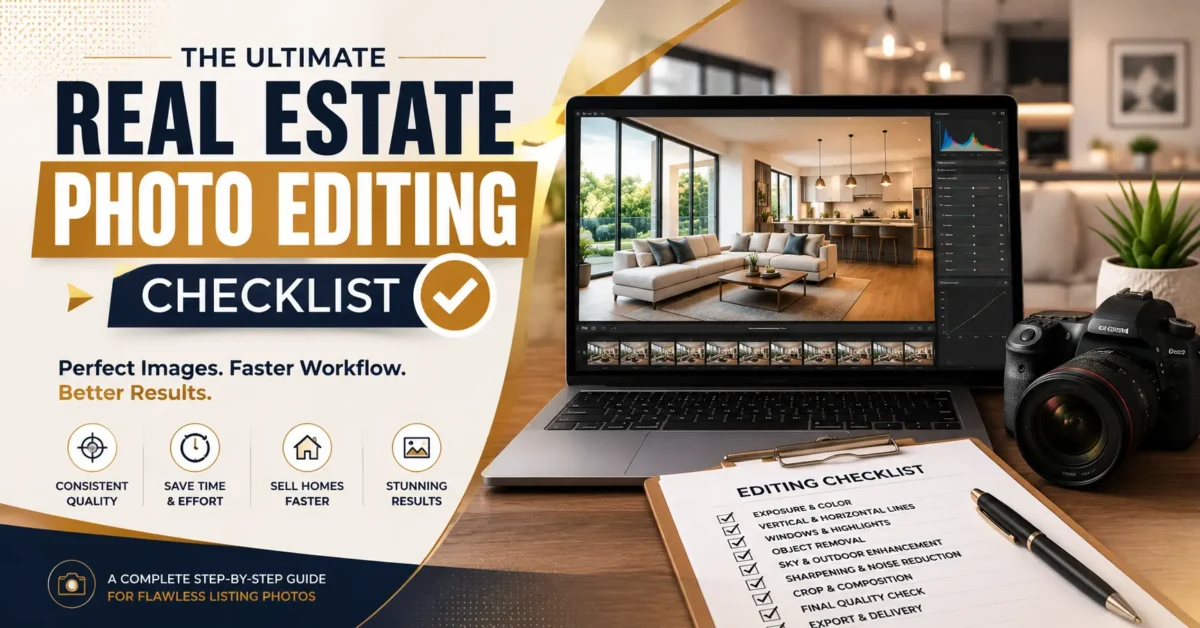
Complete Real Estate Photo Editing Checklist
Did You Know? Listings with high-quality photos receive 118% more online views than those with poor-quality images
Before Editing Checklist
Do this before you touch a slider. It saves rework.
- ☐ Import RAW photo editing files, not JPEGs
- ☐ Apply lens profile for your exact lens
- ☐ Check exposure brackets: -2, 0, +2 present?
- ☐ Straighten horizons in camera metadata
- ☐ Verify camera settings: ISO under 400, f/7.1-f/9
- ☐ Rename files: 123Main_Living_01.RAW
- ☐ Backup to two locations immediately
- ☐ Create folders: 01_RAW, 02_Selects, 03_Edits, 04_Final
- ☐ Read client instructions: twilight? virtual staging?
- ☐ Note property features: pool, view, luxury finishes
Time Saving Tip: Cull in Photo Mechanic first. Only edit selects.
During Editing Checklist – the real estate editing workflow
This is where professional real estate photo editing lives.
Exposure & Light
- ☐ Merge HDR or flambient blend for natural dynamic range
- ☐ Recover highlights to -30 to -50 for window detail
- ☐ Lift shadows to +25 to +40 for room brightness
- ☐ Set blacks to avoid washed look
Color
- ☐ White balance from white cabinet or gray card
- ☐ Color consistency across all images in same room
- ☐ Correct color casts in mixed lighting (tungsten + daylight)
Geometry
- ☐ Lens distortion correction on first
- ☐ Vertical correction: walls straight, not leaning
- ☐ Perspective correction without over-stretching
Clean-up
- ☐ Window pull editing for realistic view
- ☐ Reflection removal in mirrors and TVs
- ☐ Object cleanup: cords, pet bowls, toiletries
- ☐ TV screen replacement with neutral image
- ☐ Fireplace enhancement (warmth, not fake fire)
Exterior
- ☐ Sky replacement only if light direction matches
- ☐ Cloud enhancement subtle
- ☐ Lawn enhancement and grass repair
- ☐ Pool color correction to natural turquoise
- ☐ Driveway oil stain removal
Finish
- ☐ Noise reduction on shadows only
- ☐ Sharpening at 70-90, masking 80+
- ☐ Check at 100% and 200% zoom
Expert Tip: Homes with professionally edited photos sell 50% faster than those without, according to IMOTO Photo, and HDR listings sell 50% faster .
Room-by-Room Editing Audit
Every room has a buyer psychology. Edit for that.
Living Room
Editing goals: Spacious, bright, inviting
Common mistakes: Yellow cast from lamps, crooked verticals, dark corners
Checklist: ☐ Verticals straight ☐ White balance neutral ☐ Lift shadows in corners ☐ Remove remote controls ☐ Balance window view
Professional advice: Keep warmth at 5200-5600K. Buyers want cozy, not cave.
Kitchen
Editing goals: Clean, bright, premium finishes
Common mistakes: Blue kitchens from auto WB, over-sharpened granite
Checklist: ☐ Correct blue cast ☐ Dehaze slightly ☐ Clean countertops (object removal) ☐ Straighten cabinet lines ☐ Brightness correction even
Pro Tip: Kitchens sell homes. Spend 40% of your edit time here.
Bedroom
Editing goals: Calm, restful, spacious
Common mistakes: Over-saturated bedding, dark shadows
Checklist: ☐ Soften highlights on bedding ☐ Warm but not yellow WB ☐ Vertical correction on headboard wall ☐ Remove personal photos
Bathroom
Editing goals: Spa-like, spotless
Common mistakes: Yellow bathrooms, mirror reflections of photographer
Checklist: ☐ White balance to true white tile ☐ Remove toiletries ☐ Clean mirror spots ☐ Brighten but keep texture in tile
Dining Room
Editing goals: Elegant, defined space
Checklist: ☐ Straighten chandelier ☐ Correct mixed lighting ☐ Remove chairs blocking flow
Home Office, Laundry, Garage
Editing goals: Functional, uncluttered
Checklist: ☐ Declutter aggressively ☐ Brighten evenly ☐ Correct concrete color (not blue)
Balcony, Backyard, Garden
Editing goals: Lifestyle, green, maintained
Checklist: ☐ Lawn enhancement natural ☐ Sky replacement if needed ☐ Remove hoses/trash bins ☐ Boost greens +12 max
Swimming Pool
Editing goals: Resort clean
Checklist: ☐ Pool color to natural blue-green ☐ Remove leaf debris ☐ Straighten coping lines
Drone Images
Editing goals: Context and scale
Common mistakes: Tilted horizon, oversaturated
Checklist: ☐ Horizon perfectly level ☐ Correct lens distortion ☐ Natural color, not HDR cartoon ☐ Sharpen lightly
Did You Know? Homes with drone photos sell 68% faster .
Twilight Images / Day to Dusk Conversion
Editing goals: Warm, luxurious, inviting
Checklist: ☐ Natural window glow ☐ Sky matches ambient light ☐ No fake reflections ☐ Keep exterior lights realistic
Expert Tip: Listings using a twilight image as the main photo average 76% more views .
Luxury Features
Editing goals: Detail and texture
Checklist: ☐ Preserve marble veining ☐ Accurate wood tones ☐ No over-sharpening on fixtures
Final Quality Control Checklist – The 4-Layer Quality Check
Layer 1: Technical
- ☐ Zoom inspection at 200% for dust spots
- ☐ Check edges for halos from window pull
- ☐ Cropping: no cut-off furniture, 4:3 or 3:2 consistent
- ☐ Perspective: verticals straight
Layer 2: Color & Light
- ☐ Brightness consistency across gallery
- ☐ Natural colors, no neon grass
- ☐ Window realism: view visible but not glowing
- ☐ Shadow realism: direction matches light source
Layer 3: Cleanliness
- ☐ Noise controlled in shadows
- ☐ Sharpness: crisp but not crunchy
- ☐ Color consistency room to room
Layer 4: Delivery
- ☐ Export settings: JPEG, sRGB, 2048-3000px long edge
- ☐ File names correct
- ☐ MLS requirements met (most MLS: min 640×480, max 3072×2304, under 15MB)
- ☐ Bright MLS recommends 1024×768 or larger
- ☐ Watermarks removed unless client requests
- ☐ Delivery folders organized
The Pixel Accuracy Review: Flip through images at 2-second intervals. If anything flashes too dark, too blue, or crooked, fix it.
The 50-Point Professional Editing Checklist
Editing Mistakes That Cost Property Sales
- Too much HDR: Creates halos. Buyers distrust fake.
- Over saturation: Grass looks nuclear. Reduces perceived value.
- Fake sky: Wrong direction light kills credibility.
- Crooked walls: Subconscious signal of poor quality.
- Blue kitchens: Auto WB in shade. Fix to 5500K.
- Yellow bathrooms: Tungsten not corrected.
- Over sharpening: Crunchy edges, especially on countertops.
- Dark windows: Missed window pull opportunity.
- Noise: High ISO shadows look cheap.
- Incorrect white balance: Inconsistent gallery.
- Poor perspective: Stretched furniture.
- Over editing grass: MLS may reject.
- Artificial colors: Marble turns pink.
- Compressed images: Uploading at 70% quality creates artifacts.
Common Mistake: Editing each photo in isolation. Always edit in context of the full gallery.
Buyer Psychology and the 10-Second Buyer Impression Test
Buyers do not analyze photos. They feel them.
Eye-tracking shows the photo of the house is viewed first, before description or agent remarks. Total dwell time and fixation duration explain a buyer’s opinion of value, according to ocular tracking research on real estate homebuyer search behavior.
How buyers scan:
- Brightness – is it light and airy?
- Warmth – does it feel homey?
- Visual flow – can I understand the layout?
- Space perception – do rooms feel large?
- Trust signals – are lines straight, colors real?
Homes with high-quality images spend 89 days on market vs 123 days for lower-quality visuals. That’s 34 days faster.
The Buyer Psychology Image Test: Show the image to someone for 3 seconds, then hide it. Can they describe the room layout? If not, it’s too dark or cluttered.
Luxury perception: 85% of homebuyers rated photos as the most important feature when searching online . For luxury real estate photography, preserve texture over punch.
MLS Compliance Scan – Realtor Checklist Before Uploading
- ☐ Image order: exterior hero first, then main living areas
- ☐ File size under MLS cap (commonly 15MB)
- ☐ Resolution at least 1024×768, ideally 2048×1536
- ☐ Naming: no personal info
- ☐ Orientation: landscape preferred
- ☐ Legal: no people, license plates, branding in image
- ☐ Watermarks: removed (most MLS prohibit)
- ☐ Branding: check MLS rules
- ☐ No duplicates
- ☐ Property highlights covered in first 10 photos
Client Expectation: 61% of buyers under 40 skip listings with fewer than 10 photos
Photographer Checklist Before Sending to Client
- ☐ All images color-matched
- ☐ Verticals corrected
- ☐ Windows have detail
- ☐ No dust spots at 100%
- ☐ Files named correctly
- ☐ Two sizes delivered: web and print
- ☐ Delivery note includes edit summary
Editing Company Checklist Before Delivery – The Final Listing Approval Formula
- ☐ Match client preset/style guide
- ☐ Consistency across 25+ images
- ☐ QC by second editor
- ☐ Export to client spec
- ☐ On-time delivery logged
When Should You Outsource Real Estate Photo Editing?
After about 40% of this guide, you have seen the workload. For busy photographers shooting 3-5 homes daily, editing becomes the bottleneck.
Outsourcing makes sense when:
- You shoot high volume and need consistent turnaround
- You want to focus on shooting, not Lightroom workflow
- You handle luxury listings requiring flawless retouching
- You need specialized edits like day to dusk conversion or virtual staging
- You want to maintain editing standards while scaling
This is where teams like PixelShouters fit naturally into a professional real estate photography workflow. They are not a filter app. They are a dedicated real estate photo editor team handling the checklist above daily.
Photographers use PixelShouters for HDR Editing and Flambient Editing to balance window pulls without halos, for Window Pull and Perspective Correction to keep verticals perfect, for Sky Replacement and Lawn Enhancement that stays natural, for Day to Dusk conversions that actually match lighting, for Virtual Staging and Virtual Renovation to help vacant listings, for Item Removal and Object Removal, Drone Photo Editing, Panorama Stitching, Image Resizing for MLS Optimization, Floor Plan Redraw, and full Image Enhancement including Color Correction and Brightness Correction.
The value is not just speed. It is the Editing Confidence Score: knowing every image passed a 50-point check before it reaches your realtor. For high-volume studios, bulk property photo editing with fast turnaround keeps delivery promises without hiring in-house editors.
Pro Tip: Outsource a test batch of 10 images. Compare your time, consistency, and client feedback. Most photographers keep outsourcing after that test.
DIY Editing vs Professional Editing
Checklist Reminder: If you earn $200 per shoot and spend 2 hours editing, outsourcing at $20 saves you $180 in opportunity cost.
Homes with professional photos sell 32% faster, according to Center for REALTOR Development data, and listings with 20+ high-quality photos receive 118% more views on Zillow.
Printable Real Estate Photo Editing Checklist
Print this. Tape it to your monitor.
FAQs About Real Estate Photo Editing Checklist
1. What is a real estate photo editing checklist?
A step-by-step quality control list that ensures every listing photo meets professional standards for exposure, color, perspective, and MLS compliance before delivery.
2. Why do I need a real estate photo editing checklist if I use presets?
Presets do not fix crooked walls, window blowouts, or color casts. The checklist catches what automation misses.
3. How long should editing take per property?
15-25 images: 45-60 minutes DIY for basic HDR real estate editing, 20-30 minutes with batch editing and actions.
4. What is the ideal export size for MLS?
Most MLS accept 2048px long edge, JPEG, under 15MB. Bright MLS recommends 1024×768 or larger.
5. What is window pull editing?
Blending a darker exposure for windows into the main interior shot to show the outside view naturally.
6. Should I use sky replacement on every exterior?
No. Only when the sky is flat gray and light direction matches. Fake skies reduce trust.
7. How do I fix blue kitchens?
Set white balance to 5400-5600K and reduce blue saturation in HSL. Shoot with gray card for accuracy.
8. What is the difference between HDR and flambient?
HDR merges brackets. Flambient blends flash and ambient for cleaner windows and color.
9. How do I maintain image consistency?
Edit one hero image, sync settings, then fine-tune each. View all thumbnails together.
10. What are MLS photo requirements for watermarks?
Most MLS prohibit agent branding or watermarks on photos. Check local rules.
11. Can I edit photos on my phone for listings?
For quick social posts yes, but not for MLS. Professional real estate image enhancement needs RAW and calibrated monitor.
12. How much does professional real estate photo editing cost?
Typically $0.80 to $2.50 per image for standard editing, more for virtual staging or day to dusk.
13. What is vertical correction?
Straightening converging lines so walls appear perfectly vertical, essential in architectural photography editing.
14. How do I avoid over-editing?
Check at 50% zoom on a phone. If it looks fake there, reduce edits.
15. Does photo quality affect price?
Yes. Homes with professionally edited photos receive 47% higher asking prices per square foot, and Zillow data shows $934 to $116,076 more.
16. How many photos should a listing have?
Minimum 20 for best engagement. Listings with fewer than 10 are skipped by 61% of buyers under 40.
17. What is the best real estate photography workflow?
Shoot brackets → import → lens correction → HDR merge → white balance → perspective → clean → color → export → QC.-
Conclusion
A great real estate photo editing checklist is not about making photos pretty. It is about removing friction between the buyer and the offer. Straight verticals build trust. Correct white balance signals clean. Window pulls sell the view. Consistent brightness lets buyers flow through the home in their mind.
Checklists build consistency, and consistency builds trust with realtors, property managers, and Airbnb hosts. When every gallery looks like it came from the same high-end magazine, you stop competing on price and start competing on quality.
Homes with professional photos sell 32% faster and spend 89 days on market versus 123. That is five weeks of carrying costs saved. That is why this checklist matters.
Save it. Print it. Use it before every edit. Run the 50-point list, run the 4-Layer Quality Check, and deliver images that pass the 10-Second Buyer Impression Test. Your clients will notice, buyers will click, and listings will move.