
I get this question almost every week. A photographer messages me at 11pm: “Hey, quick one —what should I send an editing company for real estate photos so they don’t mess it up?”
And I laugh, because I used to be that photographer. I’d finish a shoot in Delhi heat, dump 400 files into a Dropbox link called “New Folder (7)”, and type “please edit, make it pop.” Then I’d wonder why the sky was purple, the windows were gray, and I needed three revisions.
After ten years working side by side with real estate photographers and editing teams, I can tell you the truth: great editing has almost nothing to do with Photoshop skills. It starts with what you send.
This is the guide I wish someone handed me. No fluff. Just exactly what to send a real estate photo editor, why it matters, and how to build a workflow that gets you perfect photos back the first time.
Table of Contents
Why Your Upload Matters More Than Your Camera
Let me tell you about Mike. Mike shoots luxury homes in Florida with a $5,000 camera. He sent me 22 JPEGs named DSC_001 to DSC_022, no notes, in a WeTransfer link that expired in two days.
The editor guessed the sky. Guessed the grass color. Guessed which photo was the master bedroom. Mike got back photos with a stormy sky on a sunny Miami listing. He spent an hour on revisions.
Next week, Sarah sent the same house. She shoots with an older Canon. But she sent RAW files, organized folders, and a one-page note that said “client hates orange, keep windows natural.” Her photos came back perfect. No revisions.
That is the difference. When you understand what should I send an editing company for real estate photos, you stop paying for guesswork.
Incomplete uploads create the same five problems every time:
- Editing delays because they email you for missing brackets
- Wrong colors because you didn’t say “warm” or “cool”
- Missing sky replacements because they didn’t know you wanted blue
- Incorrect twilight edits because they had no reference
- extra revision requests that eat your profit
Professional editing starts before the editor opens Photoshop. It starts with this flow:
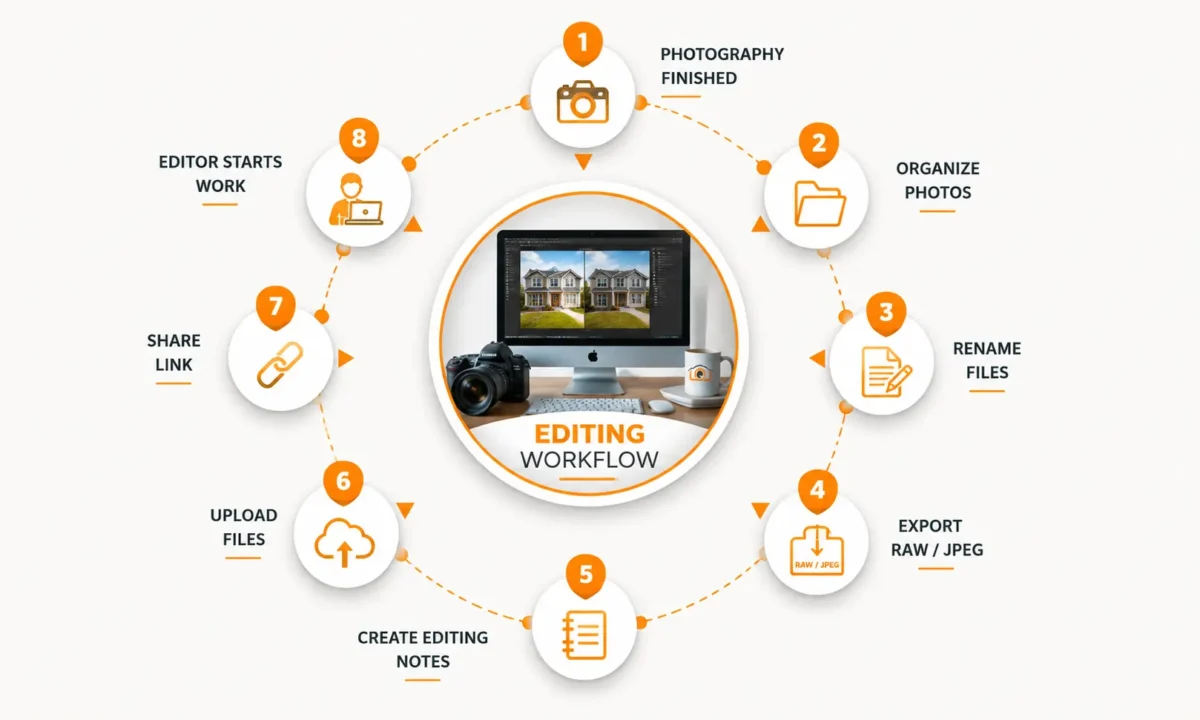
What Information Every Editing Company Needs First
Before files, give context. Think of it like giving a chef the recipe, not just the ingredients.
I put this in every email or in a tiny Instructions.txt file in the folder. It takes 90 seconds.
Property address. Don’t skip this. Editors Google it. They check if it’s a beach house or a mountain cabin. A home in Miami needs a bright blue sky. A home in Seattle looks fake with that same sky. The address tells them.
Shoot type. This changes the whole edit. Be specific:
- MLS purpose: clean, bright, true to life. Agents hate over-edited.
- Luxury listing: warmer tones, magazine feel, richer shadows
- Airbnb: cozy, inviting, a little brighter so it feels lived-in
- Rental: fast and clean, don’t overthink it
- Commercial: straight verticals, less saturation, serious
- Vacation property: punchy grass, blue water
- Builder portfolio: perfect lines, twilight hero shot
Number of photos. Don’t say “a bunch.” Say “32 HDR sets, that’s 96 RAW files, plus 8 drone.” Now the editor knows what to expect.
Turnaround time. Write “24h by 5pm IST” not “ASAP.” ASAP means different things to different people.
Delivery format. JPEG for MLS is standard. Need TIFF for print? Say so.
Pro Photographer Advice: Add one human line. “Homeowner is picky about green grass” or “Agent loves dark blue skies.” That one sentence has saved me more revisions than any preset.
What should I send an Editing company for Real Estate Photos
This is the heart of files to send for real estate editing. I’ll tell you what each file does, why editors beg for it, and the mistake I see every week.
RAW Files
RAW is the digital negative. It holds all the light data your sensor captured.
Why it matters: Last month I had a living room with bright windows. The JPEG had white blown-out squares. The RAW let the editor pull back the view of the pool outside. With JPEG, that detail was gone forever.
Send RAW for every interior, every twilight, every drone shot. CR2, NEF, ARW, DNG — all work.
Common mistake: shooting RAW+JPEG then only uploading the JPEGs to save time. You just threw away the good stuff.
JPEG Files
JPEGs are fine when speed beats quality. Think same-day Airbnb turnover shoots where the agent needs photos in two hours and you’re on hotel wifi.
Why it matters: they’re small. A 300-photo JPEG job uploads in 10 minutes. RAW would take an hour.
If you must send JPEG, export at highest quality, no extra sharpening.
HDR Brackets
This is three, five, or seven photos of the same room at different brightnesses.
Why it matters: your eye sees the bright window and the dark corner at the same time. Your camera can’t. Brackets let the editor blend them so windows look natural, not fake HDR glowy.
I always shoot 3 brackets at -2, 0, +2. For luxury homes with floor-to-ceiling glass, I do 5.
Common mistake: missing the middle exposure, or moving the tripod between shots. Then the set is useless.
Drone Photos
Send the RAW DNG from your DJI or Autel, not the little JPEG preview from your phone.
Why it matters: drone JPEGs get over-sharpened and the sky banding is terrible. The RAW lets us fix exposure and replace skies cleanly.
Add a note: “Shot at 120ft, facing south.” That helps with lot line overlays.
360 Photos and Panoramas
Don’t send the stitched tiny JPEG from the camera. Send all the original frames.
Why it matters: the in-camera stitch is low resolution and often crooked. Editors can stitch properly in PTGui with better control.
Floor Plans
For floor plan redraw or coloring, send a clear scan or PDF with measurements written on it.
Why it matters: I once got a blurry phone photo of a hand sketch taken at night. We guessed the bedroom size. The agent called back angry because the plan was wrong. Now I ask for measurements on every wall.
Twilight Photos
For day-to-dusk editing, send the actual blue-hour photo, not a daytime photo you want turned into night.
Why it matters: real twilight has soft ambient light in the sky. Fake dusk from noon looks fake. Shoot 20 minutes after sunset. Send that RAW plus a daytime reference so we know which lights to turn on.
Virtual Staging Reference Images
Don’t just say “stage it modern.” Send two or three photos from Pinterest.
Why it matters: modern to you might be Scandinavian white. Modern to your client might be dark industrial. A reference stops the back-and-forth.
Logos and Brand Guidelines
Put your transparent PNG logo in a folder called 07_References. Every time.
Why it matters: editors won’t hunt through old emails for your logo.
Time-Saving Tip: Build this folder once on your desktop. Copy it for every new property. You will never forget a file again.
RAW vs JPEG for Photo Editing
| Feature |
BEST QUALITY RAW |
FAST DELIVERY JPEG |
|---|---|---|
| Editing Flexibility | ✔ Recover blown windows and shadows. | ✖ Very limited recovery. |
| Dynamic Range | ✔ 12–14 Stops | ✖ Around 8 Stops |
| File Size | ✔ 25–45 MB | ✔ 5–12 MB |
| White Balance Recovery | ✔ Fully adjustable later. | ✖ Already baked into the image. |
| Sky Replacement | ✔ Clean edges with realistic results. | ✖ Often leaves white halos. |
| Window Pull | ✔ Natural window views. | ✖ Often gray and noisy. |
| Noise Reduction | ✔ Professional quality. | ✖ Compression reduces detail. |
| Best Use Cases | 🏡 Luxury Listings 📸 HDR Photography 🌇 Twilight Photography 🚁 Drone Photography | 🏠 Rental Listings ⚡ Fast MLS Uploads 📱 Social Media Posts 📤 Quick Delivery |
✅ Choose RAW
- Maximum editing flexibility
- Professional HDR processing
- Better sky replacement
- Natural window pulls
- Luxury property photography
⚡ Choose JPEG
- Smaller file sizes
- Faster uploads
- Quick property previews
- Rental listings
- Minimal editing needs
Simple decision: if the photo has a window in it, send RAW. If you are shooting 60 photos for a $150 rental and need them in 4 hours, JPEG is okay.
I learned this the hard way on a $2 million listing. I sent JPEGs to save upload time. The editor couldn’t pull the ocean view from the windows. We had to reshoot. That cost me more than the time I saved.
How to Organize Folders Like a Pro (And Why Editors Love You For It)
Editors open 40 jobs a day. If they open yours and see one folder with 400 files called IMG_0001 to IMG_0400, they sigh.
Here is the structure I use for every single property. Copy this exactly:
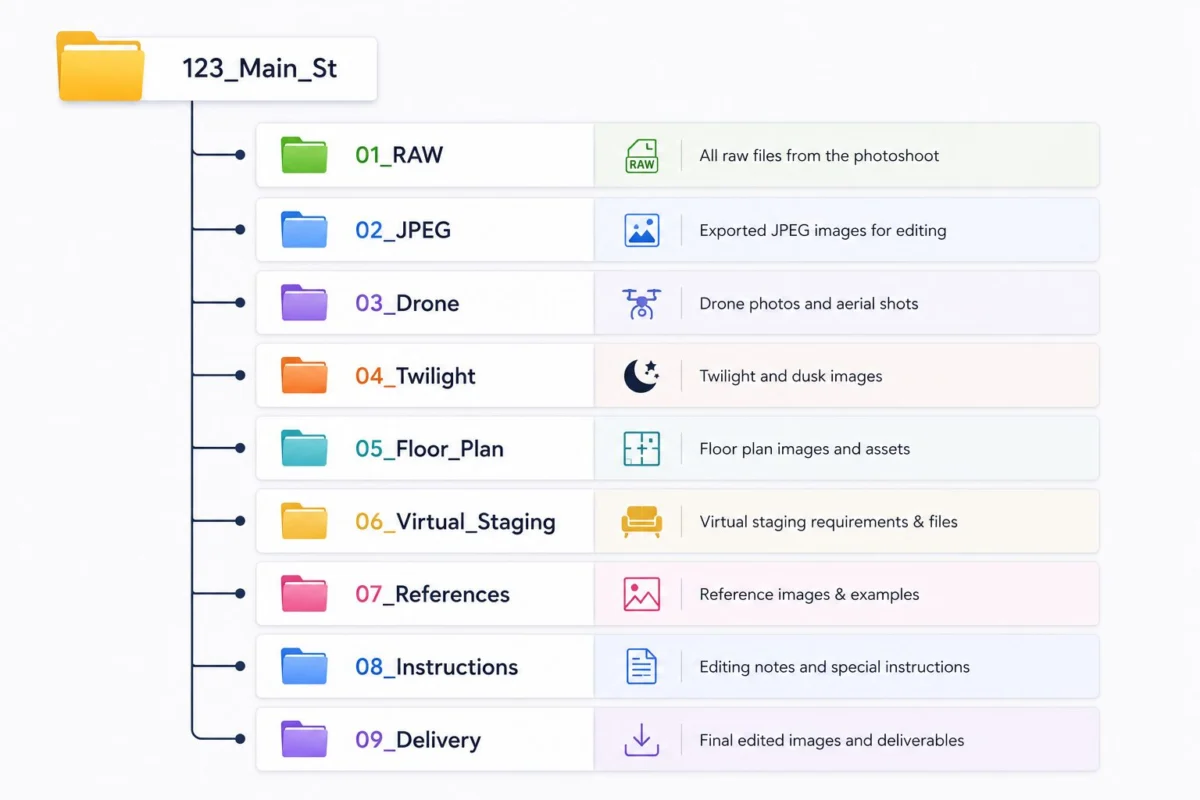
Why this works for real estate photo editing workflow:
- The editor knows where to look without asking
- Backup systems copy each folder separately
- Quality control checks RAW first, then drone
- If you forget twilight, the empty 04_Twilight folder reminds you
Number the folders. Dropbox and Google Drive sort alphabetically, so 01 comes before 02 every time.
Expert Tip: I keep a blank version of this on my desktop. Right click, duplicate, rename. Thirty seconds and I’m organized.
Naming Files So Editors Don’t Guess
Let me be blunt. IMG_4829.CR2 tells the editor nothing.
Good naming tells a story. When I see LivingRoom_01_Main.CR2, Kitchen_02_Island.CR2, MasterBed_01_Window.CR2, I know exactly what I’m editing.
Bad examples I see daily:
- DSC_4829
- IMG_0001
- _MG_1234
- Final_Edit2
Good examples that work:
- LivingRoom_01
- Kitchen_01
- Kitchen_02_Pantry
- MasterBed_01
- Bathroom_01_Vanity
- FrontExterior_01
- Drone_Front_01_120ft
- Twilight_Rear_01
Use underscores, not spaces. Keep it short. Lightroom can rename on export automatically. Set it once and forget it.
Why naming matters for MLS photo requirements and virtual staging: the stager needs to know which empty room is which. If everything is IMG, they guess and stage the wrong room.
Writing Editing Instructions That Actually Work
“Make it pop” is not an instruction. It’s a wish.
Here is what I write now. It takes five minutes and cuts my revisions by 80 percent. You can download my exact template:
My typical note looks like this:
Sky replacement: Blue sky, light clouds like reference in 07_References
Grass: Greener but natural, not neon green
TV: Remove glare, add neutral gray screen
Mirror in master bath: Remove me
Pool: Clean water, enhance blue slightly
Fireplace: Turn on, warm glow
Windows: Natural pull, keep the view, don’t blow out
Brightness: About 10 percent brighter than standard
Perspective: Correct verticals please
Object removal: Trash cans front left, hose on right side, my car in driveway
See the difference? Specific, short, human.
For object removal editing, I take an extra 30 seconds. I open the JPEG, use the markup tool on my phone, and circle the trash can. Editors love visuals.
Common Mistake: Writing a novel. Don’t write paragraphs. Bullet points win.
Where to Upload: Dropbox vs Google Drive vs WeTransfer
How you upload real estate photos changes your speed.
Best File Delivery Services for Real Estate Photographers
| Service | Speed | Storage | Ease of Use | Best For |
|---|---|---|---|---|
|
Dropbox Dropbox for photographers | ★★★★★ Very Fast | 2TB+ Plans | ⭐⭐⭐⭐⭐ Drag & Drop | Daily shooters handling multiple listings. |
|
Google Drive Google Drive photo delivery | ★★★★☆ Medium | Affordable upgrades | ⭐⭐⭐⭐☆ Excellent Sharing | Teams already using Gmail Workspace. |
|
WeTransfer WeTransfer | ★★★★★ Fast | 2GB Free / 200GB Paid | ⭐⭐⭐⭐⭐ No Account Needed | Single rush jobs and quick deliveries. |
|
OneDrive OneDrive | ★★★★☆ Good | Included with Microsoft 365 | ⭐⭐⭐⭐☆ Easy for Windows | Corporate clients and Microsoft users. |
|
FTP FTP Server | ★★★★★ Extremely Fast | Unlimited | ⭐⭐☆☆☆ Technical Setup | Studios transferring terabytes of files. |
My rule: if I shoot more than three houses a week, Dropbox. If it’s a one-off for a new agent, WeTransfer.
Always zip by folder, not one giant zip. Name it 123_MainSt_01_RAW.zip. And please test your link in an incognito window. I have clicked “access denied” links at midnight too many times.
How Professionals Handle Your Photos Once You Send Them
Knowing the real estate photo editing workflow helps you prepare better. Here is what happens after you hit send:
- Download: automated to a server
- Backup: two copies made immediately
- Verify files: they count brackets. If a set is missing the 0EV, they pause
- Sort folders: they check your naming
- Quality check: flag blurry or super dark shots
- Assign editor: HDR specialist gets interiors, twilight specialist gets dusk
- Editing: blending, sky replacement, grass enhancement, window pull, perspective correction
- Final QC: senior editor checks color consistency across the whole house
- Delivery: upload to your folder
When you send complete files with clear names, steps 3 to 5 take three minutes. When you send a mess, they take 30 minutes and your job drops in the queue.
What to Send for Each Specific Edit
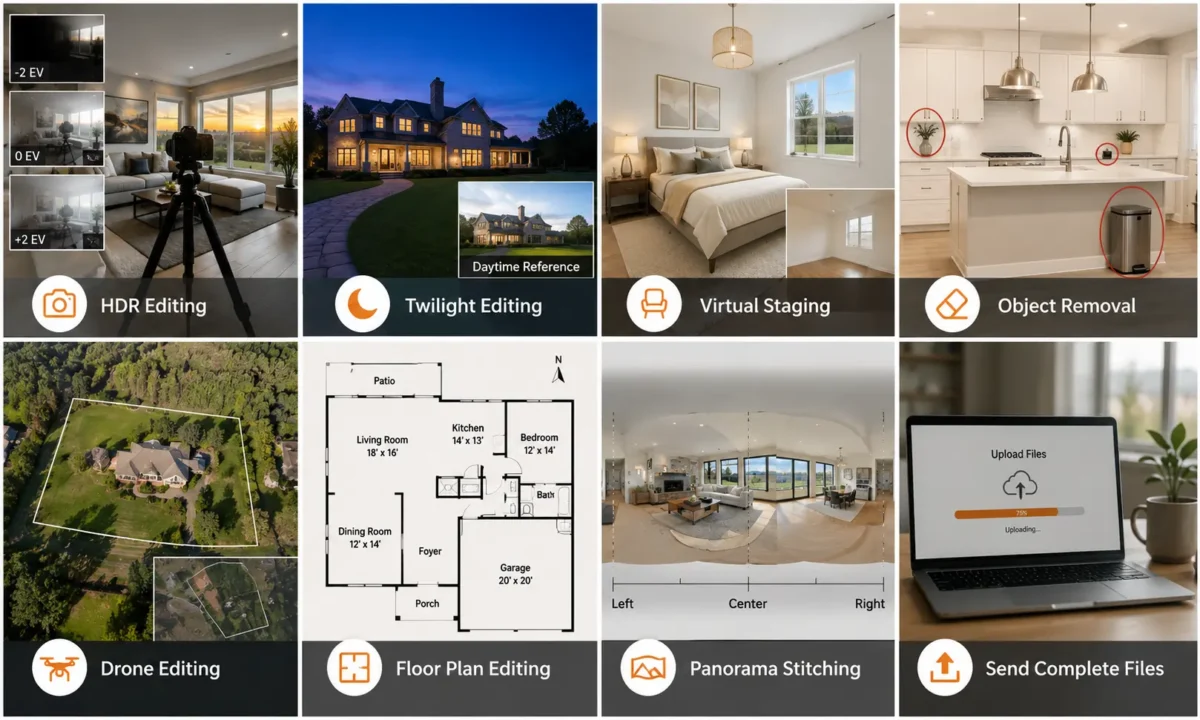
For HDR photo editing
Send 3 or 5 brackets, shot on tripod, manual mode, ISO 100-400. Don’t change anything between shots. Include all three files. Don’t send just the darkest and brightest hoping they’ll figure it out.
For twilight editing
Send the real blue-hour RAW. Shoot when the sky is deep blue, not black. Send a daytime photo too so the editor knows which interior lights to turn on. Tell them your sky preference: “dark blue, no clouds” or “purple sunset.”
For virtual staging files
Send the empty room shot from chest height in the corner. Send two angles if it’s a big room. Include room dimensions if you have them. Add style: “target buyers are young family, want modern farmhouse, see refs.” That beats “make it nice” every time.
For object removal
List everything. Power cords, trash cans, cars in driveway, for sale signs, garden hose, shadows of you, reflections in mirrors, construction tools, personal photos on walls. Circle them on a JPEG if you can.
For drone photo editing
Send RAW DNGs. Note flight height and direction. If you want lot lines drawn, include a screenshot from Google Maps with the outline. For drone photo editing, this saves an hour.
For floor plan editing
Send a clear sketch with measurements on every wall. Write room names. Mark north with a compass arrow. Include garage, patio, balcony, pool. A photo of graph paper is fine if it’s legible.
For panorama stitching
Send all frames with at least 30 percent overlap. Tell them left to right order. If it’s an HDR panorama, send full bracket sets for each position.
Here is that section rewritten the way I actually explain it to photographers on calls — just 6 mistakes, with the story behind each one:
The 6 Biggest Mistakes I Still See (And How to Fix Them)
1. Sending only JPEGs for interiors
I get it, RAWs are huge on hotel wifi. But JPEGs bake in the white balance and crush highlights. Last month a photographer sent JPEGs of a living room. The windows were pure white and I could not pull the pool view back. With RAW it takes 30 seconds. Shoot RAW+JPEG, upload RAWs for interiors, save JPEGs for quick rentals only.
2. Missing the middle bracket
You shoot 5 brackets but only send the darkest and brightest. The middle shot is the anchor. It holds the true wall color. Without it the blend looks fake. This happens when you cull too fast in Lightroom. Fix it by checking grid view before export. You should see three or five nearly identical thumbnails. If you see two, you missed one.
3. Leaving files named IMG_0001 with no folders
I opened a link last week called “New Folder (3)” with 412 files named DSC_0001 and up. No drone folder, no twilight folder. I spent 25 minutes just sorting. That delay costs you turnaround time. Fix it with the folder template and rename on export. In Lightroom set “Custom Name – Sequence” to LivingRoom_01. Takes 10 seconds once.
4. Writing “make it pop”
Pop means neon grass to one editor and a subtle brighten to another. I once added a bright blue sky because of that note, but the agent wanted soft clouds for a historic home. We wasted a revision. Be boringly specific: “blue sky with light clouds, grass natural green, windows natural pull.” Copy the same template each time.
5. Mixing two houses in one link or emailing files
You are rushed and drop House A and B into one Dropbox. Then House A gets House B’s sky. Or you email files and Gmail compresses them. Make one link per property, name the folder with the address. Use WeTransfer for rush jobs, never email.
6. Forgetting to say what you want for windows and sky
If you say nothing, editors guess. Some agents want bright white window pulls, others want natural. Same for sky. Add one line every time: “Windows: natural. Sky: blue, light clouds.” That single line cut my own revisions by more than half.
Your Ultimate Pre-Upload Checklist, Email Checklist, Project Instruction Excel
Choosing the Right Real Estate Photo Editing Company
Now you know exactly what should I send an editing company for real estate photos. The next step is finding a team that actually uses what you send.
After years of outsourcing, I look for a few things now. Not the cheapest price, but the least headache.
Look for experienced editors who know the difference between MLS and luxury. Look for clear communication — they should ask for a missing bracket instead of guessing. Look for a fair revision policy, fast turnaround, consistent quality, and secure file handling with Dropbox or Google Drive.
They should offer the full menu in one place so you are not emailing three companies.
A company like PixelShouters is a good example of this kind of workflow. I mention them because they built their process around organized uploads.
When photographers send proper RAW files and clear notes, their team can handle the whole list without drama:
Real Estate Photo Enhancement, HDR Editing, Day to Dusk Editing, Virtual Staging, Virtual Renovation, Object Removal, Sky Replacement, Grass Enhancement, Window Pull, Floor Plan Redraw, Floor Plan Coloring, Drone Photo Editing, Panorama Stitching, Image Brightening, Perspective Correction, Color Correction, Lawn Repair, TV Screen Replacement, Fire Replacement, Decluttering, and Item Removal.
I’m not here to sell you. I’m saying find a professional photo editing services partner who rewards good preparation. That’s how you stop living in revision emails.
FAQ: Real Questions From Photographers
Can I send JPEG only?
Yes, for quick rentals or when wifi is terrible. For anything with windows, send RAW.
Should I zip my files?
Yes, but zip by folder. Five small zips upload more reliably than one 18GB monster.
Can I use Google Drive?
Absolutely. Just set sharing to “anyone with the link.”
How do I send RAW photos?
Drag the.CR2 or.NEF files straight in. Don’t convert them.
What if I forgot a photo?
Upload it to the same folder and reply to your original email with the filename.
How many brackets should I send?
Three for most homes. Five for bright windows or luxury.
Can I request revisions?
Yes. Say “LivingRoom_01 – please make windows brighter” not “fix living room.”
What is the best upload method?
Dropbox for daily work. WeTransfer for one-offs.
Should I watermark before editing?
Please don’t. Send clean files, add watermark after.
Can I mix RAW and JPEG?
Yes, just keep them in separate folders labeled clearly.
How should I organize folders?
Copy my template above. It works.
What should I include for virtual staging?
Empty room photo, dimensions if you have them, style name, and two reference images.
What if my drone photos are overexposed?
Send the RAW anyway, and if you shot brackets, send those too.
How do I send a floor plan sketch?
Take a photo in good light or scan it. Write measurements clearly.
Can I send multiple properties together?
Don’t. It always gets mixed up. Separate links.
What naming convention is best?
Room_Detail_Number. Simple.
Should I include reference images?
Always for sky, grass, and staging style.
What turnaround details should I mention?
Write “24 hours by 6pm EST” not “quick.”
How do I avoid editing mistakes?
Be specific in writing. “Natural window pull” beats “fix windows.”
What information helps editors work faster?
Address, shoot type, and one line about client taste.
Can I send videos?
Yes, put in a Video folder and note if you need a thumbnail pulled.
Do you need my Lightroom edits?
No, but send a JPEG reference if you love a certain look.
Is FTP better than cloud?
Only if you’re sending hundreds of gigabytes weekly.
Final Word
If you take one thing from this, let it be this: great photos are not made in editing. They are made in the upload.
When you know what to send a real estate photo editor — the RAW files, the brackets, the clear names, the short note about the sky — you give them a chance to do their best work.
Build a repeatable process. Use the same folders every time. Use the same naming. Use the same instruction template. After three jobs, it becomes muscle memory. Your editor learns your style. Your turnaround gets faster. Your revisions disappear.
Companies like PixelShouters, or any good editing partner, can only deliver consistent results when you give them consistent, organized files. It’s a partnership, not magic.
Start tonight. Make that folder template. Download the checklist. On your next shoot, spend the extra ten minutes organizing before you upload. That ten minutes will save you two hours of revisions later. I promise.