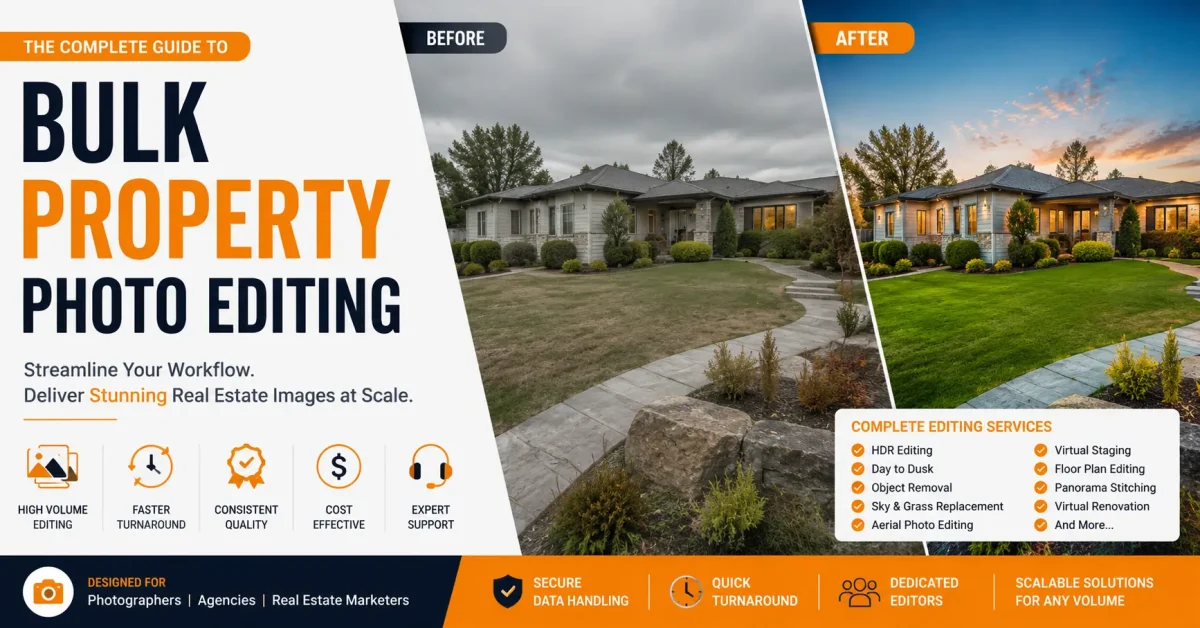
Bulk property photo editing helps real estate photographers, agencies, and property marketing teams deliver large listing galleries without inconsistent color, blown windows, crooked verticals, or missed deadlines.
Short answer: A dependable bulk real estate photo editing workflow combines culling, HDR or flambient blending, window pulls, vertical correction, color matching, MLS export sizing, and a final quality check. The goal is simple: every image in the property set should look consistent, natural, and ready for listing delivery.
Imagine: photographing 18 homes in one weekend. You get home Sunday night with 650 RAW files on three cards. Monday morning, three agents are asking for links. Each image needs brightness correction, window pulls, color correction, sky replacement, perspective correction, object removal, noise reduction, HDR blending, cropping, MLS sizing, renaming, and delivery.
That is the reality of bulk property photo editing. It is not just editing faster. It is building a system that handles volume without killing quality.
For photographers handling multiple shoots per week, the difference between a profitable editing system and a stressful backlog is not only better software. It is a repeatable real estate photo editing workflow, clear style standards, and a quality-control process that keeps every property gallery consistent.
This guide explains how high-volume real estate photo editing works, what services are usually included, where automation helps, and when outsourcing bulk property photo editing becomes the cleaner option.
Why Bulk Real Estate Photo Editing Becomes a Workflow Problem
Most tutorials show you how to edit one perfect kitchen. They do not show you how to edit 47 kitchens from seven different houses, shot in mixed light, with three different lenses, and deliver by 9am.
Bulk editing is a logistics problem first, creative problem second.
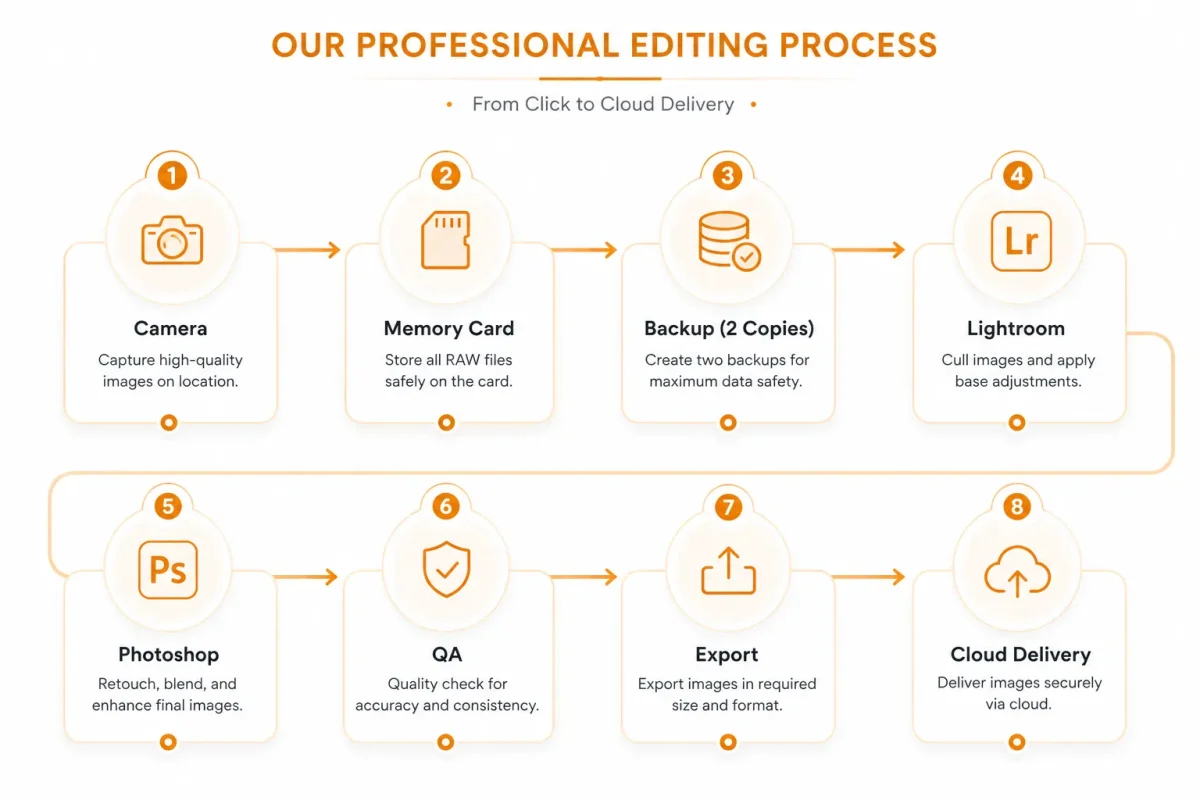
Here is the basic flow every high-volume studio uses:
Why each step matters:
- Import: If you dump everything into one folder, you will lose hours later. Good file organization prevents mistakes.
- Cull: Editing unculled images is the number one profit killer. Cull first, edit second.
- Batch Presets: This is where bulk real estate photo editing saves 70% of your time. Get 80% of the way there automatically.
- Manual Corrections: Windows, verticals, and color casts need human eyes. This is where consistency is won.
- Quality Check: One bad export can ruin a whole delivery. A second pair of eyes catches it.
- Export: MLS photo editing has strict size and compression rules. Automate it.
Key Takeaway: Bulk property photo editing is not about editing faster. It is about touching each image fewer times.
What Is Bulk Property Photo Editing?
In plain English, bulk property photo editing is the process of editing large property photo batches using a standardized system instead of editing each photo as a one-off project.
It combines batch photo editing tools, templates, and human quality control to deliver consistent real estate marketing images at scale.
Editing one vs fifty vs five hundred
One image: You can spend 12 minutes perfecting it. You adjust every slider by eye.
Fifty images: You need presets, sync settings, and a checklist. You spend 90 seconds per image.
Five hundred images: You cannot open each file individually. You need a real estate photo editing workflow with culling, AI culling, batch HDR, automated naming, and a dedicated QA person. Time per image drops to under 30 seconds for basic edits.
The software does not change much. The system does.
| Factor | Single Editing | Bulk Editing |
|---|---|---|
| Time | 5–15 minutes per image | 30–90 seconds per image |
| Consistency | Depends on editor and workload | Maintained with presets and style guides |
| Cost | Higher labor cost per image | Lower cost through volume processing |
| Automation | Minimal automation | Uses AI, batch presets, and sync tools |
| Manual Effort | 100% manual editing | 20–30% manual refinement |
| Quality | Highest possible image quality | Consistently high quality with hero-shot review |
| Scalability | Limited for large projects | Designed for high-volume production |
| Delivery | Manual export and upload | Automated export and client delivery |
Key Takeaway: If you shoot more than three properties per week, you are already in bulk territory, even if you do not call it that.
Who Needs Bulk Property Photo Editing?
- Real estate photographers. You are the core user. You shoot 200 to 800 images per day during peak season. Without a system for property photography editing, you become an editor who occasionally shoots.
- Real estate agencies and brokerages. In-house marketing teams need MLS-ready images in 12 to 24 hours. Consistency across listings builds brand trust.
- Vacation rental managers. Airbnb and Vrbo listings live or die on photos. You need 25 to 40 images per property, edited the same way every time, across 50 properties.
- Builders and developers. You shoot the same model home ten times with different finishes. Batch editing keeps the marketing pack consistent.
- Interior designers and architectural firms. You need real estate image enhancement that is accurate to color and material, not over-saturated.
- Property marketing companies. You offer floor plans, virtual staging, and video. Your editing is the bottleneck for delivery.
- MLS teams and portals. You process thousands of uploads daily. You need automated real estate retouching for basic corrections and flagging.
If you deliver more than 150 images per week, bulk workflows pay for themselves.
Bulk Real Estate Photo Editing Workflow
This is the exact workflow used by most professional property editing teams.
1. Planning and shooting for editing
Shoot brackets for HDR. Keep white balance consistent. Use a color checker in the first shot of each room.
2. File organization
Create: 2026-06-27_123_MainSt/01_RAW/02_Selects/03_Edits/04_Exports. Never mix RAW and JPEG.
3. RAW backup
Copy cards to two drives before formatting. For editing large property photo batches, a lost card means a reshoot.
4. Culling
Use Photo Mechanic, Lightroom, or AI culling. Aim for 20 to 30 final images per house, not 120.
5. Color correction and base preset
Apply lens correction, camera profile, and white balance sync. This is the foundation of real estate photo enhancement.
6. HDR merge or flambient blend
For HDR property photo editing, merge 3 to 5 brackets. For flambient, blend flash and ambient layers in Photoshop.
7. Perspective and vertical correction
Fix converging verticals. This is non-negotiable for MLS photo editing.
8. Window pulls and sky replacement
Mask windows to recover exterior detail. Replace blown skies only when it matches the actual weather.
9. Object removal and cleanup
Remove cords, trash cans, and minor distractions. Keep it ethical. Do not remove permanent fixtures.
10. Local adjustments
Brighten shadows, recover highlights, enhance grass, clean pools.
11. Virtual staging and day to dusk editing
Add furniture to empty rooms or convert daytime exteriors to twilight when requested.
12. Noise reduction and sharpening
Apply carefully, especially for twilight and interior shots.
13. Export and naming
Export for MLS, web, and print. Use consistent naming: Address_Room_01.jpg.
14. Quality check
Check 100% zoom on hero shots. Check color consistency across the set.
15. Client delivery
Deliver via cloud with organized folders.
Common Problems in High-Volume Property Photo Editing
Large file sizes. RAW brackets multiply storage needs. Solution: cull before editing, archive after 90 days.
Mixed lighting. Tungsten, LED, daylight in one room. Solution: shoot a gray card, correct white balance in batches by room.
Window exposure. The classic problem. Solution: real estate HDR editing or flambient blending, not just highlight slider.
Different camera settings. Second shooters change settings. Solution: standardize cameras and create import presets.
Tight deadlines. Next-morning delivery is standard. Solution: split workflow into batch and manual shifts.
Revision requests. “Make it brighter.” Solution: keep a style guide with sample images approved by the client.
Consistency. This is the hardest part of bulk property photo editing. Solution: calibrated monitors, fixed presets, and human QA.
Storage and naming. Chaos kills speed. Solution: YYYY-MM-DD_Address structure, never deviate.
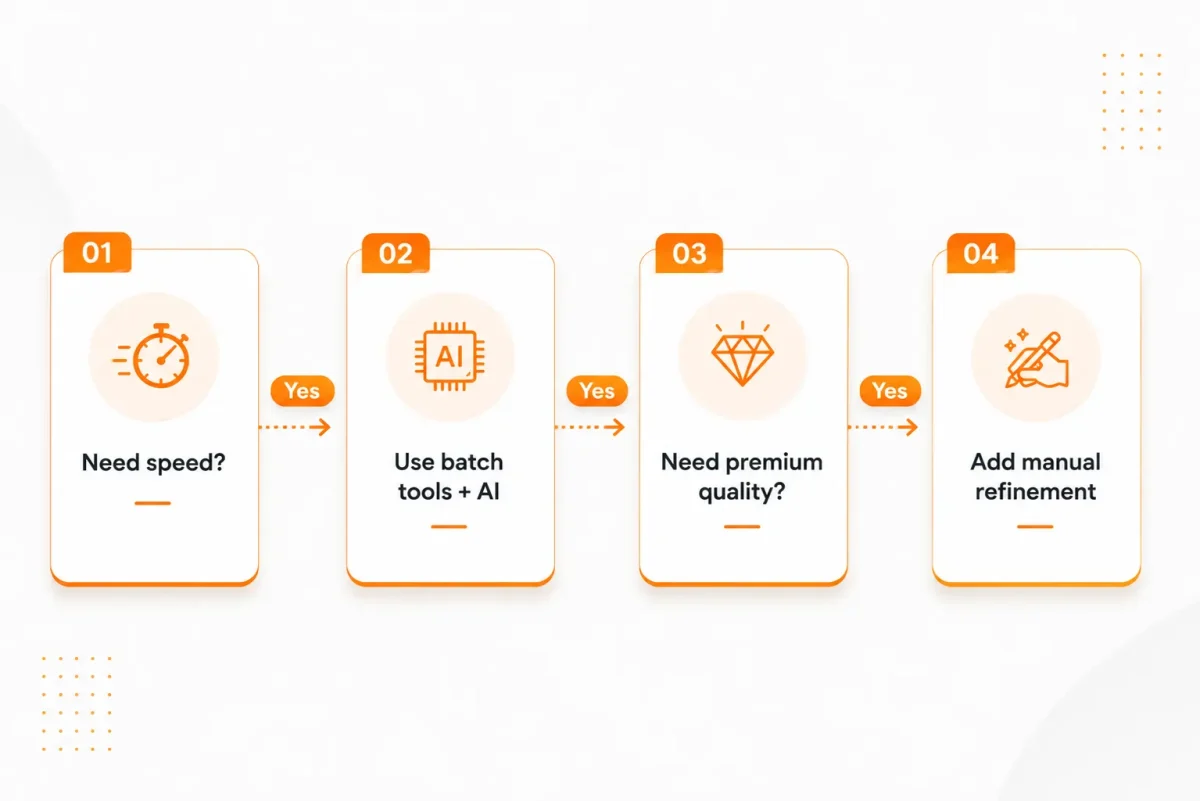
Batch Editing vs Manual Editing
Automation is great for 80% of the work. Humans are essential for the final 20%.
Use batch for: lens correction, base exposure, white balance sync, noise reduction, initial cropping, file renaming, MLS resizing.
Use manual for: window masking, complex object removal, perspective correction on wide angles, color casts on white walls, reflections in mirrors, luxury interior details, twilight conversions that need realistic lighting.
Example: A batch preset can fix 200 images in 10 minutes. But it will make the white kitchen cabinets yellow if you do not manually set white balance on the gray card. That one manual fix, synced to the whole kitchen, saves the set.
Best Software for Bulk Real Estate Photo Editing
Do not chase the newest tool. Build a stack that works together.
Lightroom Classic. The hub for high volume photo editing. Excellent for culling, batch sync, presets, and export. Weak for complex masking.
Photoshop. Essential for real estate image editing: window pulls, object removal, sky replacement, flambient blending, and perspective work. Actions automate repetitive tasks.
Capture One. Better color engine for some cameras. Preferred by architectural photographers who need precise color.
Photomatix / Aurora HDR. Fast HDR property photo editing. Good for natural-looking merges when time is short.
Luminar Neo. Useful AI sky replacement and relighting for quick turnarounds. Can look fake if overused.
Photoshop Actions and Droplets. Create one-click workflows for resizing, sharpening, and watermarking.
The best setup is usually Lightroom plus Photoshop. Everything else is a specialist tool.
How AI Helps (and Where It Fails)
AI is now part of every real estate editing company workflow.
Where AI works well:
- Initial culling and blur detection
- Sky replacement on simple horizons
- Object removal for small distractions
- Auto masking for sky, subject, and floor
- Batch upscaling and noise reduction
Where AI fails:
- Perspective correction in tight bathrooms
- Natural window pulls with curtains
- Color accuracy for paint and finishes
- Keeping verticals straight without warping furniture
- Luxury interiors where shadows matter
- Reflections in mirrors and glass
- Grass enhancement that does not look radioactive
Use AI to get to 80%. Use humans for the last 20% that clients actually notice.
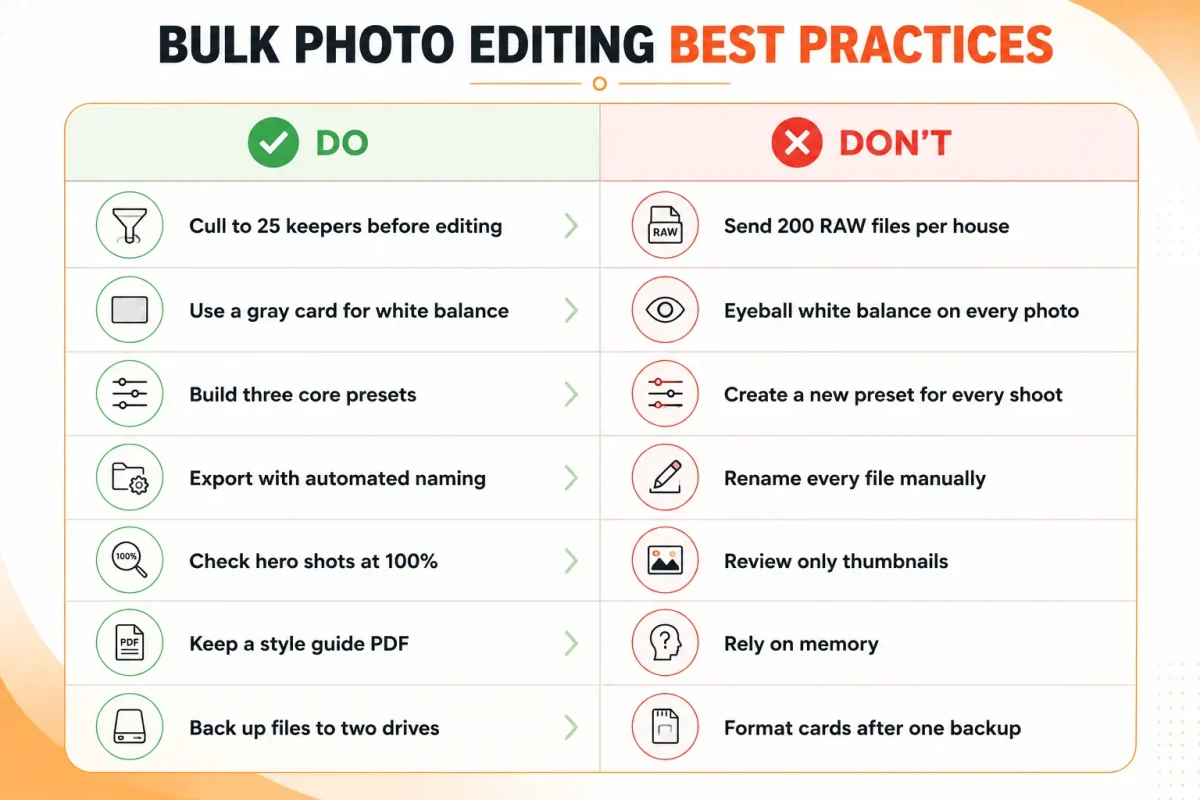
How Professionals Maintain Consistency
Consistency is the product in bulk property photo editing.
- Create three master presets: Bright Day, Twilight, and Overcast
- Use a white balance reference shot in every property
- Calibrate monitors monthly with a hardware calibrator
- Set exposure standards: interiors at -0.3 to 0, exteriors at -0.7
- Build a 10-point checklist for QA
- Use a second editor for double review on first-time clients
- Save style guides with before and after examples
- Lock export settings for MLS photo editing to avoid compression artifacts
Key Takeaway: Clients do not hire you for one perfect photo. They hire you for 30 photos that all look like they belong together.
Common Real Estate Photo Editing Services Included
HDR Editing and Flambient Blending
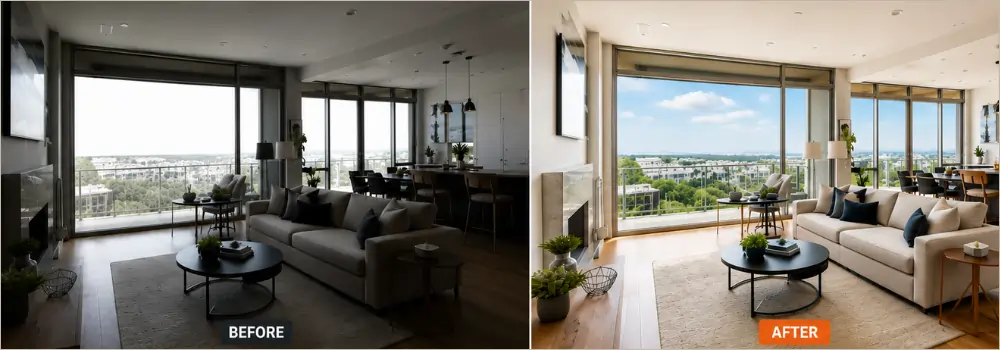
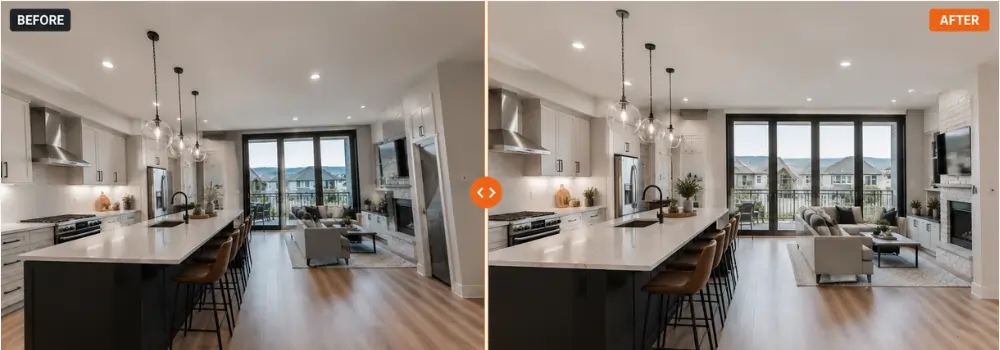
This is the core of real estate HDR editing. HDR merges 3 to 5 bracketed shots so you keep detail inside the room and outside the window at the same time. Flambient is a mix of flash and ambient light. You shoot one natural exposure and one with flash, then blend them in Photoshop.
Use HDR for speed on standard listings. Use flambient for luxury kitchens and living rooms where color accuracy matters. The mistake is pushing HDR too far, it makes interiors look like a video game. Good blending looks like what your eye saw, not what the camera captured.
Perspective and Vertical Correction
Wide lenses make walls lean in. This service straightens them. Editors use the vertical and horizontal sliders to pull door frames and cabinets back to true.
It is non-negotiable for MLS photo editing. Buyers subconsciously distrust leaning walls.
Pro tip: do not correct 100%. Leave a tiny bit of natural perspective or the room feels flat and fake. Always crop after you correct, you lose edges.
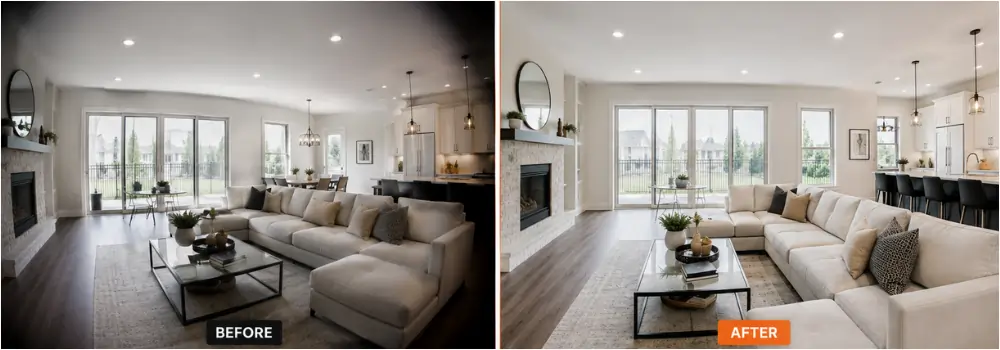
Color Correction
Mixed lighting is the nightmare of property photography editing. You have warm tungsten lamps, cool window light, and greenish LEDs in one shot.
Color correction neutralizes that mess. Editors set white balance off a gray card, then balance each light source separately. The goal is not “pretty” color, it is accurate color. Paint colors, wood floors, and countertops must match reality or you get callbacks from angry agents.
Lens Correction and Distortion Removal
Every wide lens bends straight lines and darkens corners. Lens correction fixes barrel distortion and vignetting automatically using your lens profile.
Do this first in your workflow, before any other edit. If you skip it, your vertical correction will never look right. This is pure batch work, one click syncs to the whole shoot.
Window Masking and Window Pulls
This is the skill that sells real estate image enhancement.
A window pull takes the properly exposed view from your dark bracket and masks it into the bright interior shot. Good masking keeps the window frame crisp, keeps curtains natural, and avoids the white halo around edges.
For bulk property photo editing, editors save window masks so revisions are fast. Bad window pulls look cut out. Good ones look like you had perfect light.
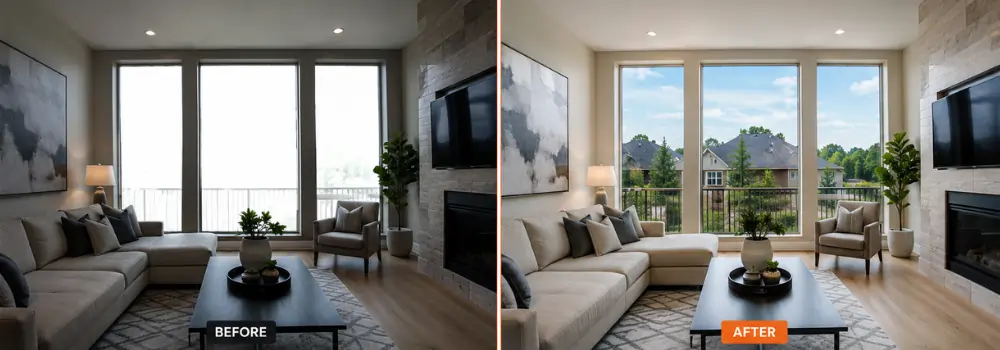
Sky Replacement

Replaces a blown-out white sky or dull gray sky with a natural blue sky with clouds.
Use it sparingly and ethically. Only use skies that match the actual weather and light direction that day. If the shadows point left, do not add a sunset on the right. For high volume photo editing, most teams keep a library of 20 approved skies to keep consistency.
Overdone skies are the fastest way to make a listing look fake.
Object Removal

Part of standard real estate retouching. This removes small distractions: power cords, trash cans on the curb, toilet brushes, for-sale signs in reflections, your own tripod in mirrors, cars in the driveway.
What it does not do: remove permanent defects like cracked driveways, water stains, or neighboring buildings. That crosses into misleading advertising. Good editors will refuse those requests.
For speed, give your editor a checklist: “remove all cords and small trash.”
Virtual Staging
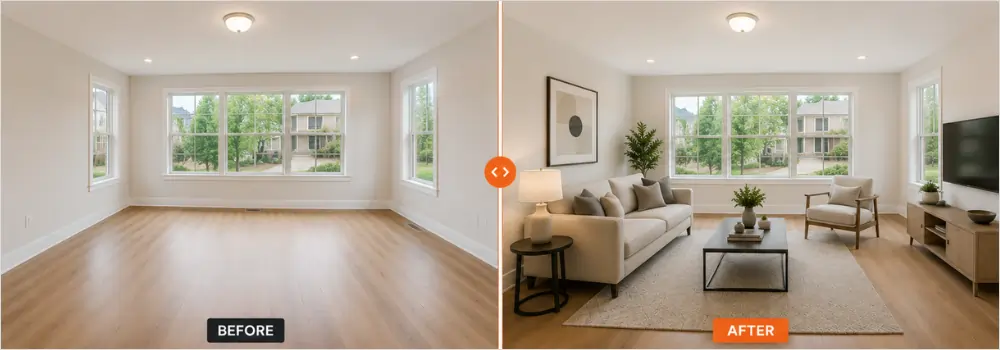
Adds digital furniture to empty rooms. It is the most requested add-on in property photo editing services right now.
You send an empty, well-lit photo. The editor adds a couch, rug, coffee table, and art that fits the room’s perspective and lighting. It costs a fraction of physical staging and helps buyers understand scale.
Provide the style you want: modern, farmhouse, mid-century. And always disclose it is virtually staged in the MLS listing.
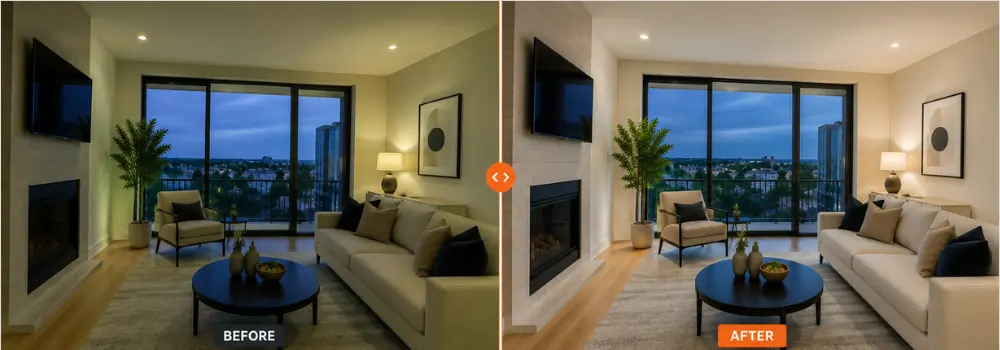
Day to Dusk Editing
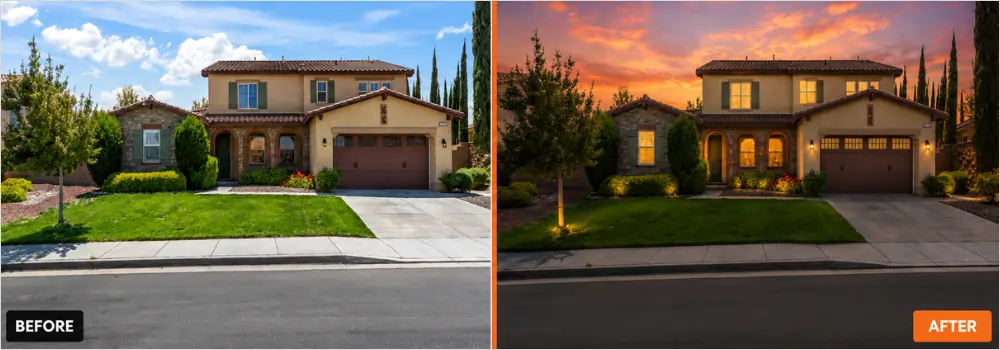
Converts a daytime exterior photo into a twilight shot with glowing windows and dramatic sky.
Editors darken the sky, add warm light inside windows, turn on exterior lights, and boost landscape lighting. It works best on photos shot in soft overcast light, not harsh midday sun.
This is a hero image service. Use it for the main photo only, not all 30 images. It stops the scroll on real estate marketing images.
Grass Enhancement and Landscape Cleanup
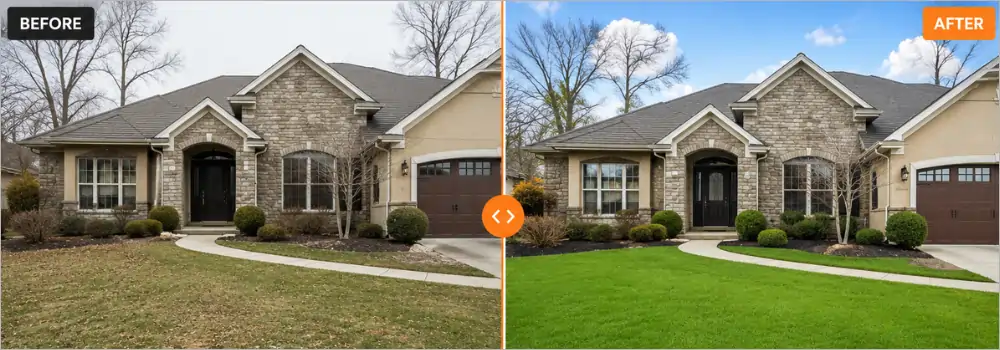
Boosts dull, patchy, or winter lawns to healthy green. Also cleans up dead spots, leaves, and brown patches.
The key is restraint. Good grass enhancement raises luminance and adds a little saturation. Bad grass looks neon and radioactive. Pair it with minor landscape cleanup like removing a hose or trash bin.
Always do this after color correction, or the grass color shifts again.
Aerial Image Editing
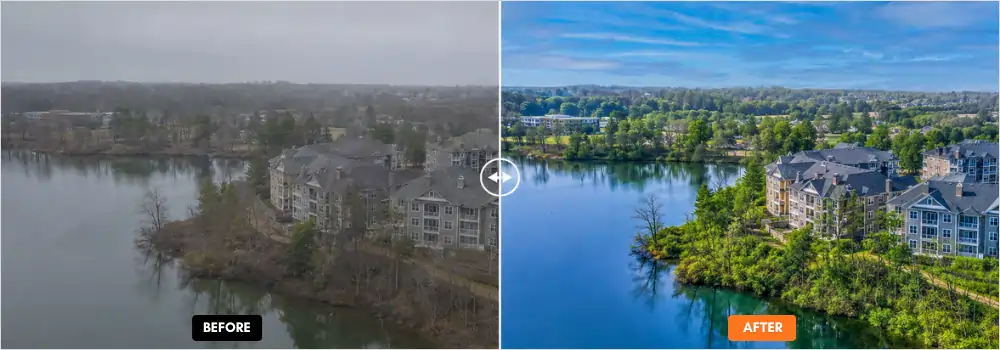
Drone photos need different work than interiors. This service corrects color cast from haze, boosts contrast, straightens horizons, and does sky replacement on wide aerials.
For real estate editing companies handling developments, this also includes removing construction vehicles, enhancing water in lakes, and balancing exposure across large areas. Because drone files are huge, this is often done separately from the interior batch.
Panorama Stitching
Stitches multiple overlapping shots into one wide view for tight bathrooms, small bedrooms, or backyard overviews.
Good stitching requires 30% overlap when shooting and a level tripod. Editors blend the images, fix seams, and correct distortion at the edges. For 360 tours, they also create the full spherical panorama.
This is essential for editing large property photo batches for luxury homes where one photo cannot capture the space.
Floor Plan Editing and Colorization
Takes a hand-drawn scan or black-and-white PDF and turns it into a clean, colored, branded floor plan.
Editors straighten lines, fix text, add color to rooms, place furniture icons, and add your logo and north arrow. For property marketing companies, this is often delivered with the photo set as a package.
Send the highest resolution scan you have. Low-res scans turn into blurry plans.
Noise Reduction and Sharpening
Low light interiors create grain, especially at ISO 800 and above. Noise reduction smooths that grain without making the image plastic. Sharpening brings back detail in wood grain, tile, and fabric.
This must be done at the RAW stage, not after export. For bulk workflows, editors apply light noise reduction to the whole batch, then add extra to twilight and basement shots only. Over-sharpening creates halos around windows, which is a dead giveaway of amateur work.
Image Resizing for MLS
Every portal has different rules. Zillow, Realtor.com, and local MLS systems reject images that are too large or too small.
This service exports each final image to the exact specs: usually 2048 pixels on the long edge, sRGB color, under 15MB, with correct file naming. For high volume photo editing, this is automated with export presets so 300 images are sized correctly in one click.
It saves hours of re-exporting and prevents upload errors on deadline day.
Virtual Renovation
Goes beyond staging. It digitally renovates a space: changes wall color, updates old cabinets, removes a wall, replaces flooring, or modernizes a dated bathroom.
It is used for investors and pre-sale visualization. It requires more Photoshop skill because lighting and shadows must match the new materials. Always label these images as “virtually renovated” to stay compliant.
This is the most time-intensive service, so it is never included in basic bulk packages, it is priced per image.
Key Takeaway: In a true bulk workflow, about 70% of these services are batched, 30% are hand-done. The best property photo editing services tell you exactly which is which, so you know where your money goes.
Outsourcing Options for Scaling
When you shoot more than you can edit, you have three choices: hire in-house, build automation, or outsource property photo editing.
Many editing companies now offer complete bulk property photo editing packages instead of individual services. This is where volume discounts and dedicated editors make sense.
PixelShouters, for example, provides the full stack that high-volume photographers use: HDR editing, real estate photo enhancement, object removal, virtual staging, sky and grass replacement, day to dusk conversion, panorama stitching, aerial photo editing, floor plan editing, and virtual renovation. They work as an extension of your workflow, not a one-off vendor, which is what you need when you are editing large property photo batches weekly.
The key is not the brand name. It is finding a real estate editing company that offers human QA, consistent style matching, and fast photo editing turnaround.
How to Choose a Bulk Real Estate Photo Editing Service
Use this checklist before you commit:
- Experience with real estate image enhancement, not just general retouching
- Consistency across 50+ image sets
- Turnaround time guarantees for standard and rush orders
- Clear revision policy
- Transparent pricing by service type
- Secure upload portal
- Dedicated editor who learns your style
- Sample edits on your own images
- Communication during your working hours
- Scalability for peak season
Quick Checklist:
✔ Fast delivery (12 to 24 hours)
✔ Consistent colors
✔ Human QA on every image
✔ Transparent pricing
✔ Dedicated editor
✔ Secure uploads
✔ Revision support
✔ Style guide onboarding
Bulk Property Photo Editing FAQs
1. What is the difference between bulk property photo editing and batch editing?
Batch editing applies the same preset to many photos at once. Bulk property photo editing is the full system: culling, batch presets, manual retouching, QA, and delivery. Batch is one tool inside the bulk workflow. Professionals use batch for speed, then add manual work for quality.
2. How long does it take to edit 300 real estate photos?
With a solid workflow, culling takes 30 minutes, batch corrections take 45 minutes, and manual work on 60 hero images takes about 2 hours. Total is 3 to 4 hours in-house, or 12 to 24 hours if you outsource property photo editing to a team working overnight.
3. Can AI fully replace human editors for real estate?
No. AI is excellent for sky replacement, initial masking, and noise reduction. It struggles with perspective, natural window pulls, accurate color for paint, and luxury details. The best results combine AI speed with human QA for real estate image enhancement.
4. What is included in a standard bulk editing package?
Typically: HDR blending, color correction, vertical correction, lens correction, brightness adjustment, sky replacement, and MLS resizing. Advanced services like object removal, virtual staging, and day to dusk editing are usually add-ons.
5. How do I maintain consistency across different photographers?
Create a style guide with before and after examples, fixed white balance targets, and export settings. Use the same presets across all cameras. Have one editor or one real estate editing company handle final QA.
6. What file format should I send for bulk editing?
Send RAW files for best quality, especially for HDR property photo editing. If you shoot brackets, send all exposures. Send JPEG only if you need quick turnaround and have perfect in-camera settings.
7. Is virtual staging worth it for bulk workflows?
Yes for vacant listings. It costs less than physical staging and increases engagement. Provide your editor with furniture styles that match the property. Keep it realistic to avoid misleading buyers.
8. How much does outsource property photo editing cost?
Pricing depends on volume, complexity, and turnaround. Basic batch editing costs less than flambient blending or virtual staging. Most property photo editing services offer tiered pricing with discounts over 500 images per month.
9. What is the best software for high volume photo editing?
Lightroom Classic for organization and batch, Photoshop for retouching. Add Photomatix for fast HDR. This combination handles 90% of real estate photo editing workflow needs.
10. How do I prepare images for MLS photo editing?
Export at MLS required dimensions, usually 2048px on the long edge, under 15MB, sRGB color space, 72 to 150 dpi. Do not add borders or heavy watermarks unless allowed.
11. What is day to dusk editing and when should I use it?
Day to dusk converts a daytime exterior to twilight with glowing windows and dramatic sky. Use for hero shots on premium listings. It works best on clear-sky images shot at dusk or late afternoon.
12. How do I handle revisions with an editing company?
Send marked screenshots with clear notes. Keep a master style guide. Good professional property editing partners offer 1 to 2 free revisions and learn your preferences over time.
13. Should I edit on a laptop or desktop for bulk work?
Desktop with calibrated monitor for color-critical work. Use laptop with smart previews for culling and travel. Always do final QA on a calibrated screen.
14. What is flambient vs HDR?
HDR merges multiple natural exposures. Flambient blends flash and ambient exposures for cleaner windows and more natural color. Flambient takes longer but looks premium, ideal for luxury real estate photo enhancement.
15. How do I speed up photo editing turnaround?
Cull before uploading, use consistent naming, provide a style guide, batch similar properties together, and avoid rush orders when possible. Outsourcing to a team in a different timezone gives overnight delivery.
16. Can I automate object removal?
AI tools can remove small items like cords and trash cans. Large object removal, like cars or furniture, still needs manual Photoshop work to look natural, especially in reflections.
17. What is the biggest mistake in editing large property photo batches?
Editing before culling. You waste hours on images the client will never use. Cull to 20 to 35 final images per property first.
18. How do I choose between in-house and outsourcing?
If you edit more than 15 hours per week, calculate your hourly shooting rate versus editing cost. Most photographers earn more shooting while a real estate editing company handles bulk work.
19. Do I need panorama stitching for real estate?
Yes for large rooms, small spaces, and 360 tours. Shoot with 30% overlap and level tripod. Good stitching is part of professional property photography editing.
20. How do I protect client images when outsourcing?
Use services with secure portals, NDAs, and EU or US data compliance. Avoid email or free file shares for large batches. Reputable property photo editing services encrypt uploads.
Conclusion
Bulk property photo editing is not a filter. It is a system. The photographers who scale do not edit faster, they edit less. They cull ruthlessly, batch intelligently, and reserve manual work for the details that sell homes.
Start by documenting your current real estate photo editing workflow. Build three presets. Automate your exports. Add a QA checklist. Then decide what to keep and what to delegate.
When you are ready to scale, partner with professional property editing teams that understand high volume, not just single-image retouching. The right partner will learn your style, protect your turnaround, and free you to shoot more.
Improve the workflow first. The speed will follow.