
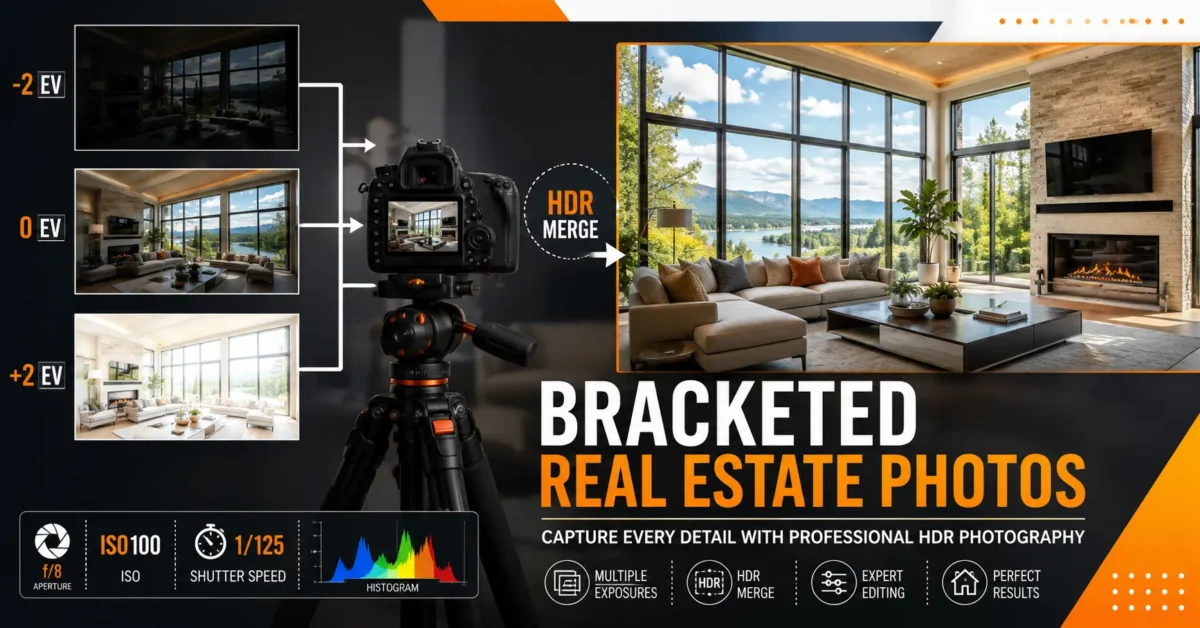
Quick answer: Bracketed real estate photos are multiple RAW exposures of the same composition, captured at different shutter speeds and blended into one finished image. A typical three-frame set at -2, 0, and +2 EV preserves bright window detail, natural midtones, and clean shadow information.
High-contrast interiors create a simple capture problem: expose for the room and the windows can turn white; expose for the exterior view and the room becomes too dark. Bracketing records both ends of that tonal range so the final property photo can show a bright interior and controlled window detail without pushing one RAW file beyond its limits.
Your eyes can see both the sofa and the sunset at the same time. Your camera cannot. The sensor simply does not have enough dynamic range to hold detail in the brightest highlights and the deepest shadows in one frame. Bracketing solves this by giving you multiple versions of the same scene at different brightness levels, so you can later combine the best parts of each.
This guide covers exposure spacing, camera settings, AEB setup, field workflow, Adobe Lightroom and Photoshop editing, window pulls, HDR versus flambient, delivery settings, and the quality checks that keep a full property gallery natural and consistent.
Table of Contents
What Are Bracketed Real Estate Photos?
Bracketed real estate photos are a sequence of images taken of the exact same composition at different exposure levels. Instead of taking one photo, you take three, five, seven, or even nine frames, each brighter or darker than the last. Later, you merge them to create one image that holds detail everywhere.
The core technique behind it is called exposure bracketing. In real estate photo bracketing, you typically keep aperture, ISO, and white balance locked, and only change shutter speed. This keeps depth of field and noise consistent while shifting how much light the sensor collects.
Why do we need this? A modern home interior is a dynamic range nightmare. You might have 14 to 18 stops of contrast between the dark corner behind a sofa and the sunlit patio outside. Most full frame cameras can capture about 12 to 14 stops in a single RAW file. The result is you have to choose. Single exposure photography forces a compromise. Bracketed photography gives you options.
For interior real estate photography, this matters more than any other genre. You are selling space, light, and view. If the windows are white, you lose the view. If the room is dark, you lose the space.
Why Real Estate Photographers Use Bracketing
A common failure is a bright interior with a completely white window, even when the exterior view is a key selling feature. A dedicated dark bracket gives the editor usable window detail, while brighter frames preserve the room and shadowed corners.
Here is where bracketed real estate photos become non negotiable.
Bright window photography: In any room with a view, you need a dark frame to hold the outside exposure. That frame becomes your window pull.
Dark interiors and historic homes: Old homes have small windows and deep rooms. You need bright frames at +2 and +3 EV to lift shadows without creating horrible noise.
Mixed lighting: Kitchens with warm under cabinet lights and cool daylight from windows. Bracketing gives you clean color data to balance later.
Luxury homes and commercial buildings: High end clients pixel peep. They want clean highlights on marble, detail in dark wood, and a view. Only multiple exposure photography delivers that.
Vacation rentals and Airbnb: Guests book what they see. Bright, airy, window to window sharp images get more clicks. HDR real estate photos create that bright, inviting look.
Architectural photography: For architects, straight lines and accurate tonal range matter more than speed. Bracketing plus careful exposure blending keeps materials looking true.
HDR Bracketing Workflow
Compact Circular View
How Exposure Bracketing Works
Understanding light is more important than any preset.
Camera metering: Your camera’s evaluative metering tries to make everything 18 percent gray. In a bright room it will underexpose. In a dark room it will overexpose. Bracketing frees you from trusting the meter.
Exposure compensation and EV: Each stop of EV doubles or halves the light. For real estate HDR editing, we usually bracket in 1 or 2 stop increments. A 2 stop gap is faster and often enough. A 1 stop gap gives smoother blending but more files.
Dynamic range: Think of it as the bucket size. Your eye is a huge bucket. Your camera is a smaller bucket. Bracketing lets you fill multiple small buckets and pour them into one big final bucket.
Auto Exposure Bracketing (AEB): The camera automatically shoots your sequence. You set the number of frames and the EV step, hold the shutter, and it fires -2, 0, +2 for example. This is how 90 percent of pros work.
Manual Bracketing: You shoot in manual mode and change shutter speed yourself using the dial. Useful when you want more than 3 frames or want to include a very dark frame for window pull editing like -3 EV.
How Bracketing Modes Compare
AEB Modes Compared
| Mode | How It Works | Pros | Cons |
|---|---|---|---|
| AEB 3 frames at 2 EV | Camera fires -2, 0, +2 | Fast, reliable, most cameras support it | May not be enough for very contrasty scenes |
| AEB 5 frames at 1 EV | -2, -1, 0, +1, +2 | Smoother gradients, better for HDR blending | More files to store |
| Manual 7 frames | You dial -3 to +3 | Full control, includes dedicated window frame | Slower, requires tripod discipline |
7-Frame EV Ladder
Darkest to Brightest – What Each Frame Saves
Best Camera Settings for Bracketed Real Estate Photography
Forget auto. For consistent bracketed real estate photography, you lock everything except shutter.
ISO: 100 to 400 base. Never auto. High ISO adds noise that shows up badly when you lift shadows from bright frames.
Aperture: f/7.1 to f/8 for full frame. This is the sweet spot where most wide angle lenses are sharpest corner to corner. For APS-C, f/6.3 to f/7.1. Avoid f/11 and smaller, you will get diffraction softness.
White Balance: Set to Daylight 5200K or Auto but shoot RAW. Locking it helps batch consistency. Do not use mixed Kelvin between rooms.
RAW: Always RAW. You need the extra bit depth for white balance correction and highlight recovery.
Tripod: Non negotiable. Even 1 pixel of shift makes HDR merge ghost. Use a sturdy tripod with a level.
Remote Trigger / 2 second timer: Prevents camera shake during bracketing burst.
Shutter: Let this float. In a bright living room, your base might be 1/30s. In a dark basement, it might be 1 second. That is normal.
Histogram: Your best friend. The darkest frame should have highlights just touching the right edge. The brightest frame should have shadows lifted off the left edge.
Focus: Manual focus after autofocusing once. Use single point AF on the main subject, then switch to MF so focus does not drift between frames.
Lens: 16-35mm full frame equivalent. Tilt shift for high end architecture, but a good 16mm with profile correction works for 95 percent of work.
Grid / Level: Turn on electronic level and grid. Straight verticals in camera save hours in real estate photography editing.
Recommended HDR Bracketing Settings
| Setting | Recommended Value | Why It Matters | Common Mistake | Professional Tip |
|---|---|---|---|---|
| ISO | 100-200 | Clean shadows for HDR merge | Using Auto ISO 1600 | Base ISO for bright frames, still looks clean |
| Aperture | f/7.1 to f/8 | Sharp corners, deep depth of field | f/2.8 or f/16 | Test your own lens; f/7.1 to f/8 is a common starting range |
| Shutter | 1/60 to 2 sec | Only variable in bracketing | Using fixed shutter | Check histogram, not screen brightness |
| White Balance | 5200K RAW | Consistent batch editing | AWB jumping room to room | Shoot a gray card in first room |
| File Type | RAW | Maximum dynamic range | JPEG bracketing | RAW gives 2 extra stops to recover |
| Focus | AF then MF lock | No focus breathing between frames | Continuous AF | Tape focus ring for long shoots |
How Many Bracketed Photos Do You Need?
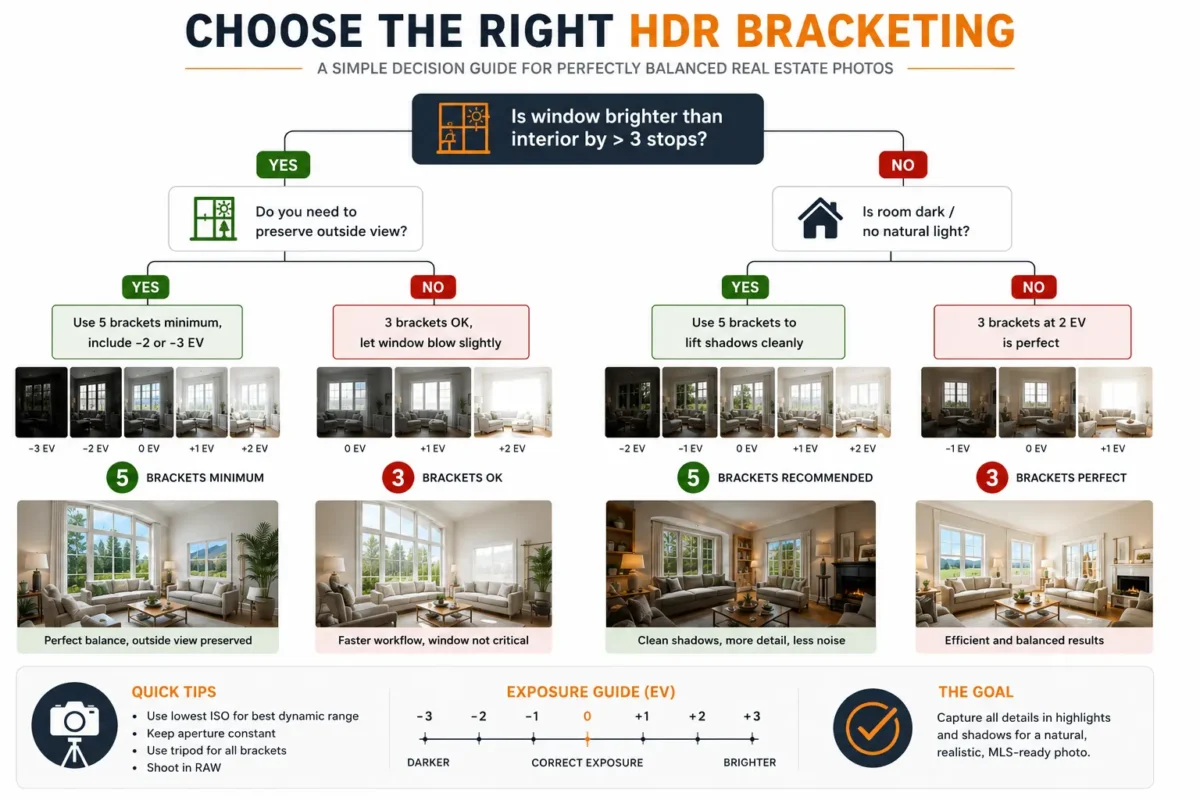
The right bracket count depends on the scene’s dynamic range, not on using the highest number the camera offers.
3 photos at 2 EV (-2, 0, +2): A fast starting point for evenly lit homes, condos, and newer interiors. Confirm that the darkest frame protects the exterior highlights and the brightest frame records clean shadow detail.
5 photos at 1 or 2 EV: A practical choice for dark kitchens, deep rooms, and interiors with large sunlit windows. The additional middle exposures can make exposure fusion and manual window blending smoother.
7 Photos (-3 to +3): For extreme dynamic range, like twilight real estate photography interiors with interior lights on and bright exterior, or mountain homes with floor to ceiling windows facing snow. The -3 frame saves exterior detail, the +3 frame saves deep shadow.
9 Photos: Rare. Used for commercial lobbies, churches, or when you know you will hand blend in Photoshop and want every tonal option. Storage and time cost is high.
Bracket Count vs Dynamic Range
| Bracket Count | EV Steps | Total Dynamic Range | Best For | File Size per Set | Editing Speed |
|---|---|---|---|---|---|
| 3 frames | 2 EV | ∼16 stops | Standard homes, Airbnb, rentals | ∼75 MB RAW | Fastest |
| 5 frames | 1 or 2 EV | ∼18 stops | Luxury, dark interiors, bright windows | ∼125 MB RAW | Medium |
| 7 frames | 1 EV | ∼20 stops | Extreme contrast, twilight interiors | ∼175 MB RAW | Slower |
| 9 frames | 1 EV | ∼22 stops | Commercial, architecture, manual blending | ∼225 MB RAW | Slowest |
Camera Setup Guide by Brand
| Brand | Menu Path | Max AEB Frames | EV Step Options | Pro Tip |
|---|---|---|---|---|
| Canon | Shooting Menu > Expo.comp./AEB | 3 or 7 with C1 | 1/3 to 2 stops | Use My Menu to save AEB, use 2 sec timer + bracketing |
| Sony | Camera1 > Bracket Settings > Bracket Type AE | 3 / 5 / 9 | 1/3 to 3 stops | Turn e-Front Curtain OFF for less banding in bracketing burst |
| Nikon | Photo Shooting Menu > Auto bracketing set > AE | 3 to 9 | 1/3 to 2 stops | Assign Fn button to bracketing for quick changes |
| Fujifilm | Drive Button > BKT > AE BKT | 3 / 5 / 7 / 9 | 1/3 to 2 stops | Use Film Simulation OFF for RAW, Astia for preview |
| Panasonic LUMIX | Menu > Bracket > Exposure Bracket | 3 / 5 / 7 | 1/3 to 2 stops | Use High Res mode OFF for bracketing, it disables AEB |
| OM System / Olympus | Menu > Bracketing > AE BKT | 3 / 5 / 7 | 1/3 to 1 stop | Set to 0 sec anti-shock for tripod sharpness |
Canon Example: Set camera to Aperture Priority, ISO 100, f/8. Go to Expo.comp./AEB, rotate dial to set 2 stops either side. Set drive to 2 sec self timer + continuous. One press gives you 3 frames.
Sony Example: Menu > Bracket Settings > Selftimer During Bracket > 2 sec. Then Bracket order – to +. Set 5 frames 1.0 EV. Hold shutter or use app shutter.
Step-by-Step Shooting Workflow
A consistent real estate photography workflow is what separates a 45 minute shoot from a 2 hour mess.
Arrive: Walk the property with agent, ask about hero shots, turn on all lights, open blinds halfway, turn off fans, hide trash, toilet lids down.
Walkthrough: Decide order, usually start farthest from entrance, work toward door so you do not appear in reflections.
Compose: Height at 44 to 48 inches, chest height. Keep verticals straight. Show two walls minimum, three walls is ideal for sense of space. Leave space for cropping.
Tripod: Level base, level camera. Use bubble level. Slightly below eye level makes rooms feel larger.
Focus: Single point AF on middle distance, then switch to manual. Check corners for softness.
Bracket: Fire your AEB burst. Do not touch tripod between frames. Check histogram: darkest frame should not be clipped on right for windows, brightest should not be crushed on left.
Review Histogram: Zoom to 100 percent on window edge. Is there ghosting? Any movement? Reshoot if needed.
Next Room: Keep settings locked. Only shutter changes. Shoot bathroom mirrors at angle to avoid reflection.
Backup: On location, copy to dual slots. At home, import to two drives. Never format card until delivery is approved.
Real Estate HDR Shoot Workflow
Photographer to Delivery Pipeline
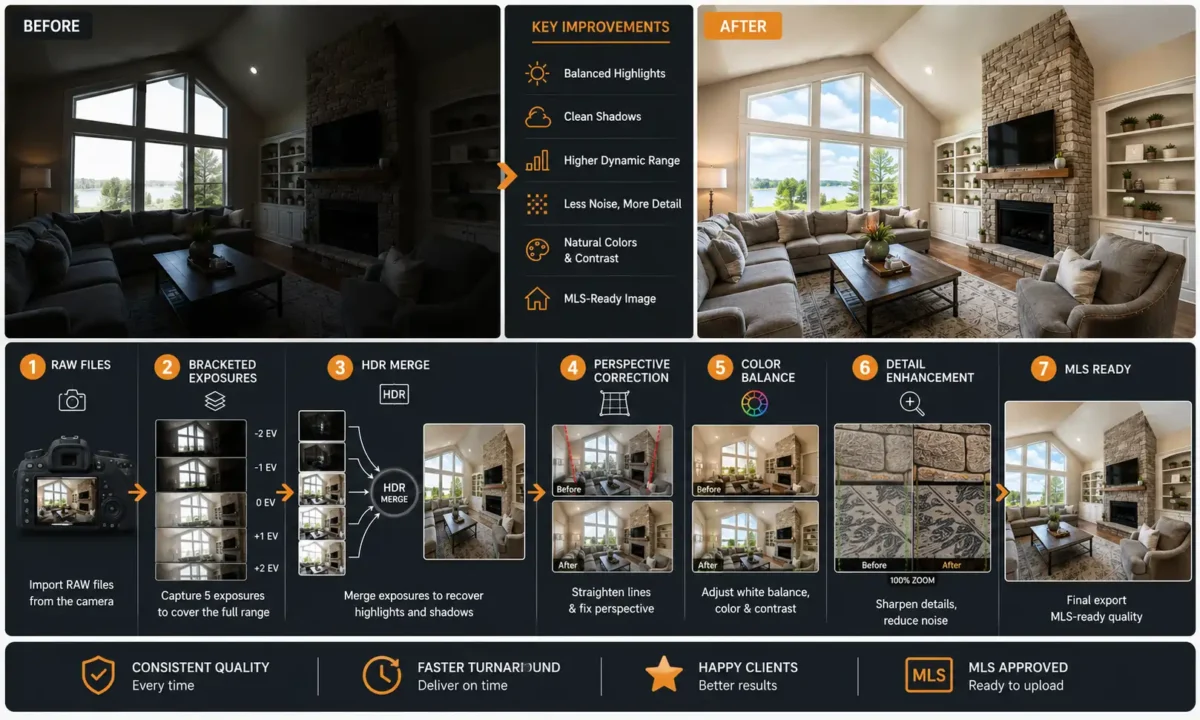
HDR Editing Workflow for Bracketed Real Estate Photos
This is where bracketed real estate photos become money.
- Import: Import all RAWs into Lightroom, keep bracket groups together. Use smart previews for speed.
- Cull: Pick best composition per room. Use color labels: green for hero, red for reshoot.
- HDR Merge: Select bracketed set, merge to HDR DNG. This creates a 16 bit file with huge dynamic range. Do not overdo deghost, low is usually fine for static interiors.
- Lens Correction: Enable profile correction and remove chromatic aberration immediately. Wide angles distort. Fixing early prevents bad perspective crops.
- Perspective: Use Transform > Auto or Guided. Draw vertical lines on door frames. Do not overcorrect and make room look like it is falling backward.
- White Balance: Start with 5200K, tint 0, then use eyedropper on neutral ceiling. For mixed lighting, you will mask later.
- Exposure: Set overall exposure so room feels bright but not fake. Histogram should sit middle to right, but not clipped.
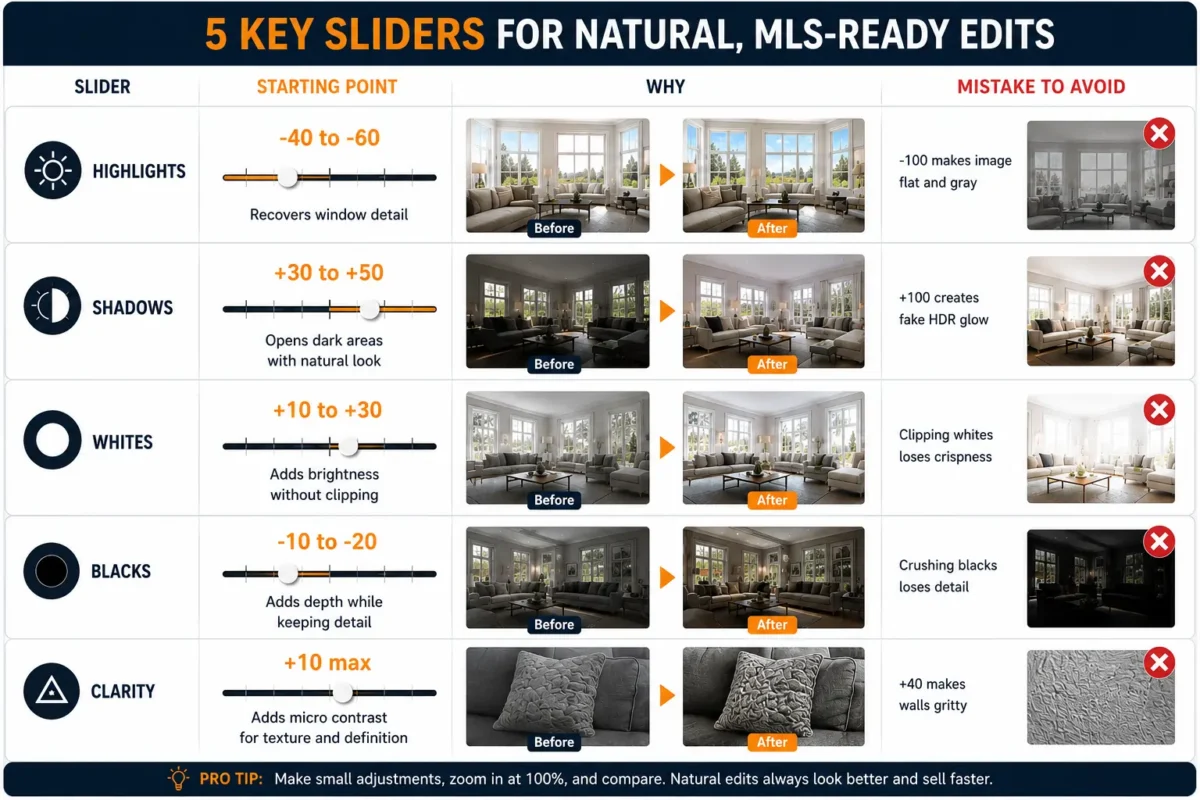
- Highlights / Shadows: Highlights -30 to -70 to recover windows, Shadows +30 to +60 to open corners. Whites and Blacks fine tune contrast.
- Masking: This is pro level. Use luminance and color masks to balance warm lamps vs cool windows.
- Windows: Use the dark frame data. Either pull from HDR file or blend in Photoshop with luminosity masks.
- Sky: If exterior visible through windows, replace with clean blue or add subtle sky replacement, but keep it believable.
- Final Export: Sharpen for screen, export sRGB JPEG, long edge 3000 to 4000 px for MLS, 2048 for portals that compress.
Lightroom HDR Workflow
Lightroom HDR merge is the fastest way to handle bracketed real estate photography.
Step by step:
- Select 3 to 7 RAWs, right click Photo Merge > HDR. Check Auto Align, Auto Settings OFF, Deghost Low, Show Deghost Overlay.
- The resulting DNG is your new master. Do not edit RAWs individually after this.
- Enable Lens Corrections > Profile and Remove Chromatic Aberration.
- Transform: Level and Vertical correction. Hold at 90 to 95 percent, not 100 percent, to avoid warping.
- White Balance: Eyedropper on white ceiling, then tweak. For real estate HDR editing, I aim 5200 to 5600K for daylight rooms, 4000K for tungsten heavy rooms.
- Exposure: +0.3 to +0.7 typically makes rooms feel bright.
- Highlights -50, Shadows +40 as starting point.
- Whites: hold Alt and drag until just before clipping. Blacks: -10 to -20 for contrast.
- Presence: Texture +15, Clarity +10 to +15 max, Dehaze +5. Over clarity makes HDR real estate photos look crunchy.
- Color Mixer: Lower orange saturation -10 for skin and wood, lift blue luminance for sky.
- Masking: Add linear gradient for windows, drop exposure -0.5 and highlights -40. Add brush for warm lamps.
- Detail: Sharpening 60, Radius 1.0, Masking 70 to avoid sharpening flat walls.
- Export: sRGB, Quality 80 to 90, Long edge 4000px, Sharpen for Screen Standard.
Photoshop HDR Workflow
When Lightroom is not enough, Photoshop gives you surgical control.
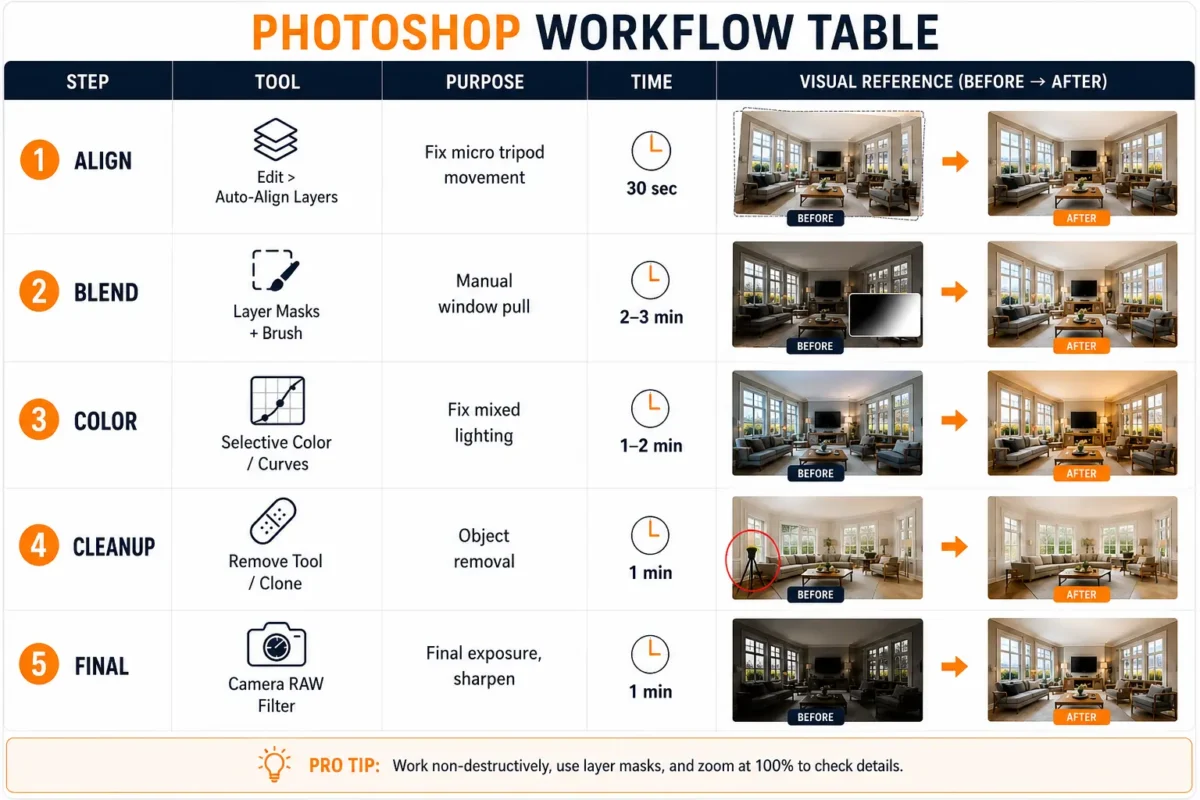
- Layer blending: Stack your bracketed exposures as layers, darkest on top. Use Auto-Align Layers.
- Masks: Add black mask to dark frame, paint white with soft brush only over windows. This is classic window pull editing.
- Luminosity masks: Create masks based on brightness. TK Panel or Lumenzia can create Lights, Darks, Midtones masks. Use Darks to lift shadows without affecting highlights.
- Sky replacement: Use Sky Replacement tool or manually mask exterior view. Keep replacement slightly darker than interior to feel natural.
- Object removal: Remove cords, reflections, toilet brush. Use Content Aware Fill and Clone Stamp.
- Perspective correction: Use Adaptive Wide Angle or Transform > Perspective to fix leaning walls.
- Color balancing: Use Selective Color to fix yellow lamp casts. In real estate photo enhancement, you want neutral whites.
- Noise reduction: Use Camera RAW filter > Detail to reduce noise from bright frames, especially in shadows.
- Sharpening: Use High Pass filter Overlay at 1.5 px for final pop, mask out flat walls.
HDR vs Flambient: The Real Difference
You will see this debate daily in Facebook groups. Both use bracketed real estate photos as a base, but flambient adds flash.
Flambient photography is HDR plus flash. You shoot your bracketed ambient frames, then shoot one or more frames with flash bouncing off ceiling or wall. You then blend flash frame for clean color and window frames for view.
HDR blending uses only ambient light, no flash.
Practical rule: Use bracketed HDR when speed and consistent volume matter. Add flash frames for commissioned interiors that require tighter color control, cleaner surfaces, or more deliberate light shaping. Many photographers bracket every composition and add flash only in key rooms, preserving options during editing.
Common Bracketing and HDR Editing Mistakes
Professional HDR Editing Checklist
Outsourcing HDR Editing
As weekly shoot volume grows, editing time can become the production bottleneck. The practical choices are to standardize an in-house workflow, hire an editor, or use a dedicated real estate photo editing partner.
Outsourcing benefits are not just time. Good editors bring consistency, fast turnaround, and scale. You shoot, they handle culling, HDR merge, lens correction, perspective, white balance, window pull editing, and final polishing.
An outsourcing partner should understand real estate HDR editing rather than general retouching alone. The core brief should cover color consistency, vertical correction, window pulls, mixed-light cleanup, natural sky and grass work, turnaround time, file naming, and revision handling.
PixelShouters provides real estate HDR photo editing for photographers and studios that need a repeatable outsourced workflow. A useful onboarding package includes RAW bracket sets, a written style guide, approved before-and-after references, delivery specifications, and clear revision examples.
What to look for when outsourcing: consistent color, natural window pulls, no halos, same day turnaround options, and ability to handle both HDR real estate photography and flambient.
HDR Editing Cost and Time Comparison
| Method | Cost per Image | Time per Home (25 images) | Pros | Cons |
|---|---|---|---|---|
| DIY Lightroom | $0 + $12/mo | 2 to 4 hours | Full control, no extra cost | Time consuming, burnout |
| Freelancer (Upwork/Fiverr) | $1 to $5 | 1 hour mgmt | Cheap, flexible | Inconsistent quality, communication issues |
| Editing Company | $0.80 to $3.50 | 20 min upload | Fast, consistent, scalable, 24/7 | Needs clear style guide at start |
When you charge $200 to $400 per shoot, spending 3 hours editing means your hourly rate drops to $30. Outsourcing at $30 per home to get those 3 hours back to shoot another $300 home is simple math.
Frequently Asked Questions About Bracketed Real Estate Photos
What are bracketed real estate photos?
Bracketed real estate photos are multiple frames of the same composition captured at different shutter speeds. A dark frame protects windows and highlights, a middle frame preserves natural color, and a bright frame records clean shadow detail for HDR blending or manual exposure blending.
How many brackets should I shoot for real estate photography?
Three frames at -2, 0, and +2 EV are a useful starting point for many interiors. Move to five frames when the room has deep shadows, direct sun, or important exterior views that still clip in the darkest or brightest frame.
What camera settings work best for bracketed property photos?
Use RAW, a tripod, low ISO, a fixed aperture around f/7.1 to f/8, locked white balance, and fixed focus. Only shutter speed should change across the bracket set. Check the histogram because camera and room conditions vary.
Should I use automatic exposure bracketing or change exposure manually?
AEB is faster and reduces camera movement for routine three- or five-frame sets. Manual exposure changes are useful when the camera cannot capture the required frame count or when you need a dedicated darker window-pull exposure.
What is the difference between HDR and flambient real estate photography?
HDR blends ambient bracketed exposures. Flambient adds one or more flash frames for tighter color and light control. HDR is usually faster for volume work; flambient takes longer but can produce cleaner color in difficult mixed lighting.
How do I merge bracketed real estate photos in Lightroom?
Group each bracket set, choose Photo Merge > HDR, keep deghosting low for static interiors, and review the resulting DNG before batch adjustments. Correct lens distortion and verticals, then refine exposure, white balance, windows, and local color.
How do window pulls work with bracketed photos?
A window pull uses the darkest exposure to restore exterior detail in the finished interior. Blend it with a controlled mask and keep the view slightly brighter than the room when appropriate so it looks natural rather than pasted in.
Why do HDR real estate photos sometimes look fake?
Common causes include excessive shadow recovery, strong clarity, halos, neon grass, oversaturated skies, inconsistent white balance, and windows that are too dark. A natural result keeps quiet contrast, neutral surfaces, believable exterior brightness, and consistent color from room to room.
Can bracketed real estate photos be shot handheld?
A tripod is strongly recommended because even small movement can soften the merge or create ghosting around windows, furniture, and foliage. Handheld bracketing may work in an emergency with a fast burst, but it is less reliable for professional delivery.
What export settings should I use for MLS delivery?
Export in sRGB and follow the receiving MLS or portal’s current pixel and file-size requirements. A high-quality JPEG with restrained output sharpening is a safe default, but platform limits vary and should be confirmed before delivery.
Final Thoughts on Bracketed Real Estate Photos
Bracketed real estate photos are not a trick, they are how you make a camera see the way your eyes do. You have learned what they are, why dynamic range matters, how exposure bracketing works, the exact settings, how many frames you need, how to set up Canon, Sony, Nikon, Fujifilm, Panasonic and OM System, the full shooting workflow from arrival to backup, Lightroom and Photoshop HDR workflows, the honest comparison between HDR and flambient, 20 mistakes to avoid, a pro checklist, and how to price and outsource.
If you are just starting, commit to shooting 3 frames at 2 EV for the next five homes. Master that, then move to 5 frames for bright window photography. Build one Lightroom preset for HDR merge and one for final polish. Your speed will double in a month.
If you are already busy, remember that shooting is only half the job. Photographers handling larger property volumes often combine good shooting techniques with professional editing support to maintain quality and meet deadlines. The goal is consistent, bright, natural, MLS ready images that help listings sell, not spending every night editing.
Go practice bracketing in your own living room today. Shoot -2, 0, +2, merge it, and watch those blown windows come back with detail. That moment is when it clicks.
A reliable bracketing system gives photographers more control at capture and gives editors cleaner source material for natural, listing-ready results.