
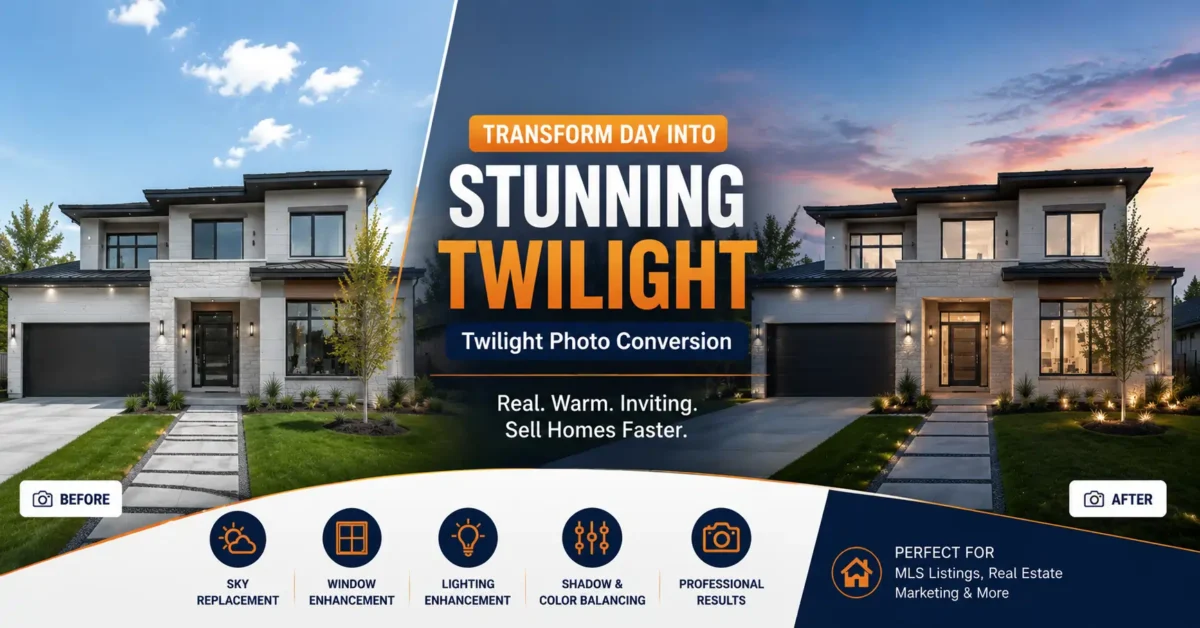
Key takeaway: Twilight photo conversion turns a well-exposed daytime exterior into a believable dusk image by matching the sky, window light, exterior fixtures, shadows, reflections, and color temperature. The best day-to-dusk edits look natural at full resolution and remain consistent with the property.
You can shoot perfect interiors, perfect HDR, perfect composition, and still lose the click to another listing. Why? Because on Zillow or Instagram, your image is one thumbnail in a wall of thumbnails. And human eyes are wired to stop for light.
Twilight Photo Conversion is the technique that gives you that stopping power without you standing in a driveway at 7:45 PM waiting for the sky.
A real twilight shoot can be excellent, but it adds a narrow shooting window, weather risk, travel time, and another opportunity for the property exterior to change. Day-to-dusk editing gives photographers and agents a predictable alternative when the listing schedule cannot wait for ideal sunset conditions.
Table of Contents
A practical workflow is to photograph the exterior when access, weather, and composition are reliable, then build the twilight version from that clean source file. This is the core purpose of twilight photo conversion.
How does it work? Start with a well-exposed daytime exterior. Use careful sky replacement with a natural dusk gradient, rebuild window glow while retaining frames and curtains, add realistic spill beneath exterior fixtures, soften hard daylight shadows, and balance the color temperature so the building does not turn orange. The result should feel warm and inviting while remaining faithful to the property.
It became popular because it solves three real business problems at once. It saves time, it removes weather risk, and it cuts travel cost. For a photographer doing 3 listings a day, or a realtor who needs a listing live tonight, virtual twilight real estate photography is not a luxury, it is logistics.
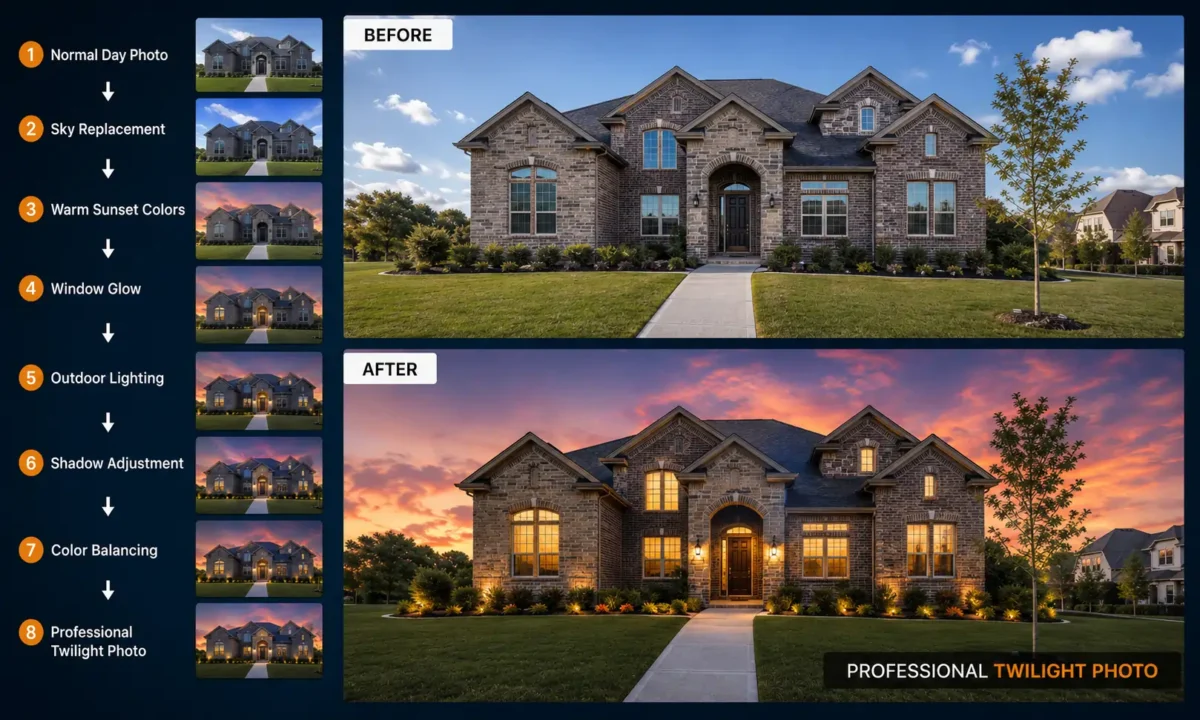
Let me break each stage more clearly.
1. Normal Day Photo: This is your foundation. If you shoot crooked, blurry, or JPEG with blown highlights, the final twilight will look fake no matter how good your editing is. Pros shoot RAW, on tripod, with all lights ON inside. That gives you data to work with.
2. Sky Replacement: More than pasting a pretty sky. You have to match perspective, horizon line, and focal length. A sky shot at 16mm looks different than one shot at 35mm. You also need to add slight blur and grain to match the base photo, otherwise edges look cut.
3. Warm Sunset Colors: Real dusk is never one flat orange. At the top it is deep blue, then it transitions to purple, then to warm orange at the horizon. If you make the whole sky orange, it screams fake. This is where sunset photo editing knowledge matters.
4. Window Glow: This is the heart of twilight house photography. Dark windows feel empty and a bit sad. Warm windows feel occupied. But you cannot just paint solid yellow. You need to keep faint curtain lines, vary brightness per room, and add a soft outer glow. That is proper window enhancement.
5. Outdoor Lighting: A house at dusk with no exterior lights looks abandoned. We turn on sconces, garage lights, pathway lights. Each light needs two parts, the bright bulb core and the soft spill that falls on the wall or ground. That spill is what sells realism.
6. Shadow Adjustment: Day shadows are harsh, short, and warm. Dusk shadows are long, soft, and cool blue. If you leave hard noon shadows under the eaves while your sky says 7 PM, the brain notices something is off even if the viewer cannot name it.
7. Color Balancing: This is the final glue. Sky, house, lawn, concrete, all must sit in same color world. Pros use Color Balance and Gradient Maps to make highlights warm and shadows cool, while keeping the white siding of the house still white.
8. Professional Twilight Photo: The final image that stops scrolling and drives showings.
What Is Twilight Photo Conversion?
Twilight Photo Conversion, also called day to twilight conversion or day to dusk conversion, is the post production method of turning a daytime exterior into a believable twilight image.
Purpose is marketing, not trickery. You are showing the emotional potential of the property. A daylight shot tells facts. A twilight shot sells lifestyle.
Professionals use it because it gives control. Real twilight photography captures what nature gives you that evening. Virtual twilight conversion lets you craft what the ideal evening would look like for that specific property, with perfect sky, perfect lights, perfect lawn.
Difference between photography and editing? Photography is capture, editing is creation. The best results use good capture as base for good creation. You still need a great daytime photo. You cannot make a bad photo good just by adding a sunset sky.
Modern masking and HDR tools make the workflow faster, but realism still depends on careful decisions: the new sky must match the horizon and lens perspective, window light must retain architectural detail, and every added light source needs believable spill and falloff.
Typical production example: Start with the cleanest exterior frame, blend the bracket set when highlight recovery is needed, replace the sky with a blue-hour gradient that matches the scene, vary the brightness of individual windows, add spill beneath exterior fixtures, and soften hard daylight shadows. The finished image should still resemble the same property, not a different building created in post-production.
When to choose real sunset: Ultra luxury single estate where budget allows, weather is perfect, and client specifically wants in camera authenticity. Even then, most pros still enhance it.
When to choose conversion: It is a practical fit for cloudy-day captures, busy listing schedules, portfolio-wide consistency, vacation-rental marketing, rainy seasons, and projects where a second sunset visit is not efficient.
Why Twilight Photos Stand Out in Property Listings
Let me explain the psychology more deeply.
Luxury feeling: At dusk, contrast drops. Small paint chips, minor cracks, patchy mulch become less visible. Architectural lines and lighting become more visible. The property instantly looks more expensive. This is why luxury property photography relies heavily on twilight.
Emotional connection: This is window enhancement psychology. A dark window triggers no story. A glowing window makes the brain invent a story, someone is inside, cooking, reading, living. Buyers project themselves into that story. That projection is powerful.
Warm atmosphere: Color temperature affects mood. Cool daylight is 5500K to 6500K, informational and alert. Warm twilight is around 3200K to 4000K inside windows, cozy and safe. Our brains associate warm light with home and safety from evolution.
Premium appearance: When a listing has a twilight hero, buyers assume the seller invested in marketing, which implies the home is well maintained. Perception matters.
Better curb appeal: Through exterior real estate editing and lawn enhancement, you maximize what is already there. No need to re landscape for one photo.
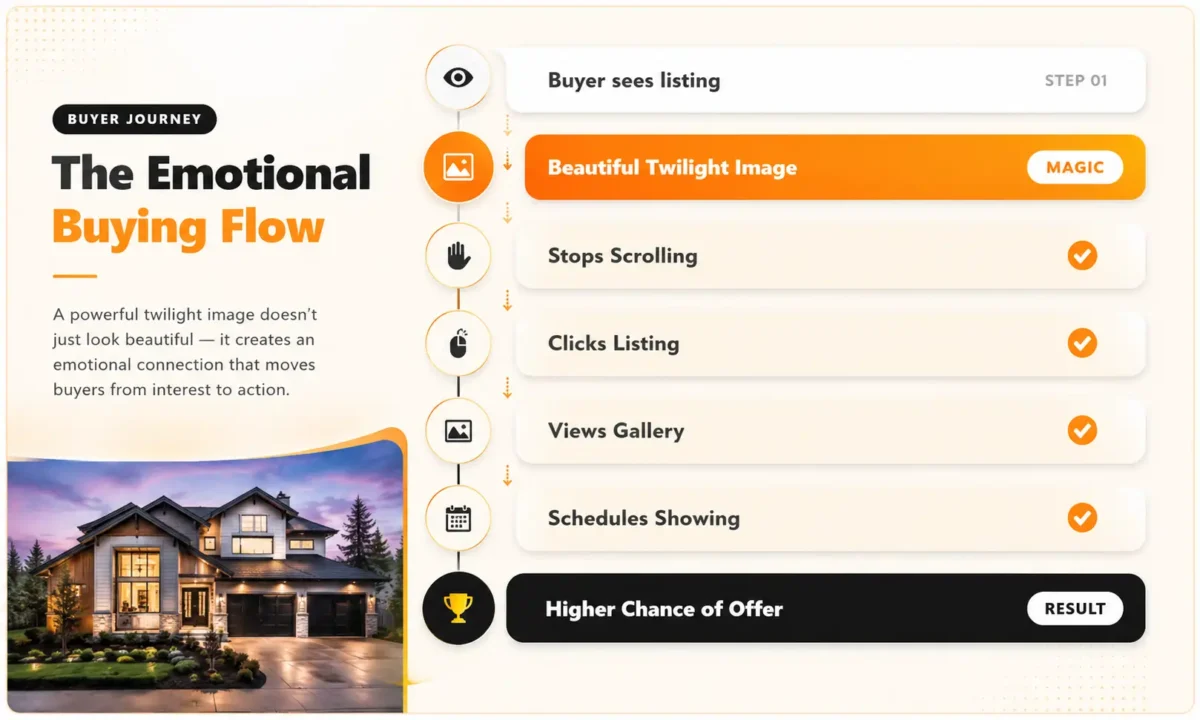
Stronger thumbnail contrast: A warm twilight exterior can stand apart in a gallery dominated by daylight images. The image still needs accurate architecture, restrained color, and a clear view of the property; the editing style alone does not guarantee portal placement or buyer inquiries.
Buyer sees listing: They are on mobile, scrolling at speed. Your image is 1 inch tall.
Beautiful Twilight Image: Among 20 daylight thumbnails, your warm glowing house with colorful sky breaks pattern. Brain flags it as different.
Stops Scrolling: That pause of 0.8 seconds is everything. Without it, no click.
Opens the listing: A distinctive cover image can earn attention, but results vary by property, market, price, and the strength of the full gallery. Treat twilight conversion as a presentation tool, not a guaranteed conversion metric.
Views Gallery: First image sets emotional tone for all other images. If first image feels warm and premium, they view interiors more positively.
Schedules Showing: Emotional engagement turns into action. Agents report more inquiry calls like “that house with the evening photo.”
Higher Chance of Offer: More showings, more emotional memory during decision, higher probability of offer. It is not magic, it is marketing funnel optimization.
Why Real Estate Pros Prefer Day to Dusk Photo Editing
I will explain each benefit more practically.
Saves time: You do not block 6 PM to 8 PM for one house. You shoot at noon and deliver twilight by evening through editing.
No waiting for sunset: Sunset window is 15 to 20 minutes. If you miss exposure, you wait 24 hours. With day to dusk photo editing, you have infinite tries.
Works all year: In winter, sunset is at 5 PM. In summer at 8:30 PM. With virtual twilight conversion, your workflow stays same.
Easier scheduling: You can batch 4 homes in one area in one day and still give each a twilight hero. No return trips.
Better consistency: For an agency, brand matters. Real sunset changes color every day. Virtual dusk lets you use same 2 to 3 sky styles so all listings look cohesive.
Lower cost: No second trip fuel, no overtime, no rescheduling fee if weather fails.
Faster delivery: Most twilight editing service teams deliver in 12 to 24 hours. Real sunset shoot needs next day at earliest.
That is why even photographers who love real sunset now offer virtual twilight as standard.
Step-by-Step Twilight Photo Conversion Workflow
Let me explain each step with what pros actually do.
1. Capture Daytime Photo: Shoot on tripod at 5 to 6 feet height, 16 to 24mm, f/8 to f/11, ISO 100, RAW. Take 3 to 5 brackets at 2 stops. Turn ON all interior and exterior lights. Clean windows. This gives you window detail and reference for where glow should go.
2. Exposure Correction: Merge brackets in Lightroom Classic or Camera Raw. Do not over HDR it. Aim for natural. Recover highlights to get some sky data if possible, open shadows to 20 to 30 percent so lawn detail exists. Straighten verticals. Lens correction ON.
3. Sky Replacement: Select sky using AI Select Sky, then manually refine with Select and Mask, especially around trees. Choose a dusk sky with resolution at least as big as your image. Place sky on layer below house. Scale to match perspective. Add 0.5 to 1.0 Gaussian blur to sky if your base has slight softness. Add 1 to 2 percent noise to match grain. Darken bottom of sky slightly where it meets horizon, real sky is darker near horizon at blue hour.
4. Window Light Creation: This is detailed window enhancement. Mask each window pane with pen tool for hard edges. Create two layers. Bottom layer warm fill, color #FFC97A to #FFDDA0, opacity 70 to 85 percent. Top layer outer glow, Gaussian blur 15 to 25px, blend mode Screen, opacity 20 to 30 percent. Vary per room, living room brighter than bathroom. Keep faint blind lines at low opacity for realism.
5. Landscape Enhancement: Lawn, trees, driveway. Use Hue Saturation targeting greens, saturation +10 to +15, lightness -5. Do not make it neon. Use Curves to darken pavement slightly, evening concrete is not light gray, it is darker and reflects sky a bit.
6. Exterior Light Glow: For each sconce, create small white core on top layer, then larger warm glow underneath with radial blur. Paint light spill on wall using soft brush on Screen mode, 10 to 20 percent opacity, with falloff. Path lights should cast small pools on ground.
7. Reflection Adjustment: If driveway is wet or there are large glass windows, add subtle reflection of sky. Duplicate sky, flip vertical, warp, opacity 8 to 12 percent. Remove harsh daytime sky reflection that conflicts with new sky.
8. Shadow Refinement: Reduce harsh shadows using Shadows slider and by painting with 10 percent opacity white brush on Soft Light. For porch shadows, cool them slightly with Color Balance, add blue. At dusk, shadows are cool, not warm.
9. Color Grading: This is where professional real estate photo editing shines. Use Gradient Map from deep blue #1A2A4A to warm amber #FF8C42, set to Soft Light 15 to 20 percent. Then Color Balance, highlights +5 red +5 yellow, shadows -5 red +5 blue. Add subtle vignette -15 to draw eye to house.
10. Final Quality Check: Check at 100 percent. Look for halos around roofline, blue fringing in windows, banding in sky, over sharp lawn, missed dark window. Export JPEG quality 80 to 90, 6000px long edge for MLS, 2048px for social. Keep PSD.
Tools Used for Day-to-Dusk Photo Editing
Adobe Photoshop: Your main Adobe Photoshop Sky Replacement. Handles layers, masks, blend modes for non destructive workflow. Without it, you cannot do luxury level twilight.
Lightroom Classic: Batch RAW processing, HDR merge, straightening. Great for consistency before Photoshop.
Camera Raw: Same engine as Lightroom inside Photoshop. Used for highlight recovery and lens correction.
Luminar Neo: Quick AI sky replacement and relight. Useful for draft, but finish manually for natural result.
AI masking tools: Select Subject, Select Sky, Object Selection. They save 10 minutes masking trees and windows, but need manual refinement or edges look crunchy.
Pen Tool: For precise hard edge masking around architecture. AI fails on intricate trim, pen tool does not.
Layer Masks: Let you paint back details. Every glow, sky, color adjustment lives on its own mask.
Blend Modes: Screen makes glows bright without blowing out, Multiply darkens shadows naturally, Soft Light adds color without destroying detail.
Gradient Maps: Maps shadows to one color and highlights to another. This is secret sauce for cinematic twilight image enhancement.
Essential Twilight Editing Techniques
Sky Replacement: Purpose is mood. Mistake is using same over saturated orange sky for every house. Pro tip: keep 6 skies you know well and match sun direction. If original sun came from left, your new sky’s brightest area should also be left.
Window Glow: Purpose is inviting feel. Mistake is solid yellow rectangles. Pro tip: inside glow should not be flat, add inner gradient darker at bottom, brighter at top, simulating ceiling light.
Lawn Enhancement: Purpose is curb appeal. Mistake is making grass look like plastic turf. Pro tip: enhance before twilight grading, and mask out shadows on grass so they stay cool.
Exterior Light Effects: Purpose is realism and luxury. Mistake is all lights same intensity and no spill. Pro tip: porch lights spill more than path lights. Vary size of glow based on bulb wattage in real life.
Reflection Control: Purpose is cohesion. Mistake is leaving daylight blue reflection in windows after adding warm glow. Pro tip: after glow, lower original window reflection layer to 15 percent and set to Soft Light.
Color Temperature: Purpose is unity. Mistake is whole house turns orange. Pro tip: mask house and sky separately. Warm sky, keep house neutral to slightly warm.
Shadow Blending: Purpose is softness. Mistake is leaving hard noon shadow under garage. Pro tip: use Clone Stamp at 30 percent opacity to soften, then add new soft shadow with Multiply brush.
Highlight Recovery: Purpose is data. Mistake is recovering too much making sky gray. Pro tip: recover in RAW first, not after sky replacement.
Object Removal: Purpose is clean marketing. Mistake is removing cars after twilight edit, leaving smudged glow. Pro tip: remove distractions before any creative edit.
Perspective Correction: Purpose is professional look. Mistake is over correction bending roofline. Pro tip: correct verticals only, leave horizontal perspective natural.
Noise Reduction: Purpose is clean final. Twilight pushes shadows and shows noise. Mistake is global noise reduction making image plastic. Pro tip: apply noise reduction only to sky via mask.
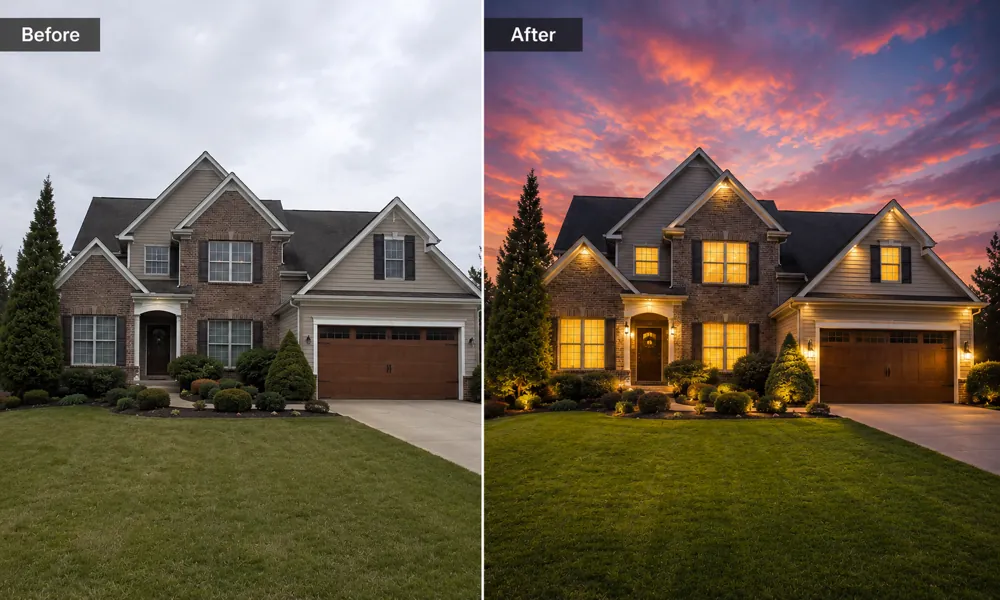
Flat lighting becomes dimensional because you add warm vs cool contrast. White sky replacement adds story and time. Dark windows become welcoming. Dull lawn corrected with targeted enhancement looks cared for. Overall weak curb appeal turns into luxury perception that justifies higher asking price and better real estate marketing photos.
Can AI Replace Professional Twilight Editors?
Let me explain this more honestly.
AI is amazing for speed. It can replace sky in 5 seconds. For bulk social posts or quick client preview, it is useful.
But for client facing luxury work, human still wins.
Accuracy: AI still struggles with complex masking like thin tree branches over roof, pergolas, intricate window grids. Human with pen tool is pixel perfect.
Lighting: AI adds generic glow. Pro considers material. Stucco reflects light differently than brick or glass.
Window glow: AI makes all windows equally yellow. Pro varies based on room depth, curtains, floor.
Natural colors: AI tends to overcook. Pro keeps MLS compliant and brand consistent.
Consistency: AI result varies image to image. Human can match exact agency style across 200 images for consistent branding.
Customization and revisions: Client says make it less orange and a bit more blue hour. AI rerolls randomly. Human adjusts Gradient Map precisely.
So best workflow today is AI assisted, human finished. Use AI for initial mask and draft sky, then finish manually for that luxury finish that sells.
Twilight for Different Property Types
Luxury homes: Less is more. Soft sky, moderate glow, emphasize pool and architectural lighting. Do not overdo orange, luxury buyers want elegance not drama.
Apartments: Focus on many window glows to show occupancy, clean entrance lighting. Avoid busy sky that competes with building.
Condos: Similar to apartments but emphasize balcony lights and city backdrop. Deeper blue hour sky works well with city lights.
Commercial properties: Keep professional. Crisp blue hour, white office window glows, not cozy yellow. Shows business vitality.
Hotels: Emphasize entrance signage, lobby glow, pool area. Warm but brand accurate.
Vacation rentals: Twilight imagery can highlight evening amenities such as string lights, fire pits, pools, and outdoor seating. Keep those features faithful to what guests will find at the property.
Farmhouses: Natural rustic sky, warm porch, avoid modern purple. Enhance barn lights.
New construction: Use twilight to hide incomplete landscaping and make site feel finished and model ready.
Modern architecture: Use blue hour, not sunset, to complement glass and steel. Minimal glow, clean lines.
Historic homes: Respect character. Softer classic sunset tones, enhance existing sconces, avoid futuristic lighting.
Benefits for Real Estate Photographers and Agents
For agents and property marketers, a believable twilight hero can support a premium visual identity and keep campaign imagery consistent across the MLS, listing presentations, social posts, and print materials.
For photographers, twilight conversion can be packaged as a clearly priced add-on without scheduling another exterior visit. A documented style guide, realistic sample edits, and consistent revision handling make the service easier to sell and repeat.
When Should You Choose Twilight Conversion?
Cloudy day: You shot at noon, sky white. Overcast is actually perfect base because shadows already soft. Convert it.
Busy realtor: Agent needs listing live tonight. You shot at 1 PM. Deliver twilight hero by 6 PM via editing partner.
Rain forecast: Week of rain, no sunset. Virtual dusk editing keeps marketing on schedule.
Luxury listing: Client wants twilight but does not want to pay for two shoots. Offer conversion as premium included.
Rental property: Airbnb host wants cozy evening vibe. Add string light glow, window glow, pool lights.
Marketing campaign: Agency launching 20 properties same week. Bulk virtual twilight conversion ensures matching luxury look.
Last minute listing: Seller decides to list tomorrow morning. No time for dusk shoot.
Bulk editing: Property management needs 50 exteriors converted for brochure. Editing scales, shooting each at sunset does not.
Twilight Photo Conversion: Final Quality Check
Twilight Photo Conversion works because it is emotional, not technical. Buyers do not care about your masking technique. They care how the home makes them feel.
We broke down the full workflow from capture to final check, the tools pros actually use like Photoshop, Lightroom Classic, Gradient Maps, pen tool, the essential techniques like sky replacement, window enhancement, lawn enhancement, exterior light glow, shadow refinement, and color grading, and the mistakes that make virtual twilight look fake like orange everywhere skies, blue windows, missing light spill, and wrong shadows.
Real sunset photography and virtual conversion solve different production needs. A real sunset capture offers in-camera authenticity, while conversion offers schedule control, repeatability, and easier scaling. AI can accelerate masking and draft creation, but a careful final review is still needed for architecture, reflections, color, and brand consistency.
We covered different property types, benefits for realtors and photographers, pricing, and how to choose an editing partner.
Best practices remain. Shoot clean, shoot RAW, shoot with lights ON, keep verticals straight, mask precisely, keep colors natural, match light direction, and aim for quiet luxury not overcooked drama. Quality beats quantity, one believable twilight hero outperforms five fake ones.
A sensible test is to create one twilight version from a strong daytime exterior, compare it with the original at thumbnail and full size, and review the result for realism, architectural accuracy, and gallery consistency before client delivery.
And when you need a reliable partner who gets natural looking results at scale, PixelShouters is one of the experienced teams offering Twilight Photo Conversion, Day to Dusk Editing, HDR Editing, Real Estate Photo Enhancement, Object Removal, Virtual Staging, Sky Replacement, Lawn Enhancement, Panorama Stitching, Floor Plan Redraw, Virtual Renovation, and Aerial Photo Editing. We focus on realistic lighting, clean masking, and fast turnaround for bulk projects, so you can deliver luxury looking real estate marketing photos without waiting for sunset.