
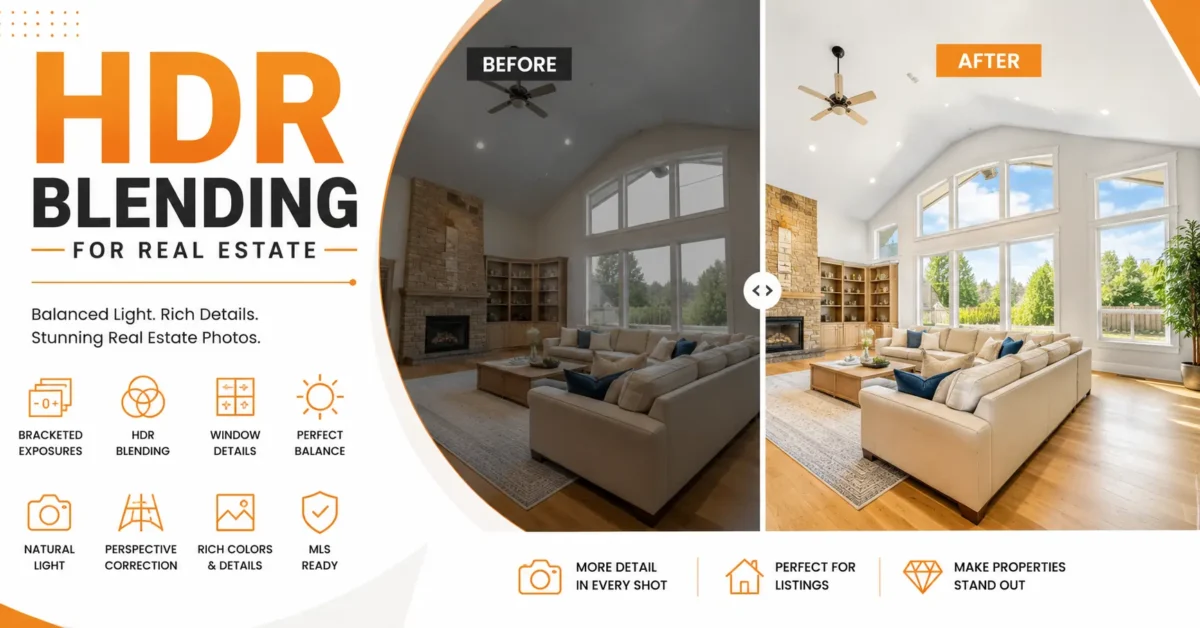
HDR Blending for Real Estate Photography is how you take 3 to 9 photos of the same room at different brightness levels and fuse them into one image that shows the inside and the outside at the same time.
Key takeaway: Natural HDR blending is not about making a room look brighter than reality. It is about preserving window detail, neutral wall color, clean shadows, straight verticals, and consistent exposure across the full property gallery.
It matters because buyers do not read first, they look. If the window is white or the corner is black, they swipe. If the room feels bright and open, they stay.
This is for you if you shoot real estate, list homes, manage Airbnbs, edit for photographers, or you are just starting and wondering why your photos never match what your eyes saw. In this guide you will learn what dynamic range really means inside a house, how to shoot bracketed exposure photography that merges cleanly, how to build a fast hdr editing workflow in Lightroom and Photoshop, how to do window pull editing when HDR alone is not enough, and how to avoid the plastic HDR look that agents hate.
Table of Contents
Why Single Exposure Fails in Real Estate Interiors
I learned this in a small condo in 2011. The living room had one big window. I exposed for the sofa. Window gone. I exposed for the window. Sofa became a black blob. Client asked why the place looked gloomy when it was sunny. That was the lesson.
Your eye adjusts as you scan a room. Your camera does not. It picks one exposure. In real estate, that choice always hurts you.
A bright window can be six stops brighter than a hallway. A camera sensor can hold about twelve to fourteen stops. Your eye can handle close to twenty. That gap is why interior photography editing is hard.
In listing photography, bright and evenly lit images reduce uncertainty because buyers can read the room layout, window view, finishes, and floor plan flow faster. Many professional photographers also report that single exposure struggles with mixed lighting. You get orange lamps, blue windows, gray walls in one frame. HDR blending for listings solves it by pulling clean pixels from each bracket.
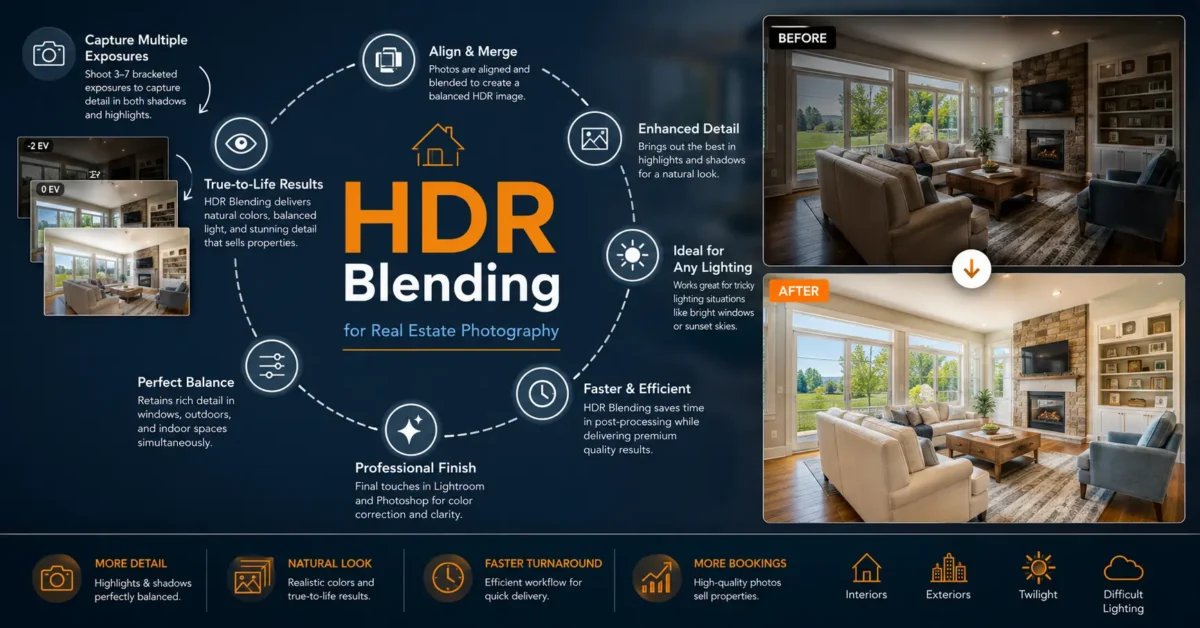
What this means in practice. You shoot on a tripod. You import bracketed sets to Lightroom. You run HDR Merge to create a natural base. You do white balance and tone. You move to Photoshop only for what Lightroom cannot do well.
That is cleanup, perspective, window pull, and local color. Then you enhance sky for exteriors and export with MLS safe settings. Every pro who delivers consistent hdr real estate photos follows this order, even if they use different software names.
Dynamic Range in Real Estate Interiors
Dynamic range is the difference between the brightest and darkest detail you can still see.
Human eye: Adapts locally. You look at a lamp, your pupil closes a little. You look at a dark corner, it opens. Brain stitches it together.
Camera sensor: Captures one global exposure. It cannot adapt locally unless you give it multiple exposures.
Bright windows in living rooms: The view is often 5 to 8 stops brighter than the wall next to it. Without hdr image blending, you choose one.
Dark interiors: Bathrooms with no windows, basements, long hallways. They need the brightest bracket to show texture in towels and tile.
Mixed lighting: This is the silent killer of hdr property photography. A kitchen with recessed 4000K LEDs, under cabinet 3000K strips, and 5600K daylight. If you white balance for one, the other two look wrong. HDR lets you correct after merge with masks.
Sunset and luxury homes: Floor to ceiling glass in a luxury property at golden hour is beautiful to the eye and brutal for the sensor. You need 7 to 9 brackets here. For vacation rentals and Airbnb, you want bright and cozy, not dramatic. Still HDR, just lighter processing.
What HDR Blending Means for Real Estate Photos
Forget the HDR button on your phone. Real hdr blending for real estate photography is manual and controlled.
You shoot the same composition several times. Dark frames hold window detail. Bright frames hold shadow detail. Middle frame holds midtones and color.
Software aligns the frames, then builds a 32 bit file that contains all that data. You then tone map it back to a viewable JPEG that looks natural. Good tone mapping is invisible. Bad tone mapping is what people call fake HDR.
How highlights recover: The software looks at your -2 and -3 EV frames and copies the properly exposed window frame into the final image. That is how hdr merge photography saves the view.
How shadows recover: It looks at your +2 and +3 EV frames and lifts detail under the bed and inside closets without adding too much noise.
Realistic vs fake: Realistic hdr editing keeps contrast. It lets shadows be slightly darker than highlights. Fake HDR tries to make everything the same brightness, which creates gray walls, halos, and that dirty orange look. For hdr real estate images that sell, realistic always wins.
This includes related methods like exposure blending and exposure fusion. Fusion does not create a 32 bit HDR file. It blends the best parts based on contrast and saturation. Many editors prefer exposure fusion for interior photography editing because it looks natural straight out of the merge.
Bracketing for HDR Real Estate Photography
Bracketing is the shoot part of HDR. Get this wrong and no software saves you.
3 exposure: -2, 0, +2. Fast. Good for overcast exteriors, small powder rooms, and when you have 30 units to shoot in a day. Not enough for bright windows.
5 exposure: -2, -1, 0, +1, +2 or -2.5 to +2.5 in 1.25 steps. This is the workhorse for hdr real estate photography. Covers most residential interiors without overcomplicating the shoot.
7 exposure: -3 to +3 in 1 stop steps. Use for luxury property photography, great rooms with two story windows, kitchens with large sliders.
9 exposure: -4 to +4. Use for twilight HDR, sunset interiors, and commercial lobbies with glass walls.
Auto Exposure Bracketing: Set camera to aperture priority, ISO 100, f/8, let shutter vary. Fast and consistent. Set continuous high and use a remote.
Manual bracketing: You control shutter with dial. Useful when AEB is limited to 3 frames on older bodies.
Tripod importance: Non negotiable. Even a 2 pixel shift creates ghost edges that deghosting cannot fully fix. Use a solid head, hang your bag for weight, turn off image stabilization on tripod.
Remote shutter and burst: Use a wireless remote or 2 second timer. Burst mode reduces time between frames so curtains that move from AC do not cause issues.
Single Exposure vs HDR Blending vs Flambient
Real Estate Shooting Methods| Feature | Single Exposure | HDR Blending MOST POPULAR | Flambient |
|---|---|---|---|
| Image Quality | Limited either windows or interior suffers |
High detail across range |
Highest flash adds color accuracy |
| Color Accuracy | Mixed casts Often mixed casts |
Good Good with local correction |
Excellent flash neutralizes walls |
| Window Detail | Usually blown white | Good sometimes needs window pull editing |
Excellent flash frame retains view |
| Natural Appearance | Natural but dark | Very natural when processed correctly | Most natural for interiors |
| Editing Time | 1 minute | 3 to 5 minutes | 8 to 15 minutes |
| Equipment | Camera and lens | Add tripod | Add tripod, flash, trigger |
| Learning Curve | Low | Medium | High |
| MLS Suitability | Okay for rentals | Excellent for hdr images for MLS |
Excellent for high end |
| Luxury Homes | Not recommended | Good baseline | Preferred method |
| Cost to Client | Lowest | Mid | Premium |
| Recommended Use | Quick rental shoots | Standard residential, condos, Airbnb | Luxury, architectural photo editing |
For most beginners, master HDR photo blending first. Then add flambient vs hdr hybrid when you can light a room without creating harsh shadows.
Best Camera Settings for HDR Real Estate Photography
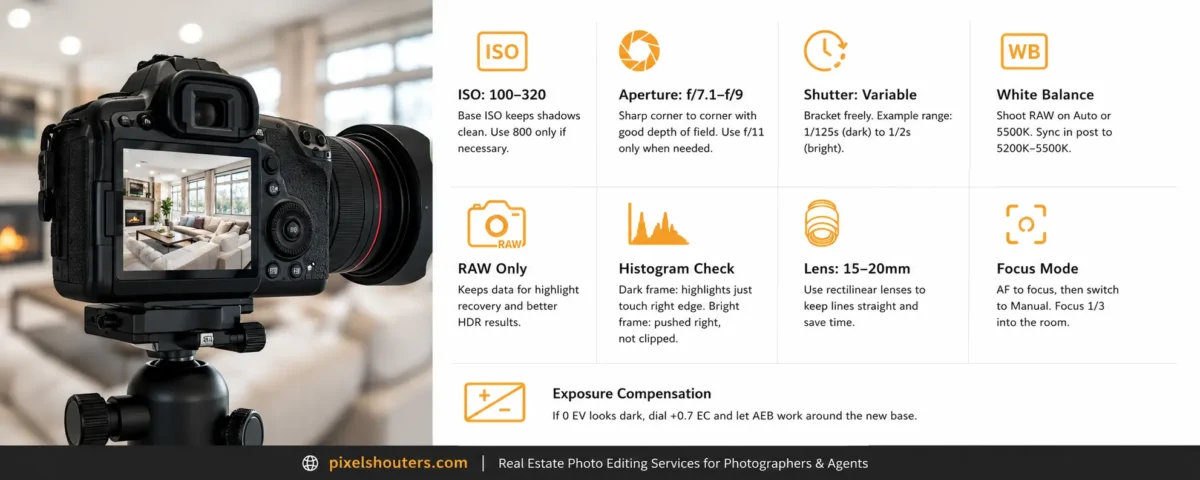
This is the cheat sheet I wish someone gave me on day one.
ISO: 100 to 320. Base ISO keeps shadows clean. HDR editing lifts shadows, and any noise there gets amplified. If you must go to 800 in a dark basement, do it, but know you will need stronger noise reduction.
Aperture: f/7.1 to f/9. Sweet spot for most wide angles. Sharp corner to corner, enough depth of field for a living room that is 25 feet deep. Go to f/11 only if you are very close to a kitchen island and need foreground to background sharpness.
Shutter: Variable. That is the point of bracketing. Your base exposure might be 1/15, your darkest 1/125, your brightest 1/2 second. Let it float.
White balance: Shoot RAW, set camera to Auto or 5500K. In post, sync to 5200K to 5500K for daylight interiors. Consistency helps batch editing for hdr editing workflow.
RAW only: JPEG throws away data you need for highlight recovery and hdr photography editing. RAW keeps it.
Histogram: After first bracket set in each new lighting condition, check histogram. Darkest frame should have highlights just touching right edge, not slammed. Brightest frame should have its histogram pushed to the right, but not clipped.
Lens: 15 to 20mm full frame. Avoid fisheye unless you correct heavily. Rectilinear lenses keep straight lines straighter, which saves time in perspective fix.
Focus mode: Autofocus to get it, then switch to manual and do not touch it during bracket. Focus one third into room.
Exposure compensation: If your 0 EV frame looks too dark on back of camera, add +0.7 EC and let AEB work around that new base.
Field Workflow for Bracketed Real Estate Photos
Great HDR starts before you press the shutter.
Property preparation: All bulbs on and matching if possible, all blinds open to same height, ceiling fans off, toilet lids down, pets out, cars out of driveway for exterior.
Lighting: Do not fight mixed light on site. Capture it cleanly and fix in hdr editing software. Turn off lamps that create hot spots on walls if you are not using flash.
Composition for hdr real estate photos: Camera at 42 to 48 inches, about light switch height. Shoot from doorway or corner to show two walls and floor to ceiling. Leave a little more ceiling than you think, you will crop slightly after perspective correction.
Room by room:
- Kitchen: 5 brackets, expose to keep under cabinet detail. Shoot two angles, one wide, one detail on island.
- Bathrooms: 3 brackets is often enough. Keep mirror out of frame or shoot at angle to avoid reflection of tripod.
- Bedrooms: 5 brackets, pull back to show windows and floor, make bed the hero.
- Living room: 5 to 7 brackets, lead the eye toward window, show flow to next room.
- Luxury spaces: 7 brackets, bracket for chandelier detail separately if needed.
- Exteriors: 3 brackets at f/9, shoot when house is front lit, keep some sky detail for sky replacement later.
- Drone HDR: Use AEB 5 frames, manual white balance 5600K, overlap 70 percent if stitching panorama.
- Twilight HDR: Tripod low, 7 to 9 brackets, shoot 10 to 15 minutes after sunset, keep interior lights on, balance sky not too dark.
This discipline makes real estate photo editing services much faster later.
HDR Editing Workflow in Lightroom and Photoshop
Import, merge, retouch, correct, export. Do not jump around.
Import and cull: Import to Lightroom, apply lens correction and a flat preset on import. Cull to keepers. Do not merge bad compositions.
HDR Merge: Select bracket sets, merge to HDR DNG.
Photoshop stage: Perspective correction, object removal, window pull, sky enhancement.
Color grading: Fix white balance globally, then locally. Walls should be neutral, wood should be warm not orange.
Noise reduction and sharpening: Light touch. HDR already adds micro contrast.
Export: 3000 to 4000 px long edge, sRGB, JPEG quality 80 to 90, sharpen for screen.
File naming: 123_MainSt_LivingRoom_01.jpg. Clients love order.
Delivery: Cloud folder with MLS and print folders if needed.
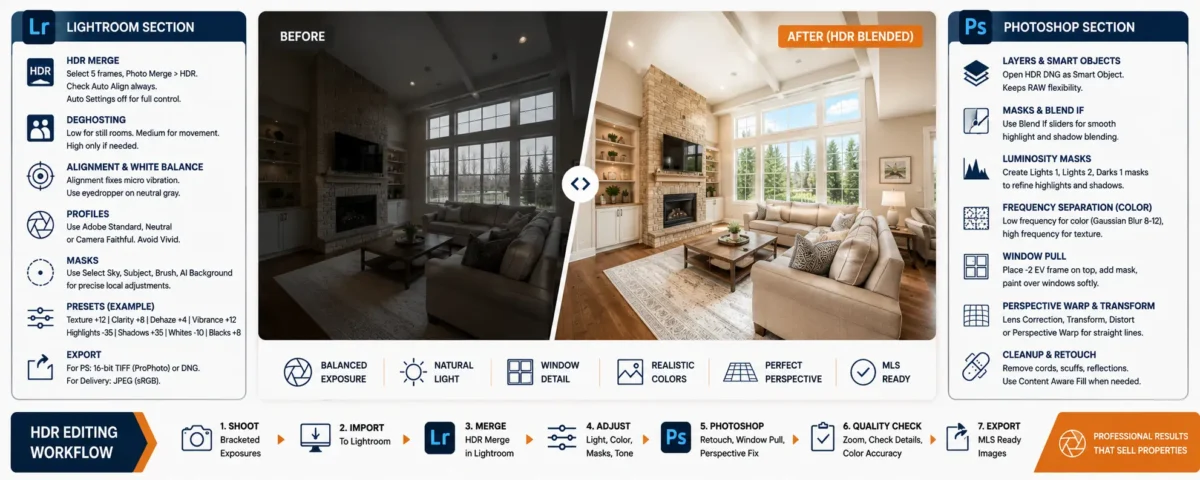
Lightroom HDR Merge Workflow
Lightroom is where 80 percent of real estate hdr editing happens.
HDR Merge: Select 5 frames, right click Photo Merge, HDR. Check Auto Align always. Auto Settings off. You want control.
Deghosting: Low for still rooms. Medium if tree leaves outside moved or curtains fluttered. High only if someone walked through. High deghost softens detail.
Alignment and white balance: Alignment fixes micro vibration. After merge, use eyedropper on a neutral gray wall or ceiling. Do not pick a white that has glare.
Profiles: Use Adobe Standard, Adobe Neutral, or Camera Faithful. Avoid Vivid. Vivid pushes saturation that makes hdr real estate editing look fake.
Masks: This is where modern Lightroom wins for hdr editing in Lightroom. Use Select Sky to bring down sky exposure without affecting interior. Use Select Subject or brush to warm up wood only. Use AI background to cool down blue window light spilling on white walls.
Presets: Build your own. My base for hdr blending for real estate photography is Texture +12, Clarity +8, Dehaze +4, Vibrance +12, Saturation 0, Highlights -35, Shadows +35, Whites -10, Blacks +8. Then adjust per room.
Export: If you need Photoshop, export as 16 bit TIFF ProPhoto or keep DNG. For direct delivery, JPEG sRGB.
Photoshop Window Pull and Local Corrections
Photoshop is where good becomes professional.
Layers and Smart Objects: Open HDR DNG as Smart Object. This keeps RAW flexibility.
Masks and Blend If: Double click layer, use Blend If to blend dark frame into bright window without hard mask. Split sliders with Alt drag for smooth transition.
Luminosity masks: Build Lights 1, Lights 2, Darks 1 masks. Use them to target only highlights around windows for hdr merge photography fixes.
Frequency separation for color: Duplicate layer, apply Gaussian Blur 8 to 12 on low frequency, high frequency holds texture. Paint color correction on low frequency to fix orange and blue casts without destroying drywall texture.
Smart objects for window pull: Place -2 EV frame as Smart Object on top, add black mask, paint white only over window glass with soft brush at 80 percent flow.
Perspective warp and Transform: Use Filter, Lens Correction, then Edit, Transform, Distort or Guided Upright. For extreme wide angles, use Perspective Warp to straighten two planes separately.
Healing and clone: Remove cords, small scuffs, reflections of photographer in mirror. Use Content Aware Fill for larger items like trash cans outside window view. Keep it ethical for MLS, do not remove permanent defects.
Window Pull Editing for Clean Window Views
Window pull is the technique everyone searches after their first HDR job.
What it is: Taking window detail from a darker exposure and blending it into your bright, clean HDR interior.
When needed: When HDR alone leaves windows white, cyan, or dirty gray. When client specifically wants view to sell lifestyle. When you shoot luxury homes where view is part of price.
How professionals do it for natural result:
- Merge to HDR for perfect interior.
- Place darkest frame that still has view detail on top.
- Add black mask, invert.
- Paint white over glass only, avoid frames.
- Set layer to Luminosity or Normal at 75 to 90 percent opacity.
- Color correct view layer with Camera Raw Filter to match daylight, usually cool it slightly.
- Feather mask edge 1.5 to 2.5 pixels.
Why HDR alone sometimes fails: If exterior is 8 stops brighter than interior, even 9 brackets cannot hold both without making interior look flat. Window pull editing gives manual control so hdr real estate images keep depth while windows stay believable.
How to Keep HDR Natural
The fastest way to lose an agent is to deliver glowing, crunchy HDR.
Halos: Bright outline around ceiling beams. Cause is high Clarity and Dehaze plus strong deghost. Fix by lowering Clarity to under +15 and using local adjustments.
Oversaturation: Grass looks neon, wood looks radioactive. Cause is Saturation slider. Use Vibrance only, and pull green and orange saturation down in HSL.
Glowing edges: Light bleeds from window onto wall. Cause is lifting shadows too high globally. Fix with luminosity mask that targets wall near window and pulls exposure down 0.3 to 0.5.
Gray walls and blue shadows: Cause is lifting blacks to +80. Real rooms have some black point. Keep Blacks 5 to 15, Shadows under +55.
Orange lighting: Tungsten lamps pollute. Use local Temp brush -20 to -35 over affected wall area, or use Color Range selection on orange.
Noise and fake look: Noise comes from high ISO plus shadow lift. Shoot ISO 100, add Color Noise Reduction 25, Luminance 15 to 20, keep Detail at 60. For fake look overall, check your histogram. Natural HDR has a full histogram, not bunched in middle.
Common HDR Blending Mistakes and Fixes
8 Pro Checks| Mistake | Why It Happens | Effect | Solution |
|---|---|---|---|
| Handheld bracketing | Rushing without tripod | Ghosting, soft images, failed merges | ✓ Use tripod, remote, 2 sec timer |
| Only 3 brackets in high contrast room | Trying to save time | No shadow detail, noisy corners | ✓ Use 5 to 7 brackets for hdr blending for listings |
| Shooting JPEG | Camera set wrong | No headroom for highlight recovery | ✓ Shoot RAW for hdr photography editing |
| Auto Settings on in HDR Merge | Default Lightroom behavior | Overcooked contrast and saturation | ✓ Turn Auto off, build your own preset |
| Ignoring white balance | Mixed bulbs and daylight | Orange and blue patches | ✓ Eyedropper neutral, then local masks |
| Tilting camera down | Wanting to show more floor | Leaning walls, amateur look | ✓ Keep sensor vertical, shoot at 44 inches |
| Skipping window pull | Thinking HDR will fix windows | White windows in final delivery | ✓ Blend dark frame for view at 80 percent opacity |
| Heavy noise reduction and sharpening | Trying to hide ISO noise | Waxy skin on walls, crunchy edges | ✓ Lower ISO at capture, light sharpening only |
Advanced HDR Blending Techniques
Once basic HDR is solid, these separate you from the crowd.
Exposure fusion with Enfuse: Enfuse HDR blends based on well exposedness, not tone mapping. Often more natural for interior photography editing. Drag 5 RAWs, set exposure weight 1, saturation 0.2, contrast 0, output TIFF.
Manual blending: Stack 5 exposures in Photoshop, mask by hand. Time consuming but gives perfect control for luxury property photography where every reflection matters.
Luminosity masking: Create a Darks 2 mask to lift only deep shadows under vanities without affecting midtone walls. This avoids the flat HDR look.
Flash blending or flambient: Shoot HDR base for ambient, then one on camera flash bounced off ceiling for color accurate walls. Blend flash frame at 30 to 50 percent with Color blend mode to neutralize orange. This is flambient vs hdr in practice.
HDR panorama: Shoot 3 angles each with 5 brackets, merge each angle to HDR, then stitch the 3 HDRs into panorama. Use for large open plans and commercial spaces.
HDR drone photography: Merge 5 AEB drone frames for balanced roof and shadow detail, then do aerial photo editing with light contrast.
Commercial, hotels, resorts: Use same HDR base, but keep verticals perfect and color neutral. Brands want consistency across 200 images, not drama.
Best Software for HDR Blending
7 Tools Compared| Software | Price Model | Ease | Speed | Quality | Best For |
|---|---|---|---|---|---|
Lightroom HDR Merge |
Subscription | Easy | Very fast | Very good natural base | Batch hdr real estate photography |
Photoshop |
Subscription | Medium | Medium | Excellent retouch | Window pull, perspective, object removal |
Photomatix Pro |
One time | Medium | Fast | Good but can look fake | Quick hdr merge settings when you like tone mapping |
Aurora HDR |
One time | Easy | Fast | Very good color | Beginners who want guided hdr editing workflow |
Enfuse / LR Enfuse Plugin |
Donation / low cost | Medium | Medium | Excellent natural fusion | Realistic hdr editing, no halos |
SNS-HDR |
One time low | Easy | Fast | Natural, low halo | Quiet favorite for architectural photo editing |
Affinity Photo 2 |
One time | Medium | Medium | Very good | Budget alternative to Photoshop for hdr image blending |
Many real estate photographers use Lightroom for the main HDR merge, Enfuse when they want a softer exposure-fusion look, and Photoshop for window pulls, object cleanup, and final local corrections.
Natural HDR vs Overcooked HDR
Quality Check| Aspect | Natural HDR Editing | Overcooked HDR |
|---|---|---|
| Highlights | ✓ Detail retained, windows show soft view | ✕ Gray or glowing, harsh transition |
| Shadows | ✓ Open but still has depth and direction | ✕ Too bright, flat, noisy |
| Color | ✓ True paint colors, neutral whites | ✕ Orange wood, neon grass, blue shadows |
| Texture | ✓ Wood grain and fabric visible | ✕ Over sharpened, crunchy |
| Buyer Trust | ✓ Feels like being there | ✕ Feels edited, distracts from home |
| Agent Feedback | ✓ More showings, fewer complaints | ✕ Requests for re edits, looks cheap |
| MLS Risk | Low | Higher if view or condition misrepresented |
HDR vs AI Editing
AI tools now claim one clickdedicated HDR real estate photo editing service.
Where AI helps: Culling 2000 images from a resort shoot, auto straightening, initial white balance, quick sky replacement for exterior photography editing.
Where AI fails: It does not know that the wall is supposed to be warm white not gray, that the window view should be slightly brighter than interior to feel sunny, or that the mirror reflection should stay. It also struggles with hdr real estate editing where each room has different mixed light.
My workflow now: AI for culling and first merge, human for color, perspective, and window pull. This hybrid keeps speed and quality.
Automation can speed up a first pass, but many professional real estate photographers still finish luxury homes manually because clients notice inconsistent color, window views, and room-to-room brightness across a gallery.
HDR for Every Property Type
Luxury homes: 7 brackets, manual window pull, keep some highlight to feel airy, deliver 45 to 70 images, include twilight HDR. Use hdr property photography with restraint.
Apartments and condos: 5 brackets, emphasize light and storage, keep verticals perfect to make small feel tall.
Commercial, office, retail, industrial: Neutral color, perfect verticals, less sky drama, show flow and ceiling height.
Vacation rentals and Airbnb: Bright, warm, inviting. Keep beds white, wood warm, avoid over saturation. Add one twilight exterior for clicks.
Hotels and resorts: Consistent color across hundreds of images, same white balance per building, light hdr editing workflow preset that does not change.
10-Step HDR Blending Workflow for Client Delivery
This is the client delivery version you can share with assistants.
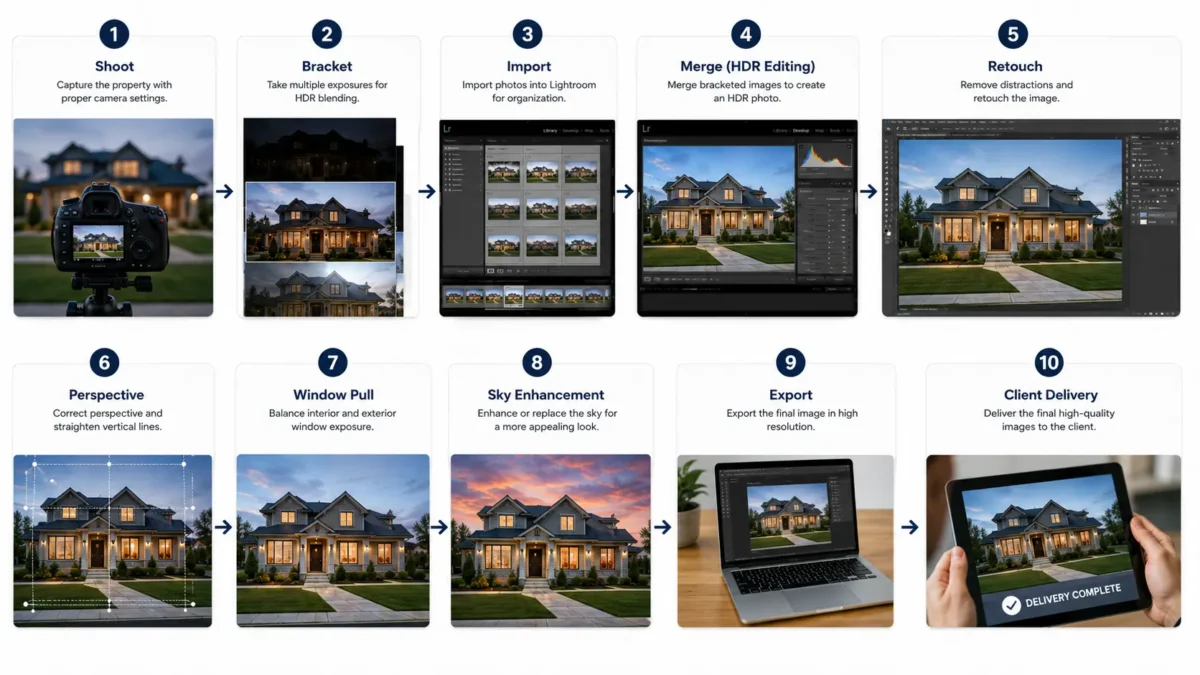
Teach this to new editors. Shoot consistently, bracket properly, import with preset, merge with same HDR merge settings, retouch with actions, fix perspective with guided, handle windows with masked dark frame, enhance sky lightly, export and deliver with consistent naming. Repeatability is what makes HDR editing software profitable.
When to Outsource Your HDR Editing
You will hit a wall at about three shoots a day. Shooting is fun. Culling and merging 900 frames every night is not. That is when many studios keep their shooting style but outsource the merge and finish to stay consistent and hit next morning delivery.
A good Real Estate Photo Editor does more than HDR Blending. They handle
- Real Estate Photo Enhancement
- Object Removal
- Day to Dusk Editing
- Virtual Staging
- Virtual Renovation
- Sky and Grass Replacement
- Aerial Photo Editing
- HDR Editing
- Panorama Stitching
- Floor Plan Redrawing
Under one roof, with your presets and your file naming, so gallery looks like you edited it.
If you explore that path, look for RAW based workflow, lens and perspective correction included, manual window pull not auto, and color matching across rooms. One studio that works this way is PixelShouters, used by teams who want their HDR to stay natural while they stay behind the camera.
FAQs About HDR Blending for Real Estate Photography
1. What is HDR blending for listings?
Merging multiple exposures so interior and window detail show in one natural image.
2. How many brackets for interiors?
5 is standard, 7 for bright glass or luxury homes.
3. Is HDR allowed for MLS?
Yes, when it looks natural and does not misrepresent. Avoid heavy sky replacement that hides condition.
4. What is difference between hdr photo blending and exposure fusion?
Blending often tone maps a 32 bit file, fusion averages well exposed pixels. Fusion is often more natural.
5. Can I do HDR editing in Lightroom only?
Yes for most residential work. Photoshop needed for advanced window pull and object removal.
6. What HDR merge settings avoid fake look?
Auto Align on, Auto Settings off, Deghost Low, Highlights -30 to -50, Shadows +30 to +45.
7. How to avoid halos?
Lower Clarity and Dehaze, avoid pushing Shadows to 100, use local masks.
8. What is window pull editing?
Replacing white window with detail from darker bracket via masking.
9. Do I need flash?
No for pure HDR, yes if you want flambient vs HDR hybrid for better color.
10. Is flambient better than HDR?
Better color accuracy, slower. Use for premium listings.
11. Best lens for bracketed real estate photography?
16 to 20mm rectilinear full frame, low distortion.
12. How to fix mixed lighting?
Shoot RAW, correct globally then brush Temp locally on orange or blue areas.
13. Can I shoot HDR handheld?
You can but you will get ghosting and soft merges. Use tripod.
14. What is Enfuse HDR?
Fusion tool that blends exposures naturally, great for realistic HDR editing.
15. How long per image?
3 to 5 minutes manual, under 1 minute with solid preset and batch.
16. Why gray walls after HDR?
Blacks lifted too high. Keep Blacks 5 to 15.
17. How to fix orange walls?
Local HSL, pull orange saturation down 15 to 25, shift Hue slightly.
18. Export size for MLS?
3000px to 4000px long edge, sRGB, JPEG 80 to 90, under 10MB.
19. Is Aurora HDR good?
Yes, good color tools, but Lightroom is standard for batch real estate HDR editing.
20. How to learn HDR editing tutorial fast?
Shoot 5 brackets of one room, merge 10 times varying only one slider each time, compare.
21. Do luxury buyers like HDR?
Yes when natural. They notice fake editing more than anyone.
22. What is Deghosting?
Software fix for movement between brackets, like curtains or leaves.
23. Should I use HDR for exteriors?
3 brackets helps balance sky and shaded porch, good for exterior photography editing.
24. What is natural HDR editing?
Balanced highlights and shadows that match what eye saw on site.
25. How to price HDR photo editing services?
Per image 0.80 to 2.50 for basic HDR, more with window pull and object removal, or per property package.
Conclusion: Natural HDR Photos That Sell the Space
HDR Blending for Real Estate Photography is not a filter, it is a way to tell the truth about a space. When you control light with bracketing, when you merge with care in Lightroom, when you finish with precise window pull and color correction in Photoshop, you create images that help buyers understand a home before they walk in.
Clear, bright, well balanced real estate photos earn more attention because they answer buyer questions quickly: room size, natural light, view quality, finishes, and whether the property feels cared for. Many professional photographers find that once they standardize their hdr photography workflow, they spend less time fixing and more time shooting.
Practice the 5 bracket method in one house this week. Merge it three ways, natural, fusion, and manual window pull, and compare. You will see quickly which version looks trustworthy. Keep that version as your standard, build a preset around it, and repeat. That consistency is what turns good hdr real estate photos into a business that agents refer.