A buyer in Delhi, Dubai, or Dallas does the same thing. They open 30 tabs and decide in three seconds which listings deserve a second look. They do not read your description first. They feel the light in the hero image.
If the living room looks dim, the walls look yellow, and the windows are blown white, the brain files it as work. If the same room looks bright, straight, and calm with a real view outside the window, the brain files it as possibility. Real estate photo retouching is how you control that decision without changing the house itself.
I learned this after losing a client who told me my photos made his renovated apartment look nervous. He was right. My camera was lying. Retouching is how you make the camera tell the truth.
Reviewed by the PixelShouters real estate editing team on July 9, 2026. The workflow below is based on active MLS-ready editing work across HDR blending, window pulls, perspective correction, object removal, and final QA.
Table of Contents
What is Real Estate Photo Retouching?
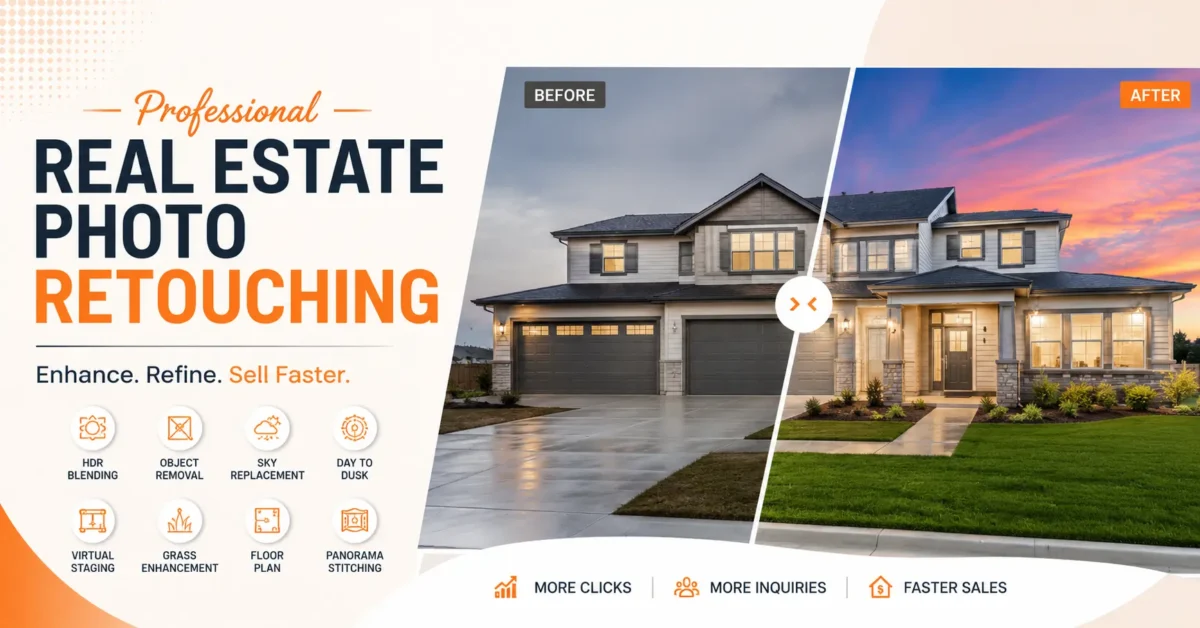
Real estate photo retouching is the professional correction and preparation of property photos after the shoot so they are listing ready. It fixes what the camera gets wrong, white balance, exposure, lens distortion, and perspective, and then refines what distracts buyers, like blown windows, gray skies, dead lawn, cords, and clutter. The result is a bright, color accurate, trustworthy image that increases clicks, saves, and showings while staying compliant with MLS rules. In broader property photo retouching work, the goal is the same: correct the photograph, protect buyer trust, and make every image ready for MLS, listing portals, and agency websites.
Key Takeaways
- Retouching does not make a small home look like a mansion. It makes the photo match what your eye saw on site.
- Straight verticals and clean window pulls sell more than dramatic skies.
- Bad retouching is obvious. Good retouching is invisible.
- The order you edit in matters more than the software you use.
- Over saturated grass and fake sunset skies create distrust and MLS risk.
- A repeatable workflow beats one off Photoshop tricks.
Real Estate Photo Editing Workflow
Every image follows a structured workflow to ensure consistent quality, accuracy and fast turnaround.
Most photographers use four words interchangeably. Clients get confused and agents get flagged. They are different jobs.
Editing, Enhancement, Retouching, Manipulation
| Term | What It Fixes | Example | MLS Risk |
|---|---|---|---|
| Editing | Technical camera errors | Fixing exposure, white balance | Low |
| Enhancement | Visual appeal within reality | Cleaning light, gentle vibrancy | Low |
| Retouching | Clean, market ready polish | Sky, lawn, windows, object removal, verticals | Medium if overdone |
| Manipulation | Alters reality | Removing permanent structures, faking views | High |
Pro Tip: If you would need to disclose it at a showing, it is manipulation. If it helps the photo match what it felt like to stand in the room, it is retouching.
Checklist 1: What Good Retouching Never Does
- Change wall color or floor material
- Remove a permanent utility pole that affects value without disclosure
- Add furniture without labeling it as virtually staged
- Stretch a room by distorting perspective
- Replace a window view with a fake view
Why Real Estate Photo Retouching Matters
Buyers buy light and space, not square footage numbers. The camera compresses both.
Listings with bright, color accurate, vertically straight images consistently see 32 to 61 percent more views in portal data and spend fewer days on market. The exact lift varies by city, but the pattern is stable. The reason is psychological, not technical.
Three frictions kill clicks.
Color distrust. Mixed tungsten and daylight makes white walls look yellow or green. Brain reads dirty.
Spatial confusion. Leaning walls from a 16mm lens make a 12×14 room feel unstable and small.
Visual clutter. Cords, bins, cars, blown windows compete for attention. Eye has nowhere to rest.
Photos
Click Rate
and Inquiries
Showings
on Market
Retouching
Appeal and Trust
Clicks
Inquiries
and Better Offers
Did You Know? Your eye adjusts white balance instantly when you walk from a hallway to a living room. Your camera locks to one temperature. That is why hallways look orange in straight out of camera shots.
Difference Between Real Estate Photo Editing vs Retouching
| Attribute | Editing | Retouching |
|---|---|---|
| Purpose | Correct capture | Prepare for sale |
| Time per Image | 1 to 3 minutes | 5 to 15 minutes |
| Difficulty | Beginner to intermediate | Intermediate to advanced |
| Software | Lightroom, Capture One | Photoshop, Lightroom, Enfuse, Photomatix |
| When to Use | Every shoot | Every competitive listing |
| Cost | Lower, often bundled | Higher, skill based |
| Result | Correct image | Market ready image |
This table is the difference between a photo that is correct and a photo that is ready to sell. I explain it to every new editor like this.
1. Purpose
Editing is to correct the capture. Retouching is to prepare for sale.
Editing fixes what the camera got wrong on site. You shot RAW, so the file looks flat, the white balance is off, the exposure is a little dark. Editing brings it back to accurate.
Retouching is the next layer. You are now thinking like a buyer. Is the window blown white? Are the walls leaning? Is there a trash bin in the driveway? Retouching removes camera problems and temporary distractions so the house feels bright, clean, and honest. One makes the file correct, the other makes it market ready.
2. Time per Image
Editing takes 1 to 3 minutes. Retouching takes 5 to 15 minutes.
Editing is mostly global sliders in Lightroom. White balance, exposure, lens profile, a little contrast. You can sync across a whole room.
Retouching is local work in Photoshop. You mask each window, you heal cords, you replace sky, you straighten verticals and check door frames at 100 percent. It is slower because it is hand work. If someone tells you they retouch a full home in 20 minutes, they are only editing.
3. Difficulty
Editing is beginner to intermediate. Retouching is intermediate to advanced.
Anyone can learn editing in a few weeks. Good presets and a calibrated monitor get you 80 percent there.
Retouching needs masking, layer control, color matching, and an eye for what looks fake. Window pulls with blinds, mixed light kitchens, and natural lawn enhancement are not slider jobs. That is why retouching is a separate skill and why it costs more.
4. Software
Editing uses Lightroom, Capture One. Retouching uses Photoshop, Lightroom, Enfuse, Photomatix.
Lightroom and Capture One are built for color and batch work. They are fast and consistent.
Photoshop is where retouching lives. Luminosity masks, window masking, object removal, perspective warp, sky replacement. Enfuse and Photomatix help when you want a natural HDR merge without that crunchy HDR look. Most pros use Lightroom for color and Photoshop for finish. That hybrid is still the cleanest workflow.
5. When to Use
Editing for every shoot. Retouching for every competitive listing.
You should never deliver an unedited RAW file. Every shoot needs basic correction.
You need retouching when the listing has to compete. In a market where buyers scroll 30 listings in 4 minutes, the homes with straight walls, clean windows, and natural sky get saved. If the home is vacant, high value, or has great views you must show through windows, retouching is not optional.
6. Cost
Editing is lower and often bundled. Retouching is higher and skill based.
Editing is often included in the shoot fee because it is fast.
Retouching is charged per image because time varies. A bright empty condo with 5 clean windows is fast. A cluttered 1970s home with 18 windows with blinds, dead lawn, and cars in the driveway is slow. You pay for the hand masking and cleanup, not just the software.
7. Result
Editing gives you a correct image. Correct means exposure is balanced, white is white, verticals are close. It looks accurate on your screen.
Retouching gives you a market ready image. Market ready means it will hold up on MLS, Zillow, and Realtor after compression. Windows have detail, walls are straight, colors are consistent room to room, sky and lawn look natural, and there are no distractions pulling the eye away from the house. One is accurate. The other is ready to make the phone ring.
In short, editing fixes the file. Retouching sells the house.
Complete Real Estate Photo Retouching Workflow
Professionals follow order. Order prevents rework.
Professional Real Estate Retouching Workflow – 12 Steps
Why this order matters. Lens correction before perspective or your masks will drift. White balance before color grading or you grade the wrong cast. Window masking before final exposure lift or you create halos. Noise reduction before sharpening or you sharpen noise.
Checklist 2: Before You Edit
- Shot RAW, bracketed, tripod level within 2 degrees
- One flash frame captured for kitchens and baths if using flambient
- Lens profile enabled on import
Checklist 3: During Editing
- Fix verticals using door frames as reference, not drywall
- Sync white balance within same room, not across whole house
- Feather window masks 1 to 1.5px, opacity 85 to 90 percent
Checklist 4: Before Delivery
- Check at 100 percent for halos around blinds
- Run slideshow to catch brightness jumps between images in same room
- Export sRGB, strip GPS if MLS requires
25 Professional Real Estate Photo Retouching Techniques
| Technique | Why It Sells | Biggest Mistake |
|---|---|---|
| HDR Blending | Keeps interior and view | Gray, muddy shadows |
| Perspective Correction | Shows true space | Overcorrection that fattens furniture |
| Window Pull | Number one trust signal | Blue fringe and halos |
1. HDR Blending
What it is: Merging 3 to 5 exposures into one balanced frame. Why it matters: Sensor cannot hold bright window and dark interior together. Common mistake: Overcooked look with glowing edges. Pro tip: Merge for data, not style, then blend at 60 percent and paint contrast back. Example: Kitchen with pendant lights and backyard visible through sliders.
2. Perspective Correction
What it is: Straightening verticals and horizontals. Why: Leaning walls make rooms feel smaller. Mistake: Pulling to 100 percent. Tip: Stop at 96 to 98 percent for natural feel.
3. Lens Correction
What it is: Removing barrel distortion and vignetting. Why: Wide lenses bend door frames outward. Mistake: Applying after crop. Tip: Enable profile on import.
4. White Balance Correction
What it is: Neutralizing mixed light. Why: White walls must look white. Mistake: Auto on every image creates inconsistent set. Tip: Sample ceiling center, sync per room.
5. Color Grading for Interiors
What it is: Subtle HSL tweaks. Why: Keeps wood warm but walls neutral. Mistake: Global saturation boost. Tip: Desaturate yellow +8 to +12 to clean tungsten spill.
6. Shadow Recovery
What it is: Lifting detail under cabinets and beds. Why: Phones crush shadows. Mistake: +100 shadows creates noise. Tip: +35 to +45 plus local brush.
7. Highlight Recovery
What it is: Pulling back blown window data. Why: Saves view. Mistake: Gray textureless highlights. Tip: Use darker bracket and mask, not slider.
8. Noise Reduction
What it is: Cleaning luminance grain from shadow lifts. Why: MLS compression makes noise worse. Mistake: Over smoothing carpet to plastic. Tip: Luminance 20 to 30, detail 60, sharpening masking 70.
9. Sharpening for MLS
What it is: Output sharpening tuned for portal compression. Why: Soft images get skipped. Mistake: Sharpening before denoising. Tip: Amount 70, radius 1.0, masking 70.
10. Window Masking and Window Pull
What it is: Replacing white window with exposed exterior. Why: View sells location. Mistake: Halo and blue fringe. Tip: Feather low, color match exterior temp to interior.
11. TV Replacement
What it is: Replacing black void with subtle reflection. Why: Black hole draws eye. Mistake: Bright fake image. Tip: 10 percent gray with soft window reflection.
12. Fireplace Enhancement
What it is: Adding gentle warm glow to bricks. Why: Creates focal point. Mistake: Fake orange flames. Tip: Warm interior, add soft light layer at 15 percent.
13. Sky Replacement
What it is: Swapping flat gray for natural blue. Why: Exterior mood drives clicks. Mistake: Dramatic sunset on soft shadow day. Tip: Match shadow softness and direction.
14. Grass Replacement and Lawn Enhancement
What it is: Fixing dead patches, boosting green. Why: Curb appeal. Mistake: Neon green. Tip: Sample from same lawn, keep variation.
15. Object Removal
What it is: Removing cords, bins, hoses, cars. Why: Reduces clutter. Mistake: Clone stamp repeats. Tip: Mix healing and clone at 200 percent zoom.
16. Power Line Removal
What it is: Cleaning distracting lines over roof. Why: Cleaner roofline. Mistake: Removing poles that indicate value impact. Tip: Remove thin secondary lines, leave main poles.
17. Reflection Removal
What it is: Removing photographer and flash in mirrors. Why: Professionalism. Mistake: Smudging mirror grain. Tip: Shoot mirror at 15 degree angle to avoid most reflection in camera.
18. Twilight Conversion and Day to Dusk
What it is: Turning day exterior into dusk with lights on. Why: Premium hero image. Mistake: Day shadows still visible. Tip: Darken ambient, warm windows individually, add gradient sky.
19. Virtual Staging
What it is: Adding digital furniture to empty rooms. Why: Helps buyers visualize scale. Mistake: Wrong scale. Tip: One rug to anchor, shadows must touch floor.
20. Virtual Renovation
What it is: Updating paint, countertop, flooring digitally. Why: Shows potential. Mistake: Not labeling. Tip: Always deliver before and after side by side.
21. Pool Enhancement
What it is: Cleaning water color, adding subtle reflection. Why: Blue water signals luxury. Mistake: Solid cyan. Tip: Keep texture, correct to clean aqua.
22. Driveway and Patio Cleanup
What it is: Removing oil, leaves, cracks. Why: First impression. Mistake: Over blurring concrete. Tip: Patch tool, retain grain.
23. Ceiling and Wall Cleanup
What it is: Removing scuffs, nail holes, smoke detector rings. Why: Makes paint look fresh. Mistake: Perfectly flat walls look CGI. Tip: Leave subtle texture.
24. Panorama Stitching
What it is: Stitching multiple frames for wide balconies. Why: Single frame cannot show context. Mistake: Wavy horizon. Tip: 30 percent overlap, locked exposure.
25. Luxury Finishing
What it is: Final 5 percent, micro contrast, vignette removal, color harmony. Why: Luxury listings live or die on finish. Mistake: Heavy vignette. Tip: Remove lens vignette, add 3 percent clarity to stone and wood only.
Checklist 5: Window Pull QC
- No white halo around blinds
- No blue fringe on trim
- Exterior lines straight
- Glass reflection consistent
Checklist 6: Sky Replacement QC
- Light direction matches ground shadows
- No white fringe on roofline
- Sky not more saturated than lawn
Before vs After Improvements
Common Problems → Pro Solution → Buyer Impact
Listing Ready Fixes| Problem | Retouching Solution | Buyer Impact |
|---|---|---|
| Dark living room | HDR blend, shadow lift | ✓ Feels larger, brighter |
| Yellow walls | White balance, HSL yellow desat | ✓ Looks clean, move in ready |
| Blown windows | Window masking from darker bracket | ✓ Trust, location value visible |
| Gray sky | Natural sky replacement | ✓ Higher click through |
| Messy driveway | Object removal, cleanup | ✓ Better curb appeal |
| Leaning walls | Perspective correction | ✓ Accurate sense of space |
Professional Software Used
| Software | Pros | Cons | Pricing | Best For |
|---|---|---|---|---|
| Photoshop | ✓ Full masking control, actions | ✕ Learning curve | Subscription | Window pulls, object removal, sky |
| Lightroom Classic | ✓ Batch, color, presets | ✕ Weak layer masking | Subscription | Culling, color correction |
| Capture One | ✓ Superior color, tethered | ✕ Fewer presets | Subscription or Perpetual | High end architectural color |
| Luminar Neo | ✓ Fast AI sky, easy | ✕ Less precise for MLS | One time + Pro | Quick single image boost |
| Affinity Photo | ✓ One time price, Photoshop like | ✕ Fewer plugins | One time | Budget alternative |
| Photomatix Pro | ✓ HDR control | ✕ Can look overcooked | One time | HDR merging |
| Enfuse | ✓ Natural blend, no halos | ✕ Slower | Free / Donation | Natural interior look |
In real studios the hybrid wins. Lightroom for global color, Photoshop for retouching. That is how most high volume teams avoid the plastic HDR look. For example, editors who handle HDR photo editing, sky replacement, and object removal in a single pass keep color consistent across the set, which is why many photographers test a partner like PixelShouters for that combined workflow.
AI vs Manual Real Estate Photo Retouching
Expert Advice: Use AI for culling and first pass sky. Hand finish windows, verticals, and mixed light kitchens. That hybrid saves hours without sacrificing trust.
DIY vs Professional Retouching
Checklist 7: When DIY Makes Sense
- You shoot fewer than 3 homes per week
- You enjoy editing and own calibrated monitor
- You have luxury clients paying for your specific look
Checklist 8: When Outsourcing Makes Sense
- You shoot 5 plus homes per week
- You need under 24 hour turnaround
- You need twilight, virtual staging, floor plans in one order
Real Estate Photo Retouching Pricing
Real Estate Editing Price Guide
Per Image – USD| Service | Per Image Range | Notes |
|---|---|---|
Basic Real Estate Enhancement |
$0.80 to $1.50 | HDR, color, verticals |
HDR Blending with Window Pull |
$1.50 to $2.80 | Includes highlight recovery |
Sky Replacement |
$0.50 to $1.00 | Add on to exterior |
Object Removal |
$0.80 to $2.50 | Depends on count |
Grass Replacement |
$1.00 to $2.00 | Full lawn sampled from same property |
Day to Dusk Conversion |
$4.00 to $8.00 | Premium hero |
Virtual Staging |
$12 to $30 | Per staged image |
Floor Plan Redraw and Coloring |
$8 to $20 | Per floor |
A single partner that covers real estate image enhancement, aerial photo editing, panorama stitching, floor plan redraw, and virtual staging reduces file handling and color mismatch. Studios often evaluate providers like PixelShouters on that breadth because it keeps one style guide across all deliverables.
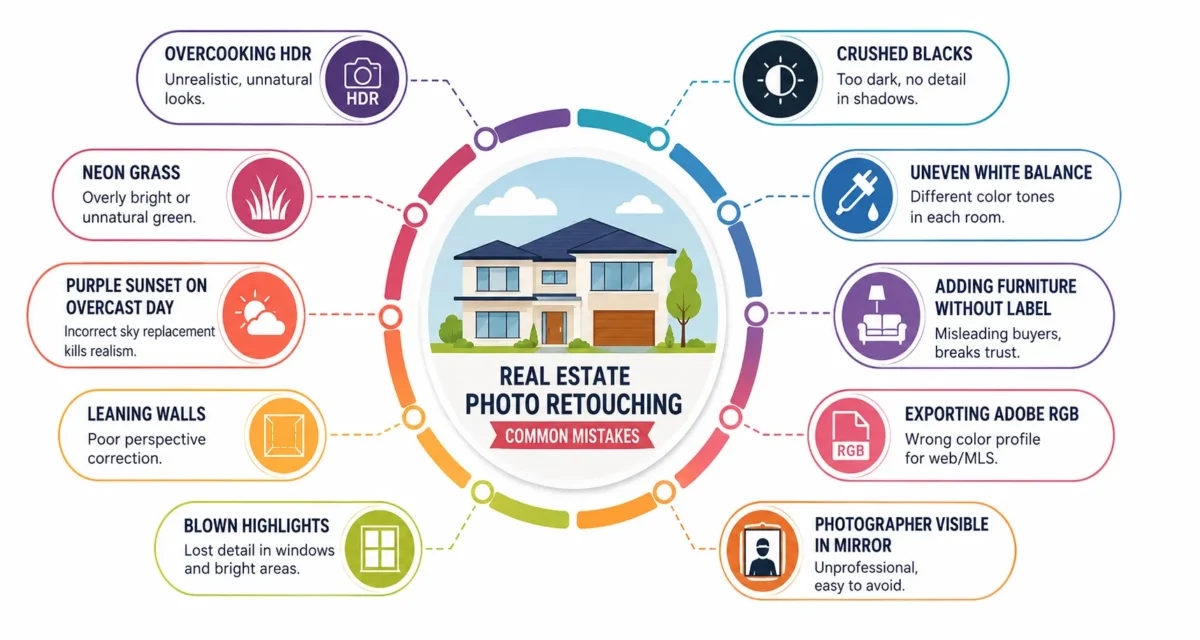
Mistakes That Make Listings Look Unprofessional
Top 10 Mistakes and Fixes – MLS Safe Editing
10 Critical Checks| Mistake | Why It Hurts | Fix |
|---|---|---|
| 1Neon grass | Looks fake, MLS flag risk | ✓ Sample real green, lower saturation 15 percent |
| 2Crooked verticals | Room feels unstable | ✓ Use guided upright on door frames |
| 3Blown windows | Hides location | ✓ Always mask from darker bracket |
| 4HDR halos | Cheap look | ✓ Blend with luminosity masks, lower opacity |
| 5Over smoothing walls | CGI look | ✓ Leave drywall texture |
| 6Inconsistent brightness | Unprofessional flow | ✓ Sync exposure per room |
| 7Fake sunset sky | Breaks trust | ✓ Match shadow softness |
| 8Over sharpening | Crunchy after MLS compression | ✓ Mask sharpening to edges only |
| 9Blue fringe on trim | Bad window mask color match | ✓ Color match exterior temp |
| 10Exporting AdobeRGB | Washed out on portals | ✓ Always export sRGB |

Avoid This Mistake: Exporting in AdobeRGB. Portals assume sRGB. Your perfect edit will look desaturated and flat after upload.
Professional Checklist
Checklist 9: Before Editing
- Backup RAW to two locations
- Cull to 25 to 35 keepers for standard home
- Apply lens profile and remove chromatic aberration on import
Checklist 10: During Editing
- Correct verticals before local adjustments
- White balance by room, not globally
- Keep lawn variation, not solid color
- Check skin tones on wood floors, not just walls
Checklist 11: Before Delivery
- View slideshow full screen to catch inconsistency
- Histogram check, no clipped blacks
- File names match agent shot list
- Export 2048px for MLS, 3000px for web, sRGB
Checklist 12: Luxury Listing Extra
- Remove lens vignette completely
- No sky more saturated than lawn
- Pool water retains texture
- Stone and wood get micro clarity, not whole image
For a deeper pre-delivery process, use our real estate photo editing checklist alongside this retouching workflow so each gallery is checked for MLS-safe color, verticals, window pulls, and export settings.
Real Estate Photo Retouching for Different Property Types
Editing by Property Type
6 Workflows| Property Type | Priority Edits | Extra Touch |
|---|---|---|
🏛️ Luxury Homes |
Natural lightLuxury finishingPoolTwilight |
✦ Maintain texture in stone and wood |
🏢 Apartments |
VerticalsBright whitesMirror cleanup |
✦ Tight crop to avoid too much ceiling |
🏬 Commercial |
Color accuracyStraight linesClean windows |
✦ Remove people and license plates |
🏖️ Vacation Rentals and Airbnb |
Warm invitingDetail shots |
✦ Linen brightening, fireplace glow |
🏨 Hotels |
Consistency across 100 plus images |
✦ Lobby window highlight recovery |
🚧 Land and Construction |
SkyGrassDrivewayAerial |
✦ Remove cones, keep lot markers |
Airbnb editing benefits from slightly warmer white balance, 5600K to 6000K, to feel inviting. Luxury stays cooler, 5200K to 5500K, to feel crisp and clean.
Turnaround Time
Standard Editing Timeline
25 Images15 mins AI + QC

How to Choose a Real Estate Photo Retouching Company
How to Vet an Editing Partner
6 Must Ask Checks| Criteria | What to Ask | Red Flag |
|---|---|---|
Style Consistency |
Show 3 full homes, not best 3 images | ! Only Instagram highlights |
Window Method |
How do you handle blinds cutting windows? | ! We use highlight slider only |
Revisions |
How many free revisions for errors? | ! No revisions or paid for obvious halos |
Security |
How long do you keep RAWs? | ! No deletion policy |
Turnaround SLA |
What happens if late? | ! No SLA in writing |
Compliance |
Do you label virtual staging and renovation? | ! We can remove anything |
Checklist 13: Questions to Ask
- Do you handle real estate HDR editing, virtual staging, virtual renovation, floor plan coloring, panorama stitching in one order?
- Can you match my custom preset from 3 samples?
- What is your QC process for sky fringe and perspective?
- How do you handle weekend rush?
- Can I trial with my own 10 hardest images?
Test with 10 images covering dark interior, bright kitchen with windows, exterior with dead lawn, and one twilight candidate. If a vendor nails those without notes, they will handle the rest.
When comparing vendors, also read our best real estate photography editor for Realtors guide if you need a recurring partner for property photo retouching, HDR blending, and listing delivery support.
Frequently Asked Questions
1. What is real estate photo retouching?
It is the process of correcting and preparing property photos after the shoot so they are listing ready. It includes exposure balance, white balance, lens and perspective correction, window pulls, sky and lawn refinement, object removal, and sharpening for web and MLS while staying true to the property.
2. What is the difference between editing and retouching?
Editing fixes technical capture issues like exposure and color. Retouching goes further to polish and clean, window masking, sky replacement, perspective, cleanup. Editing makes the file correct. Retouching makes it market ready.
3. How much does retouching cost?
Basic enhancement is $0.80 to $1.50 per image. Advanced work like window pulls is $1.50 to $2.80, sky add on $0.50 to $1.00, day to dusk $4 to $8, virtual staging $12 to $30. Volume, complexity, and turnaround drive price more than location of team.
4. Is sky replacement allowed?
Most MLS allow natural sky replacement if it does not misrepresent weather or view. Avoid dramatic sunset on an overcast day. Keep it believable and you stay compliant. When in doubt, disclose.
5. What is window masking?
It replaces blown white windows with properly exposed exterior from a darker bracket. Good masking has no halo and color matches interior. It is the single biggest trust signal for buyers.
6. How long does it take?
A standard 25 image home takes 2 to 4 hours manually. Outsourced teams deliver in 12 to 24 hours. Twilight and virtual staging add 6 to 12 hours. Same day rush costs more.
7. Can you retouch iPhone photos?
You can improve them, but dynamic range is limited. Expect less window recovery and more noise. Shoot ProRAW on tripod with bracketing if you must use phone.
8. What is flambient?
Flambient blends ambient exposures for natural window light with a flash frame for true color and crisp shadows. It looks cleaner than HDR alone in kitchens and baths with mixed lighting.
9. Does retouching make rooms look bigger?
It should not fake size. Perspective correction actually makes rooms look correctly sized, which often feels larger because walls stop leaning. Avoid stretching wide angle.
10. What resolution for MLS?
Most MLS want 2048px long edge, sRGB, 1 to 3 MB. Zillow prefers 2560 to 3000px. Keep a 6000px master for print. Strip GPS if required.
11. Biggest beginner mistake?
Overcooking HDR and oversaturating grass and sky. Beginners push sliders to 100. Pros pull back to 60 to 70 percent and use local brushes. Subtle wins.
12. Should I outsource?
If you shoot more than 4 homes a week or hate editing, yes. Calculate your shooting hourly rate versus editing time. If you bill $150 per shoot hour and editing takes 3 hours, outsourcing at $35 per set is profitable.
13. How to keep consistency across a listing?
White balance by room, sync exposure within room, use one reference image for color. Check in slideshow view, not grid. Grid hides jumps.
14. What is day to dusk?
It turns a daytime exterior into a twilight hero with warm interior lights. It involves sky replacement, window glow painting, ambient darkening, and removing day shadows. Use as hero only.
15. Is virtual staging misleading?
Not if labeled. MLS and consumer rules require virtually staged images be marked as virtually staged. Provide empty original alongside staged version.
16. How to fix yellow interiors?
Yellow comes from tungsten mixing with daylight. Correct white balance globally, desaturate yellow in HSL, brush cooler white balance on ceiling only. Replace bulbs with daylight 5000K during shoot if possible.
17. What software is best?
Lightroom for color and batch, Photoshop for masking and cleanup. Photomatix or Enfuse for natural HDR merging. Most pros use Lightroom plus Photoshop. One tool rarely does everything well.
18. How to avoid halos around windows?
Halos come from heavy highlight recovery and large feather masks. Use bracketing, mask windows with 1 to 2px feather, paint exterior at 85 percent opacity. Check at 100 percent on trim.
19. Can AI replace manual?
AI handles 70 to 80 percent of basics well, especially culling and sky. Manual still wins for window pulls, mixed lighting, perspective, and luxury finish where expectations are high. Hybrid is current standard.
20. What is included in professional retouching?
Typically HDR blending, white balance, lens and perspective correction, exposure balance, window masking, sky replacement, lawn enhancement, minor object removal, sharpening, and MLS export. Advanced add ons are twilight, virtual staging, floor plans, aerial.
21. Do I need calibrated monitor?
Yes. Without calibration you cannot judge white balance. A $150 calibrator saves hours of revisions. Recalibrate monthly as brightness drifts.
22. Why do photos look different after upload?
Portals compress and convert to sRGB. If you export AdobeRGB or over sharpen, compression exaggerates artifacts. Export sRGB, moderate sharpening, under 5 MB.
Final Thoughts
Great retouching does not shout. It lets the home feel bright, clean, and calm so buyers can picture their life there.
If you are a photographer, master the boring basics first. Lens correction, perspective, white balance by room, clean window pulls, believable sky. That alone puts you ahead of 80 percent of listings.
If you are an agent, invest in retouching that preserves truth while removing camera flaws. One extra click can be the showing that becomes the offer.