
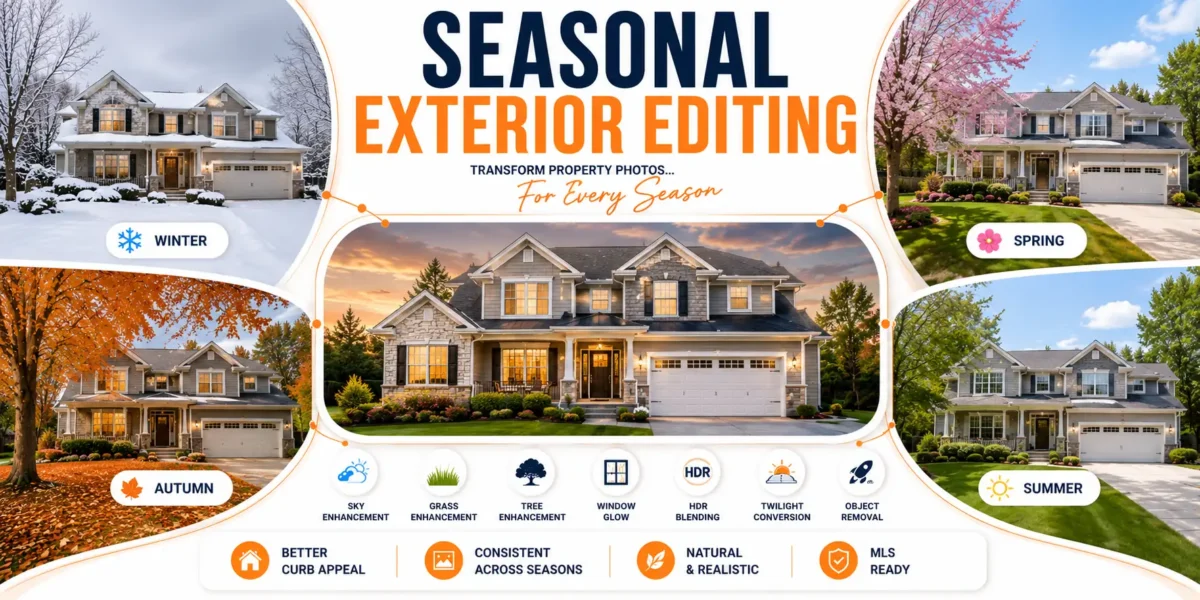
Key takeaways: Seasonal Exterior Editing is how you make exterior photos look right for the season you’re selling in – cleaning up snow, dead grass, and gray skies without faking the home itself.
Imagine you shoot a beautiful two story home in January. The house is perfect. The lawn isn’t. It’s brown, patchy, covered in half-melted snow. The sky is flat white. The trees look like sticks. The owner says, “Can you make it look like April?”
Then April comes and you shoot a different home. It’s 2 PM, 95 degrees, the sun is directly overhead. The sky is blown out, the shadows are harsh, the white siding is glowing, and the grass has dry yellow spots from the heat.
Same job, opposite problem. That’s why Seasonal Exterior Editing exists.
I have been editing exterior real estate photos for over 15 years. I’ve seen how one bad exterior can kill clicks for an otherwise great listing. Buyers don’t read the description first. They look at the first exterior photo for about two seconds and decide — does this home look cared for?
This guide will show you how to fix seasonal problems without making the home look fake. It’s written for real estate photographers, agents, brokers, property managers, Airbnb hosts, builders, architects, and media teams who have to deliver clean, MLS-ready exteriors every week, no matter what the weather did on shoot day.
Let’s explore.
Table of Contents
What is Seasonal Exterior Editing?
Let me explain it the way I explain it to new photographers on my team.
Seasonal Exterior Editing is the combination of retouching steps you use to make an exterior photo usable and appealing for a specific season.
It’s not one filter. It’s a set of decisions. Think seasonal real estate photo editing as a complete mindset.
The purpose is simple: help the buyer picture living there in the coming months, not apologize for what the yard looked like on Tuesday.
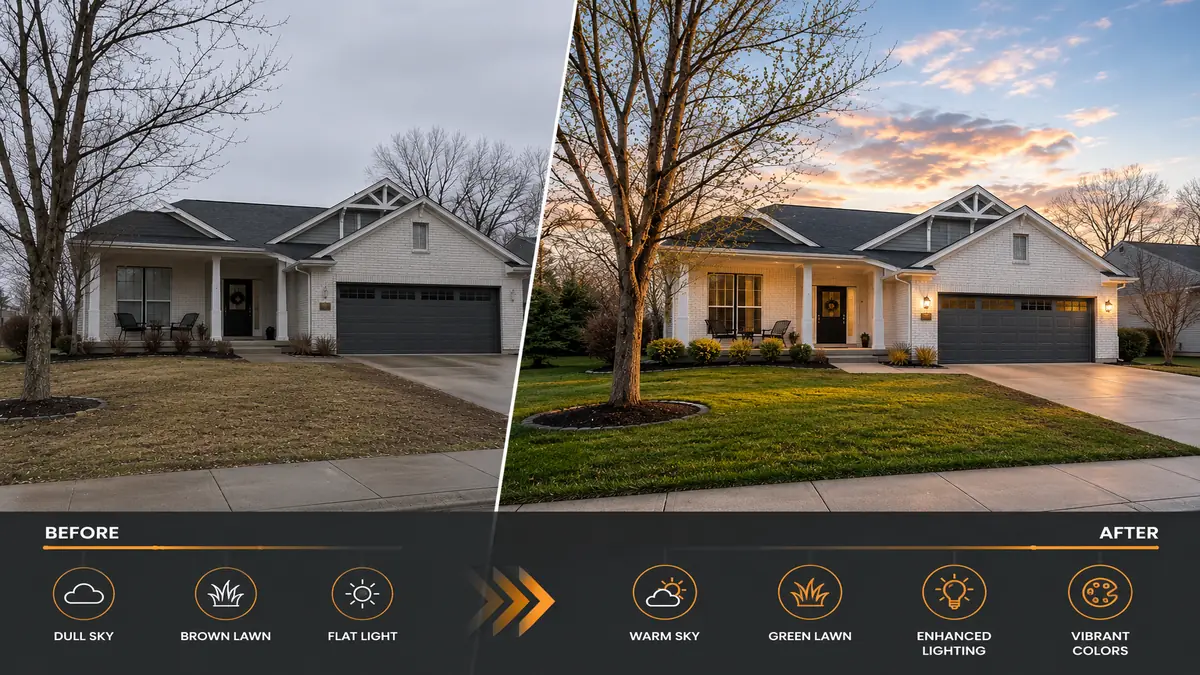
What it usually includes:
- Sky replacement when the sky was gray or white
- Lawn enhancement or green grass replacement when grass is dormant
- Tree enhancement to bring bare trees back to life
- Snow removal photo editing to clear driveways and walkways
- Leaf cleanup for fall real estate photography
- Color correction so siding and brick look true
- Perspective correction so walls don’t lean
- HDR real estate editing and window pull so windows have life
When you need it:
You shot in December but you are listing in March. You shot on a rainy day. The HOA hasn’t turned on irrigation yet and the lawn is yellow. You have 30 listings shot across 4 months and they need to look like they belong to the same brand.
Who uses it every day?
Real estate photographers who don’t want reshoots. Agents who want more showings. Airbnb hosts who need summer property photos to look bookable in winter. Builders documenting a project across seasons. Marketing agencies and real estate media companies delivering consistent exterior image enhancement at volume.
✔️ Expert Tip: If you have to write “lawn looks better in summer” in the caption, the photo failed. Fix the photo.
Why Season Changes Everything in Real Estate Marketing
I learned this early. I edited two identical floor plans on the same street. One had a winter photo — gray sky, brown grass, snow piles. One had a spring photo — blue sky, clean lawn, warm light. Same price, same agent. The spring one got 3x more saves in the first week.
Buyers are not buying logic first. They are buying a feeling.
Spring real estate photography feels like a fresh start. People imagine gardening, kids playing outside.
Summer property photos feel active and bright. People imagine barbecues, open windows.
Fall real estate photography feels cozy and settled. People imagine school starting, holidays at home.
Winter real estate photography feels cold and distant unless you add warmth — interior glow, clean paths, a little light.
This is what happens in a buyer’s head:
If you lose them at step two, nothing else you did — virtual staging, virtual renovation, perfect interior HDR — matters.
Seasonal emotions also drive scrolling. On portals, a bright exterior with blue sky and defined lawn creates a pattern interrupt. Gray and brown blends into the feed. Color wins.
✔️ Did You Know? In our studio, the number one reason for exterior reshoot requests is not composition. It’s weather. Seasonal Exterior Editing solves 90% of those reshoots without going back.
Understanding Every Season – Problems and Fixes
Spring
Spring looks easy but it’s messy.
What goes wrong: Muddy flower beds, overgrown grass after winter, weeds, pollen haze that makes the image soft, skies that change every 10 minutes.
How I edit it: I don’t go full summer. Spring should feel fresh, not peak. Light lawn enhancement, repair bare spots instead of full green grass replacement if the lawn is 70% there. Sky replacement with a light blue and soft clouds. Tree enhancement with early leaves, not full summer canopy. Subtle flower addition near the front door only. Driveway cleaning to remove winter grit.
Color and light: Lift greens just a little. Warm color temperature by 200-400K. Keep whites clean. If you push greens too much, white siding turns green from spill.
Mistakes I see: Adding so many flowers you can’t see the foundation. Making grass look like artificial turf.
Pro tip: Sharpen mulch a bit. Defined dark mulch makes spring beds look instantly cared for.
Summer
Summer should be bright but not harsh.
What goes wrong: Harsh overhead sun, strong black shadows under eaves, blown-out sky, glare on windows, lawn burnout with yellow spots.
How I edit it: This is where exterior real estate photo editing gets technical. Sky replacement with a blue sky that has definition, not just flat blue. Shadow balancing to open porch shadows but keep direction. HDR real estate editing or exposure blending to save highlight detail on white siding. Window pull to show interior without glare. Lawn repair for dry spots.
Color and light: Pull down yellows. Summer greens go neon fast. Keep foliage from glowing. Control highlights so you still see siding texture.
Mistakes I see: Cranking vibrance to 50 and making the home look like a cartoon.
Autumn / Fall
Fall is my favorite but it’s the easiest to overdo.
What goes wrong: Leaves on roof, in gutters, on driveway. Brown patches in lawn. Dull light at 4 PM. Trees turning at different rates.
How I edit it: For autumn exterior editing, I clean more than I add. Leaf cleanup on roof and driveway is non-negotiable. I keep some leaves in beds for realism. For trees, selective color — warm up some trees, keep others green. Garden enhancement to tidy edges. Cloud enhancement for depth.
Color and light: Think golden, not orange. If your wood siding turns orange when you warm fall colors, mask it off.
Mistakes I see: Turning every tree red in the same week. In real life, that never happens.
Winter
Winter needs a clear story. You have two honest options.
What goes wrong: Snow covering everything, dead grass, bare trees, flat gray sky, heavy blue cast on everything, short days so it’s dark at 4:30.
How I edit it – Option A – Keep Winter Honest: Snow removal photo editing only for driveway, walkway, and steps. Keep light snow on lawn edges for context. Sky replacement with soft winter blue, not tropical blue. Add window pull with warm glow. Remove blue cast from snow.
How I edit it – Option B – Seasonal Adaptation for Spring Listing: Full snow cleanup, green grass replacement that keeps original lawn shape and borders, tree enhancement with light foliage, warm sky, sunlight enhancement. This is common for MLS photo editing when you shot in winter but are listing in spring. Check your local disclosure rules.
Mistakes I see: Green grass but heavy snow on roof in same image. Or removing all shadows so house looks like it’s floating.
Pro tip: Always clear the path to the front door first. Safety and access sell.
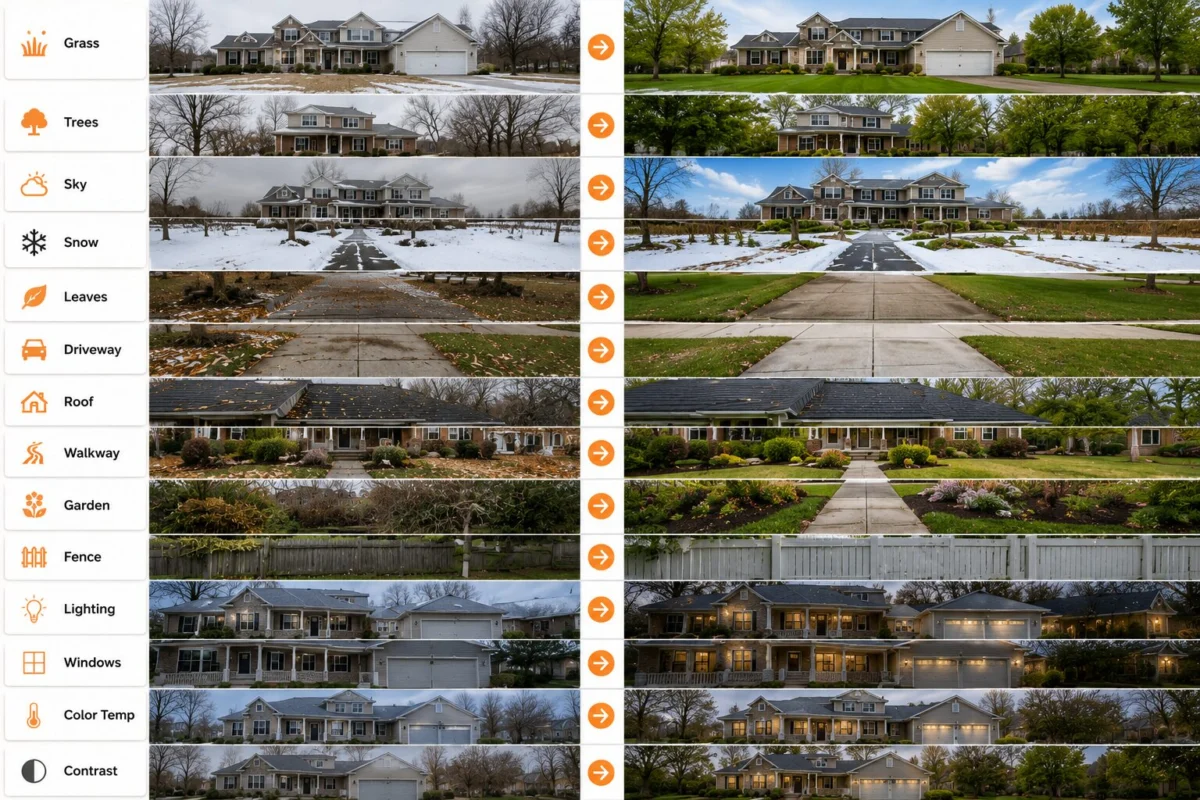
✔️ Common Mistake: Lifting shadows to 100% until the image has no depth. Real homes have shadows. Keep them, just make them softer.
My Full Workflow: From RAW to MLS-Ready
This is the exact workflow I use and teach. It works for seasonal real estate photo editing at volume.
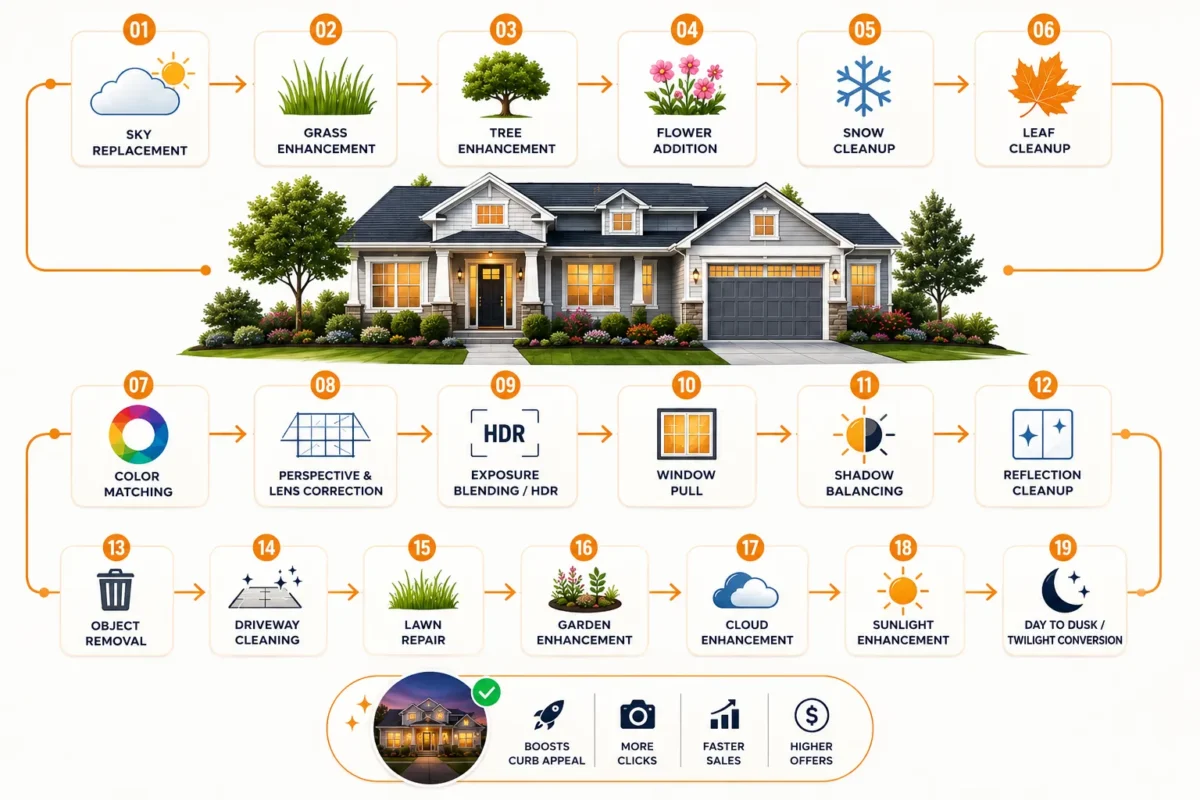
1. Season Detection
What season was it shot in? What season are we selling for? Write it down. “Shot winter, sell spring” tells you everything.
2. Image Evaluation
I look at the bracket set. Is there enough data in highlights? Is the wide angle bowing? Is there clutter that needs object removal? Is the lawn 20% alive or 80%?
3. Editing Strategy
Decide: Is this a cleanup job or an adaptation job? Cleanup = keep same season but make it best version. Adaptation = move from one season to another. For MLS photo editing, adaptation may need disclosure.
4. Global Fixes First
Lens correction, then perspective correction, then color correction, then exposure blending. I always fix geometry before I fix grass. If you fix grass first and then straighten, your lawn edges stretch.
5. Landscape Enhancement
Lawn enhancement or green grass replacement, tree enhancement, garden enhancement, leaf cleanup or snow cleanup. I work background to foreground — trees, then lawn, then beds.
6. Sky and Light
Sky replacement or cloud enhancement, sunlight enhancement, shadow balancing, HDR blending. After new sky, I always add a tiny bit of sky color spill to roof highlights. It sells realism.
7. Detail Work
Window pull, object removal for bins, hoses, cars, power lines if allowed, driveway cleaning, reflection cleanup.
8. Season Matching
This is where taste comes in. Spring = fresh and bright. Summer = crisp and true. Fall = warm golden. Winter = clean and cozy. Adjust color temperature and contrast to match that feeling.
9. Quality Check
Zoom to 100% on three places: where sky meets roof, where grass meets concrete, and windows. Look for halos, repeating grass patterns, and fake window edges.
10. Export
MLS size, sRGB, 2048-3000px long edge, 70-80% JPEG, light sharpen for screen. Keep TIFF archive.
Here’s the flow as a diagram I have pinned on my wall:
✔️ Action Step: Before you touch sliders, write one sentence: “This was shot in X but needs to feel like Y for Z buyer.” That one sentence prevents 90% of over-editing.
Every Editing Technique Explained Like a Human
Every Editing Technique
I am going to explain each technique the way I wish someone had explained it to me when I started. For each one — purpose, why it helps, how pros do it, what goes wrong, and when to skip it.
Sky Replacement
Purpose: Fix dull, gray, or blown skies that kill curb appeal. Benefits: Instant lift.
Pro workflow: Select sky by luminosity, not just quick select. Match light direction — if shadows fall left, sky light should come from right. Add 3-5% blue spill to roof. Keep some cloud texture, not flat blue.
Common mistake: Sunset sky with midday shadows.
When NOT to use: When original sky is already beautiful and matches light.
Grass Enhancement vs Green Grass Replacement
Enhancement repairs what is there. Replacement builds new lawn texture. For lawn enhancement, I clone healthy patches and boost greens with selective HSL. For green grass replacement, I keep original borders exactly and add texture with variation.
Benefit: Signals care.
Common mistake: Neon Astroturf with no variation or mow lines.
When NOT to use: Desert landscaping, xeriscaping, or when lawn is intentionally dormant and your MLS forbids replacement.
Tree Enhancement
Purpose: Bring life back to bare winter trees.
Pro workflow: Add foliage at low opacity, build up, shape to not block second floor windows. Keep trunk structure.
Common mistake: All trees identical, like copy-paste.
When NOT to use: When trees hide architecture — thin instead of fill.
Flower Addition
Purpose: Small color near entry for spring.
Pro workflow: Add low, slightly blurred blooms in beds near door, not across entire yard. Common mistake: Rainbow garden that hides foundation vents.
When NOT to use: Winter listings that claim to be current.
Snow Cleanup
Purpose: Make home look accessible. Pro workflow: Clear driveway, walkway, steps first. Then decide lawn. Keep concrete texture. Keep eave shadows so house doesn’t float.
Common mistake: Removing snow shadows.
When NOT to use: Cabin listings where snow is the selling point — then clean, but keep snow.
Leaf Cleanup
Purpose: Remove clutter that reads as neglect.
Pro workflow: Remove from roof, gutters, driveway. Thin on ground.
Common mistake: Over-smoothing roof shingles to plastic.
When NOT to use: Light scatter that adds fall feel.
Color Matching / Color Correction
Purpose: Make siding, brick, roof true to real life.
Pro workflow: Use white trim as reference, check memory colors. Keep same correction across entire set for listing photography editing.
Common mistake: Each photo different color.
When NOT to use: Never skip.
Perspective Correction & Lens Correction
Purpose: Straighten verticals so home doesn’t lean.
Pro workflow: Apply lens profile first, then vertical correction to 95%, not 100%. Leaving tiny convergence looks more natural.
Common mistake: Over-correcting so house leans backward.
When NOT to use: Intentional dramatic aerial photo editing angles.
Exposure Blending & HDR Real Estate Editing
Purpose: Balance bright sky with dark porch.
Pro workflow: Merge 3-5 brackets, natural tone mapping, manual blend for windows.
Common mistake: Grungy halos around roofline.
When NOT to use: When single RAW has enough range and you need speed.
Window Pull
Purpose: Show warm interior life.
Pro workflow: Blend darker bracket for window, correct color cast, keep slight reflection so it doesn’t look like a sticker. Keep exposure 0.5 stop darker than interior hero.
Common mistake: Neon white windows.
When NOT to use: When interior is messy — keep soft reflection.
Shadow Balancing
Purpose: Open dark porches without killing depth.
Pro workflow: Lift with luminosity masks, not global shadows slider.
Common mistake: Removing all shadows.
When NOT to use: When you want dramatic day to dusk editing.
Reflection Cleanup
Purpose: Remove photographer, car, harsh glare from windows.
Pro workflow: Clone gently, keep natural glass look.
Common mistake: Matte windows with zero reflection.
Object Removal
Purpose: Remove bins, hoses, toys, cars, power lines.
Pro workflow: Remove in order — big vehicles, bins, hoses, small trash. Keep what defines lot lines.
Common mistake: Removing permanent things buyers will see on visit.
When NOT to use: Don’t remove defects to hide them.
Driveway Cleaning
Purpose: Reduce oil stains and grit.
Pro workflow: Lighten stains, keep texture and expansion joints.
Common mistake: Paper-white driveway.
Lawn Repair
Purpose: Fix pet spots, tire marks.
Pro workflow: Clone healthy texture from same image.
Common mistake: Repeating pattern that looks like wallpaper.
Garden Enhancement
Purpose: Define beds and trim overgrowth.
Pro workflow: Sharpen mulch edges, tame bushes slightly. Common mistake: Topiary that looks fake.
Cloud Enhancement
Purpose: Add depth without full sky swap.
Pro workflow: Add subtle contrast to existing clouds.
Common mistake: Storm clouds on sunny house.
Sunlight Enhancement & Golden Hour Effect
Purpose: Add warmth and direction.
Pro workflow: Warm highlights, add soft glow, keep shadows long and consistent.
Common mistake: Light coming from two directions.
Day to Dusk Editing / Twilight Conversion / Sunset Editing
Purpose: Create emotional twilight from day shot. This is huge for curb appeal editing and click-through.
Pro workflow: Darken sky to deep blue (not black), add window glow, turn on exterior lights, keep landscape slightly visible, add subtle stars.
Common mistake: Black sky with nuclear windows.
When NOT to use: If your MLS bans twilight as first image — use as image 2-3 instead.
Fixing Real Seasonal Challenges
- Rain and wet pavement: Dry pavement slightly via color, but keep some reflection for realism. Remove photographer puddle reflection. Dehaze.
- Snow: Clear paths first. Then decide story — keep winter honest or adapt to green. Keep ground shadows.
- Fog: Dehaze, lift contrast, light sky replacement, keep some atmosphere so it doesn’t look cut out.
- Dead grass: For light dormancy, lawn enhancement. For heavy dormancy, green grass replacement with honest borders.
- Bare trees: Tree enhancement at low opacity, don’t block architecture.
- Construction next door: Tighter crop, light object removal if small. Never hide active construction on subject property.
- Vehicles: Remove from driveway and directly in front if MLS allows. Keep realistic street parking so it doesn’t look deserted.
- Trash bins, hoses, toys: Always remove for hero exterior. They signal clutter.
- Power lines: Light removal is usually okay. If lines dominate view, leave them — removing is misleading.
- Harsh sunlight: HDR blending saves white siding. Shadow balancing opens porches.
- Dirty sidewalks: Clean but keep texture.
- Aerial photo editing: Fix vignetting, enhance greens slightly but desaturate 5-10% — drone greens go neon fast. Keep neighboring properties accurate.
✔️ Pro Insight: If you shoot 3 homes a week, DIY seasonal work costs you one full shoot day. Outsourcing that day often pays for the editing.
Best Software – Honest Breakdown
Photoshop: Full control for sky replacement, object removal, perspective correction, lawn repair. Slow. Subscription. Best for complex seasonal adaptations.
Lightroom: Great for batch color correction, HDR merge, lens correction. Weak for precise lawn and sky masking. Best for base HDR and color for listing photography editing.
Luminar Neo: Easy sky replacement and quick AI enhance. Can look over-processed fast. Best for quick swaps.
Capture One: Excellent color and detail. Great for architectural photo editing where color accuracy matters. Smaller preset world.
ON1 Photo RAW: Good sky tools, decent masking. Interface takes time.
DxO PhotoLab: Best lens corrections and denoise. Limited compositing. Best for fixing wide-angle exteriors.
Affinity Photo: One-time cost, solid compositing. Fewer plugins.
AI editors: Fast first pass for grass and sky. Struggle with realism — repeating patterns, halo edges, light mismatch.
Most pro studios use Lightroom for base + Photoshop for seasonal work. AI helps with masking, not with taste.
Where AI Helps and Where It Fails
What AI does well right now: auto sky selection, auto lawn masking, initial exposure blending, small object removal, panorama stitching, image brightening.
Where it still fails: Realistic grass texture without repeating, tree edges against sky, matching light direction after sky replacement, window pull that keeps natural reflection, snow removal that keeps curb texture.
Why human editors still matter: Seasonal judgment. AI doesn’t know that a maple in Minnesota in March shouldn’t be full green, or that a desert home shouldn’t have Kentucky bluegrass. A human knows that.
Future is human-guided, AI-assisted — better season detection, smarter color matching across a set, but taste stays human.
How Seasonal Editing Actually Builds Curb Appeal
Curb appeal editing works because of visual hierarchy. Eye goes: sky → roofline → front door/windows → lawn → driveway → garden.
If any step is broken — gray sky, black windows, brown lawn — the chain breaks.
Seasonal Exterior Editing fixes the chain in order. Clean sky first, then detailed roof, then warm windows with window pull, then even lawn, then clean hardscaping. That order creates feeling: safe, cared for, easy to own.
You are not adding value that isn’t there. You are removing friction that hides value that is there. A clean exterior image enhancement lets buyers project their future onto the property. That’s emotional selling without lying.
How to Build a Workflow That Doesn’t Eat Your Week
When you handle listings every week, consistency beats creativity. This is where having a pro partner helps.
In my studio, we cut revisions in half by documenting a style: fixed sky set, fixed grass HSL values per season, fixed perspective tolerance. Every photographer knew what “spring” meant.
If you are scaling, it helps to work with a team that lives in seasonal logic, not just basic retouching. I have seen this work well with teams like PixelShouters — they support photographers and agents with high-volume workflows including Real Estate Photo Enhancement, HDR Photo Editing, Day to Dusk / Twilight Photo Conversion, Sky Replacement, Grass Replacement, Object Removal, Lawn & Landscape Enhancement, Color Correction, Perspective Correction, and Image Brightening, plus extended services like Virtual Staging, Virtual Renovation, Floor Plan Conversion, Aerial Photo Editing, and Panorama Stitching.
The idea is not to outsource taste. It’s to systematize it. You define your seasonal look once — what spring green looks like, what twilight blue you like — and then every listing photography editing job matches it, whether it was shot in snow or sun.
✔️ Quick Checklist for Briefing an Editor: Send 3 reference finals you love, note MLS rules on grass/sky disclosure, tell them repair vs full replacement, and share one twilight sample you like. That brief prevents 90% of revisions.
Seasonal Editing Checklist
Use this for every exterior set:
Capture
- Brackets 3-5 for HDR
- Shot a bit wider for cleanup crop
- No cars directly in front if possible
- Bins, hoses, toys moved
Global
- Lens correction
- Perspective correction — verticals straight at 95%
- Color correction — trim is true white
- Exposure blending — no halos
Seasonal Cleanup
- Sky — enhance or replace, light direction matches
- Lawn — enhance, repair, or replace, keep borders
- Trees — enhance or thin, not blocking home
- Leaves / Snow — driveway and walkway cleared
- Garden — edges defined, mulch natural
Detail
- Window pull — warm, detailed
- Shadow balancing — porch open, depth kept
- Object removal — bins, hoses, cars
- Driveway cleaning — texture kept
- Reflection cleanup
Season Match
- Color temp matches target season
- Contrast matches target season
- Realism check at 100% on skyline and grass edge
Export
- MLS size, sRGB, sharpen for screen
- Archive RAW + final
FAQ
1. What is Seasonal Exterior Editing exactly?
It’s the process of adjusting exterior property photos to look right for the season you are selling in. It includes sky replacement, lawn enhancement, green grass replacement, tree enhancement, snow removal photo editing, leaf cleanup, color correction, perspective correction, HDR blending, and window pull. Goal is better curb appeal editing while keeping structure accurate.
2. Is seasonal editing considered misleading?
It can be if done wrong. Good seasonal exterior editing cleans temporary conditions like snow or leaves and enhances what is there. It should not change roof material, lot size, or add landscaping that doesn’t exist. Many MLSs allow enhancement but ask for disclosure when you do full grass replacement.
3. When should I use lawn enhancement vs full green grass replacement?
Use enhancement when lawn is 60-80% healthy — repair patches and boost color. Use replacement when lawn is dormant, dead, or snow-covered. Always keep original borders, concrete edges, and add variation so it doesn’t look like carpet. For desert yards, don’t add grass.
4. Can you turn a winter photo into a summer photo?
Yes. We do it with snow cleanup, lawn enhancement or replacement, tree enhancement, sky replacement, and warming color temperature. For realism, we also adjust shadows and add sunlight enhancement. If your market requires disclosure, add it in listing.
5. What is difference between sky replacement and cloud enhancement?
Replacement swaps entire sky, ideal for flat gray. Enhancement adds contrast to existing sky without full swap. Replacement has more impact but needs light direction matching. Enhancement is more subtle and faster.
6. How does day to dusk editing help?
Day to dusk or twilight conversion turns a daylight exterior into twilight with glowing windows and deep blue sky. It creates emotional impact and often gets higher click-through as second or third image. Check if your MLS allows twilight as first image.
7. What is included in exterior image enhancement?
Typically HDR real estate editing, color correction, perspective correction, lens correction, exposure blending, window pull, shadow balancing, sky replacement, lawn enhancement, object removal, driveway cleaning, and sharpening. Seasonal work adds snow or leaf cleanup and season matching.
8. How do I avoid fake-looking grass?
Use texture from same image, avoid 100% saturation, keep some yellow and brown, keep mowing lines and shadows, keep concrete edges. Never use solid color fill.
9. Do I need HDR for exteriors?
For most exteriors yes. HDR or exposure blending saves sky detail while opening porch shadows and enables realistic window pull. Single RAW works when light is soft and even, but brackets give more control.
10. What is best workflow for winter real estate photography?
Shoot brackets, expose for house not snow. In edit: remove blue cast, clear paths, decide story — clean winter vs adapted spring. Add soft blue sky, warm window pull, subtle brightening. Avoid heavy flower addition that contradicts season.
11. How is editing different for Airbnb vs MLS?
MLS needs accurate, compliant property photo enhancement. Airbnb and vacation rentals can be slightly more aspirational with sunset editing and garden enhancement to sell experience, but must still show accurate layout and access.
12. What are most common seasonal challenges?
Rain puddles, snow hiding walkways, fog, dead grass, bare trees, harsh midday shadows, dirty sidewalks, vehicles, trash bins, power lines, overgrown spring landscaping. Each has specific fix — dehaze, shadow balancing, object removal, lawn repair.
13. Can AI do seasonal exterior editing automatically?
AI can do first-pass sky and lawn masking and small object removal. It struggles with realistic texture, tree edges, light matching, window pull with natural reflection, and snow removal that keeps curb texture. Human taste still wins.
14. How long does good seasonal editing take?
Light curb appeal edit 5-10 min per image. Full adaptation with sky, grass replacement, snow cleanup, object removal 15-30 min per image manually. With batch systems and pro teams, your active time is just upload and review.
15. What should I include in editing brief?
Target season, reference finals, grass preference repair vs replacement, sky style, MLS disclosure rules, whether you need twilight conversion, and whether aerial photo editing should match ground set.
16. Does twilight work for all homes?
Almost all, but homes with exterior lighting look best. If home has no exterior lights, add subtle landscape lighting or choose golden hour effect instead of full twilight.
17. What is window pull and why important?
Window pull blends darker exposure into windows so interior warmth shows without glare. Prevents black holes and mirror reflections, makes home feel occupied, especially for winter and twilight images.
18. How do I keep edits consistent across listing?
Use same sky family, same grass HSL, same color temp, same perspective level. Edit one hero exterior fully, use as reference for rest including aerial and panorama stitching shots.
19. What software is best for beginners?
Start Lightroom for HDR merge and color, Photoshop for sky and object removal. Luminar Neo for quick sky swaps while learning masking. As volume grows, pro workflow saves time.
20. Is virtual staging part of seasonal editing?
It can pair. Virtual staging for patios and virtual renovation for paint often go with seasonal exterior editing to show potential. Keep staged images labeled for MLS compliance.
21. How to handle power lines and construction?
Light power line removal usually okay for aesthetics. Removing dominant lines or nearby construction that affects value can be misleading. When in doubt, leave it and crop tighter. Trust over perfection.
22. What is biggest mistake in autumn editing?
Making every tree bright red. Real fall is mixed — some green, some yellow, some bare. Selective color and leaf cleanup looks more believable.
23. How do I know if I over-edited?
Show image to someone who didn’t see original. If they say “nice house,” you are good. If they say “nice edit,” you went too far. Also check at 100% zoom on skyline and grass edge.
Final Thoughts
I have edited exteriors shot in blizzards, in 110-degree heat, in pouring rain, and at noon when light is worst. The homes were all good homes. The photos just needed help telling the right seasonal story.
Seasonal Exterior Editing is not about faking a property. It’s about removing the temporary stuff that hides value — snow piles, leaf clutter, flat gray sky, dead grass, harsh shadows — and presenting the home in its best honest seasonal context.
Build a simple system. Define what spring, summer, and fall look like for your brand. Save your sky library by light direction. Lock your grass values. Use the checklist on every set. Teach your team to write that one sentence: “Shot in X, needs to feel like Y.”
When you do that, you stop reshooting for weather. You stop losing clicks because of a brown lawn. You start delivering consistent curb appeal editing that agents trust and buyers click.
If your calendar is full and you are spending nights fixing skies and lawns, consider bringing in a professional editing partner to keep your look consistent across hundreds of images. Done right, thoughtful seasonal exterior editing saves time, improves listing consistency, and keeps your photos honest — and that’s what gets more showings.
Go pull your last 5 exterior sets from different months and run them through the checklist. Fix sky, grass, and windows in that order. You will see the difference in two minutes.