
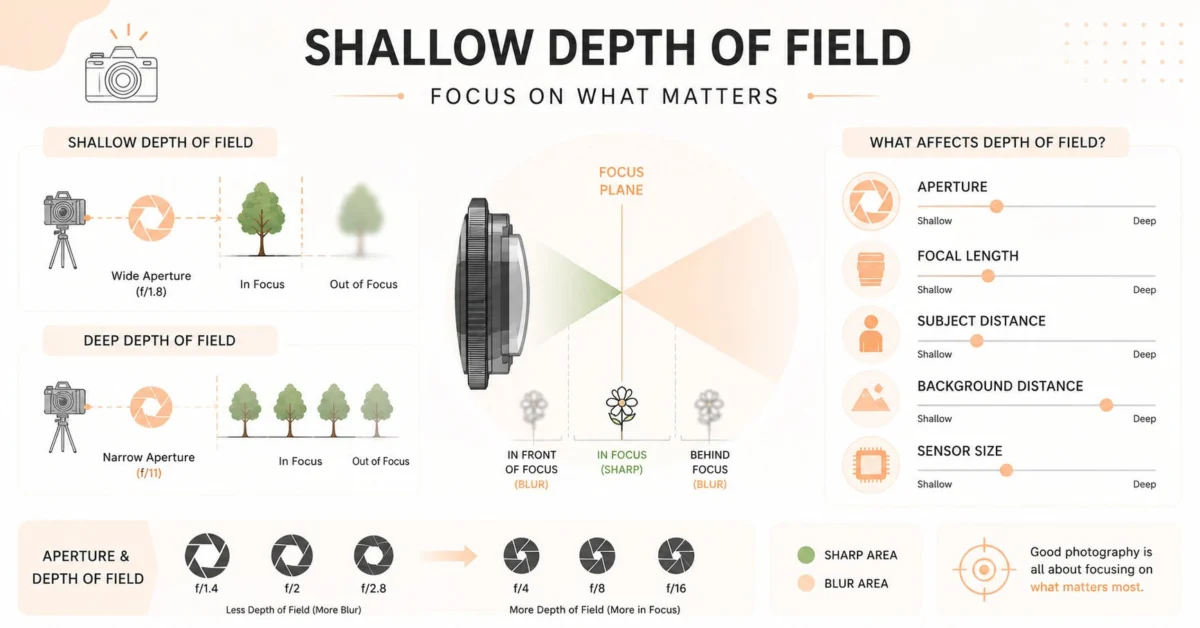
Key takeaways: Shallow depth of field is more than just a blurry background—it’s a powerful way to control attention and create depth in your photos. In this guide, learn what it is, how to create it, and when to use it effectively.
Let me tell you how I first messed it up.
I bought a 50mm f/1.8 because everyone on YouTube said it would make my photos look professional instantly. I put it on my camera, set it to f/1.8, went out and shot everything wide open. My dog, my coffee, my friend, a building. Everything was blurry. I thought I was doing art.
When I got home and looked on my laptop, almost nothing was usable. My friend’s nose was sharp but his eyes were soft. My dog’s ear was in focus but not his face. The coffee cup had one tiny sharp spot and rest was mush.
That’s when I realized shallow depth of field photography is not just about maximum blur. It’s about control. Where you place that little slice of sharpness matters more than how blurry the background is.
If you have ever wondered what is shallow depth of field, why your shallow depth of field photos are not sharp where you want, or how to get shallow depth of field without expensive gear, I wrote this for you. Simple language, no physics lecture.
Table of Contents
What Is Shallow Depth of Field in Photography?
The simplest way to understand what is a shallow depth of field in photography.
Every photo has a zone that looks sharp. Some photos have a huge sharp zone. Some have a tiny one.
When that sharp zone is very thin and small, we call it shallow depth of field. So in a shallow depth of field photo, your subject is sharp, but everything a little bit in front and a little bit behind turns into soft blur.
Think of looking at your phone in your hand. If you focus on your phone, the TV behind it goes blurry. If you focus on the TV, your phone goes blurry. Your eyes do shallow depth of field naturally all day. A camera can do same, but you get to decide how much.
So what is shallow depth of field? It is a creative choice where you intentionally keep depth of field small to isolate your subject. The blurry background that everyone loves, that creamy thing, photographers call bokeh. Bokeh is the result. Shallow depth of field is the technique that creates it.
When I started, I thought shallow depth of field just meant background blur. It’s more than that. It includes foreground blur too. Some of the best pictures with shallow depth of field have blurry leaves in front of the subject, like you are peeking through something. That adds depth.
Deep or Shallow Depth of Field: The Real Difference
Every article about deep or shallow depth of field makes it sound like you have to pick a side. You don’t. They are two different tools.
Shallow depth of field images are about feeling and isolation.
- Only a small part is sharp
- Background and foreground melt
- Subject pops out
- Feels intimate, dramatic, cinematic, premium
- Perfect for portraits, wildlife, macro, food, product details, street portraits
Example: A girl in a market, shot at 85mm f/2. Only her eyes sharp, crowd behind is soft colors. You feel her expression instantly.
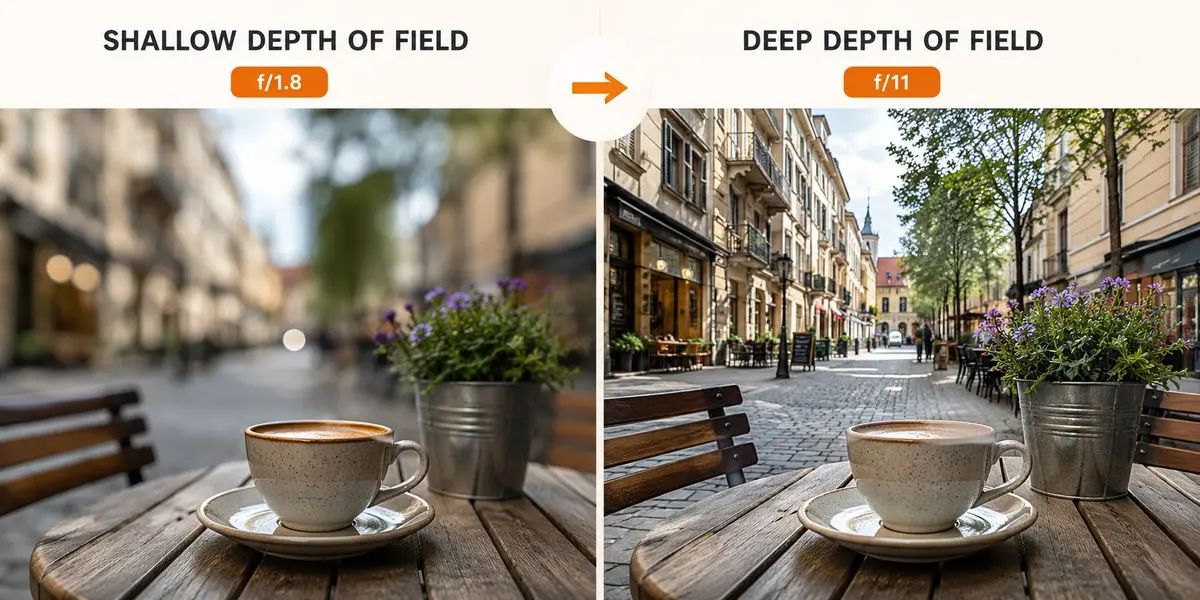
Deep depth of field is about information and context.
- Everything from front to back is sharp
- You can see details everywhere
- Feels epic, documentary, real
- Perfect for landscapes, architecture, interiors, group photos, real estate
Example: A landscape where flowers at your feet, the lake in middle, mountains far away, all sharp.
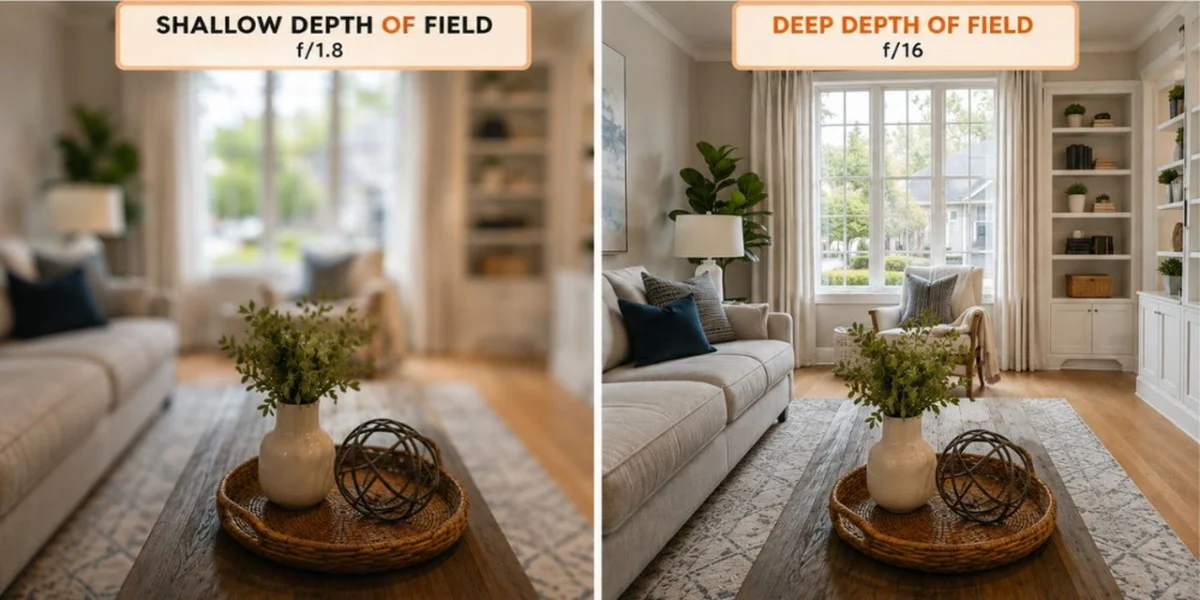
I learned difference the hard way on a real estate shoot. Client wanted interior of a 2BHK. I shot at f/2.8 because I loved blur. Client said “I can’t see the room, where does living room end?” He was right. For interiors you need deep depth of field like f/8 to f/11. But for that same house, when I shot a close-up of the kitchen tap with shallow depth of field, that one image made listing look expensive. So for real estate you need both.
So when people search deep or shallow depth of field, answer is: use shallow when subject matters more than place, use deep when place matters more than subject.
What Is The Opposite of Shallow Depth of Field?
The opposite of shallow depth of field is also deep depth of field.
Also called large depth of field, wide depth of field, or big depth of field.
If shallow is about blur, deep is about sharpness.
To get opposite look, do reverse: use small aperture like f/11 or f/16, use wide lens like 16mm or 24mm, step back from subject, and keep background close to subject.
In movies, deep depth of field was made famous by Citizen Kane. Everything sharp front to back. In photography, Ansel Adams landscapes are deep depth of field. Everything sharp.
Why Shallow Depth of Field Photography Is So Powerful
Why does every photographer obsess over shallow depth of field photography? There are two obvious reasons your competitors talk about, and one reason only Medium article touched that is actually most important.
1. It removes clutter. You don’t always get clean locations. There is always a bike, a wire, a person, a dustbin. Shallow depth of field erases it. Subject separates. This is why shallow depth of field photos look professional instantly. Background cleanup without Photoshop.
2. That blur is beautiful. Honestly, let’s admit. Good bokeh looks gorgeous. When fairy lights turn into soft circles, when green forest becomes creamy painting, it feels expensive. Phone tries to fake it, but real lens blur has smooth transition that looks natural.
3. It tells viewer where to feel. This is big. Shallow depth of field is not just blur trick. It is a way to control emotion. You are saying to viewer: ignore everything else, look here, feel this. If you blur background without thought, it’s just showing off gear. If you blur because you want viewer to connect with eyes, or texture of old hands, or ring, then it has purpose. I read that Medium piece and that line stuck: wide aperture needs sharp mind.
Genres that live on shallow depth of field:
Portrait for eyes, wildlife to separate animal from jungle, macro for tiny details, product for hero shot, food to make one dish craveable, street sometimes to isolate person in chaos.
Shallow Depth of Field Examples You Can Copy Today
Looking at shallow depth of field examples is better than reading theory. Here are real ones I shoot regularly.
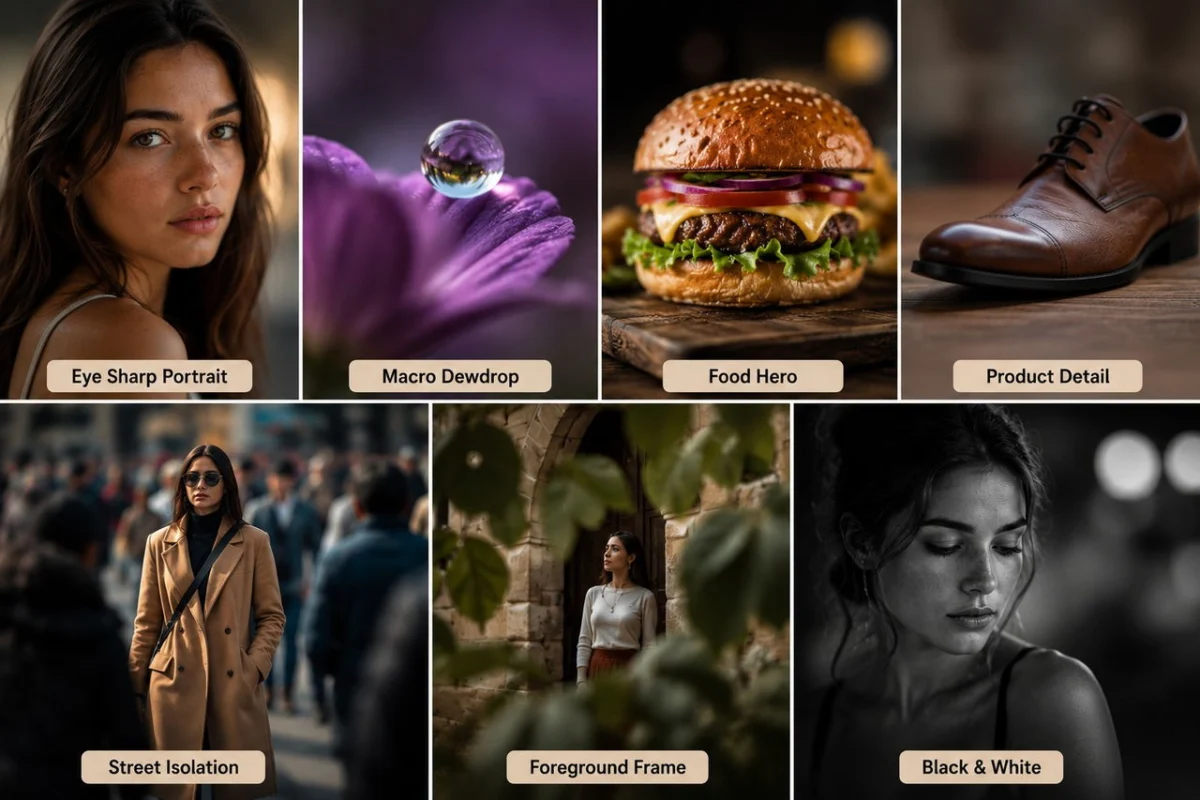
The Classic Eye-Sharp Portrait. This is most common shallow depth of field photo. 85mm, f/2 to f/2.8, focus on closest eye. Background melts. Tip: if you shoot at f/1.4, one eye might be sharp, other soft if face is turned. Stop down to f/2.2 for safety. This is what Adobe warns about – hit or miss focus in portraiture.
The Macro Dewdrop. Get close as possible to flower. Even at f/5.6, if you are 20cm away, background will blur heavily. Only one waterdrop sharp. Rest becomes color wash. Macro always has shallow depth of field because distance is so close.
The Food Hero. Shoot a burger from 45 degree angle. Focus on front edge of bun. Rest of burger and table fall into blur. Makes viewer look at that one spot and feel hungry. Top shallow depth of field images for restaurants use this.
The Product Detail. A shoe on floor, shot at f/2.8. Toe sharp, heel soft, floor blurred. E-commerce brands love this for premium feel.
The Street Isolation. Crowded Connaught Place, 135mm f/2. One person in focus walking towards you, everyone else blurred streaks. Story isolated from chaos.
The Foreground Frame. Shoot through leaves or railing that is out of focus in front. Subject behind is sharp. Those blurry leaves frame subject and add depth. Most beginners forget foreground blur, they only think background.
Shallow Depth of Field Black and White Photography. This deserves separate love. In color photo, red flower stands out from green leaves even without blur because colors contrast. In black and white, red and green might become same grey.
So you lose separation. In shallow depth of field black and white photography, texture separation is everything. Sharp skin texture against soft grey background. Sharp leaf skeleton against soft dark background.
Look for backgrounds with bright spots, they become white bokeh orbs that look amazing in mono. I convert many portraits to black and white just because shallow depth of field looks more timeless that way.
7 Methods That Actually Work
This is core question: how to get shallow depth of field. Digital Photography School lists 6, Studio Binder lists 4, Adobe hints at few. Let me combine all and tell you what actually works in field, not just theory.
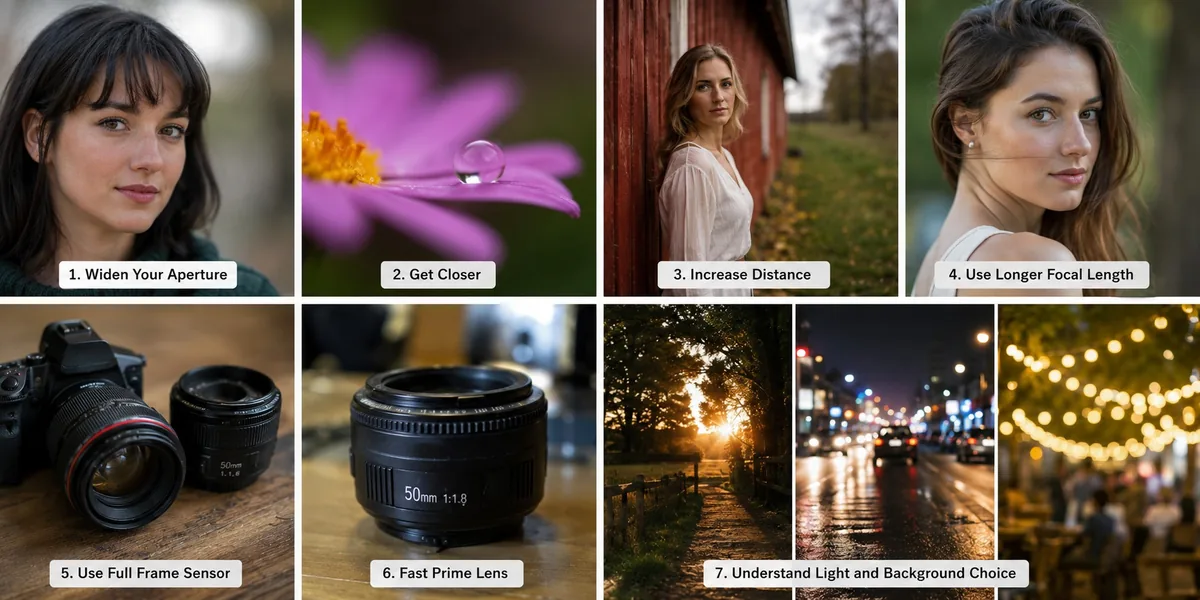
1. Widen Your Aperture – Lowest f Number
Biggest lever. f/1.2, f/1.4, f/1.8, f/2.8 = very shallow. f/8, f/11, f/16 = deep. Set camera to A or Av mode and dial lowest number lens allows. If you want extreme shallow depth of field images, shoot f/1.8 to f/2.8. But here’s what competitors don’t say enough: don’t always shoot wide open. Bracket. Shoot same portrait at f/1.8, f/2.2, f/2.8 and compare. Often f/1.8 is too thin and f/2.5 is perfect. Lenses are also softest wide open. Stopping down a little makes sharper subject and still blurry background.
2. Get Closer To Your Subject
Physics. Closer you are, shallower DoF. If you have kit lens that only goes to f/5.6, you can still get blur if you get within 30cm of subject. This is why phones can blur macro objects even with tiny sensor. For portraits, take two steps forward instead of zooming, background will blur more.
3. Increase Distance Between Subject and Background
This is free trick and most powerful for beginners. It doesn’t technically change depth of field calculation, but it makes background appear much blurrier. If model stands against wall, wall will be somewhat sharp even at f/1.4. Pull model 4 meters away from wall, same f/1.4, wall becomes creamy. Give background room to blur. I tell clients to step forward, always.
4. Use Longer Focal Length
Longer lens = more blur and more compression. 35mm at f/1.8 gives some blur but shows lot of background. 85mm at f/1.8 obliterates background. 200mm at f/2.8 makes background like painting. This is why 85mm, 100mm, 70-200mm are portrait kings. Wide lenses like 16mm, 24mm are terrible for shallow depth of field, they want everything sharp. Adobe article says avoid wide-angle for shallow, they are right.
5. Use Full Frame Sensor
Controversial but true. Full-frame gives shallower look than APS-C if you keep same framing. Why? Because with APS-C you have to step back to get same framing, and stepping back increases depth of field. So if you love this look, full-frame helps. But don’t sell your crop camera, you can still get amazing shallow depth of field photos on crop with fast lens and good technique.
6. Fast Prime Lens – Best Investment
If you are serious, get a fast prime. 50mm f/1.8 is cheapest and best teacher. It forces you to move, it gives beautiful blur, and it works in low light. After that, 85mm f/1.8 is portrait weapon. Fast lenses are expensive but worth. Before buying, check bokeh quality. Some cheap fast lenses have harsh, busy bokeh with onion rings. Good lenses have creamy, round bokeh. Search Flickr for sample shallow depth of field images from that lens.
7. Understand Light and Background Choice
This is what separates okay from great pictures with shallow depth of field. Blur quality depends on background. Busy background with branches close together gives nervous bokeh. Background with distance and small lights gives creamy bokeh.
Shoot into light in late afternoon, sun behind subject peeking through leaves, at f/2.8, background lights turn into golden orbs. That’s magic hour shallow depth of field. Also, try shooting cities at night at f/1.8 with manual focus, city lights become big soft circles.
Mistakes
I have made all of these. Save yourself time.
Mistake 1: Focus on Wrong Spot. At f/1.4 depth of field can be 1cm thin. If you focus on eyelash instead of iris, eyes look soft. Always use single point autofocus on eye. Use eye-AF if camera has. If not, manual focus with zoom check. Adobe experts say manually focus and zoom in to check, they are right for critical shots.
Mistake 2: One Eye Sharp Group Photo. Shooting 3 people at f/1.8. Only middle person sharp. Group needs f/5.6 to f/8. Rule: if more than one person in different planes, you need deep depth of field.
Mistake 3: Using Blur As Crutch. Blurred trash is still trash. Blurred bright spot still distracts. First find clean angle, then add blur to enhance. Don’t rely on blur to fix bad location.
Mistake 4: Overdoing It. Medium article nails this. Bokeh-trumps-everything move gets boring. If every single photo is at f/1.2 with no context, your portfolio looks one-dimensional. Sometimes stop down to f/4 or f/5.6 and show environment. Story matters more than blur.
Mistake 5: Forgetting Foreground. Everyone blurs background. Pros also blur foreground. Put leaves very close to lens, out of focus, shoot subject behind. Adds depth and frames.
Mistake 6: Shutter Speed and ISO Mess. Wide open in bright sun lets in too much light. You might hit 1/8000 and still overexpose. Use ND filter or raise shutter but keep ISO 100. Also, in low light at f/1.4, your shutter might be 1/50, causing motion blur that looks like missed focus. Keep shutter above 1/200 for people.
Editing and Retouching
Here’s something competitors never talk about because they are camera companies. Getting blur in camera is half work. Making that shallow depth of field photo client-ready is other half.
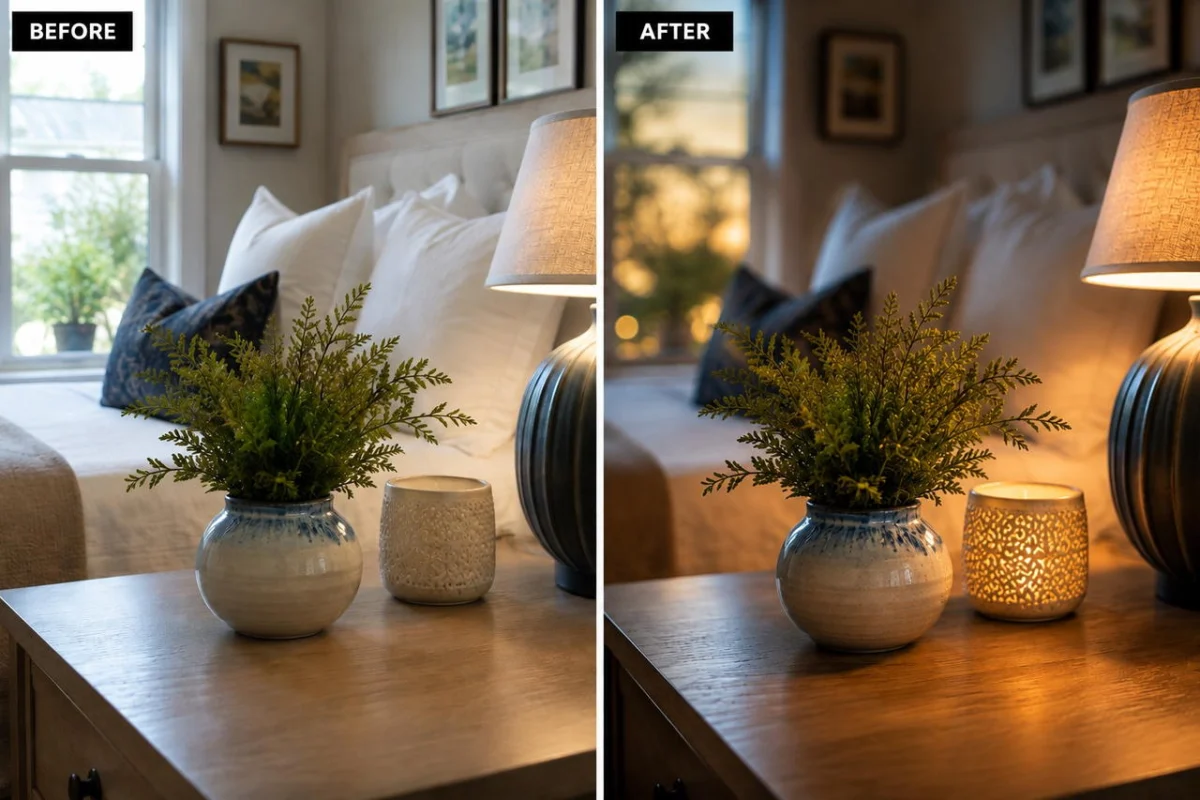
Real client work is mixed. One day you need deep depth of field for interiors, next day shallow for details. You come back with 800 photos needing color correction, background cleanup, sky fixes, object removal. That shallow depth of field shot where background is blurred but still has a bright distracting sign? You still need to remove it.
When I started getting paid work, I spent nights editing instead of shooting. Then I started outsourcing. I now work with PixelShouters for my real estate and product shoots. I am mentioning them late in article intentionally because this is not an ad, but they actually solved a real problem.
They are built for photographers who shoot both shallow and deep. Their services cover full workflow: Real Estate Photo Enhancement and HDR blending to fix exposure when you shot wide open in tricky light, Object Removal and cleanup to finish what bokeh started, Day to Dusk and Twilight Editing for mood changes, Aerial Photo Editing for sharp deep focus drone images, Virtual Staging and Virtual Renovation to stage empty rooms, Panorama Photo Stitching and 360 virtual tours, Floor Plan Editing and redraws, and Sky and Grass Replacement when sky is dull even though your shallow detail shots look great.
For portrait or product folks shooting shallow depth of field black and white photography, their retouching keeps sharp area crisp and blur creamy without making it look fake.
Point is, learn to get shallow depth of field in camera, but have editing partner so you can deliver consistent shallow depth of field images without living in Lightroom.
Pro Tips For Better Shallow Depth of Field Images
- Manual focus for still subjects. Autofocus hunts at f/1.4.
- Use back-button focus so you lock focus and recompose without losing eye.
- Shoot in open shade for soft light on face, then blur gives creamy look.
- For video, shallow depth of field looks cinematic but focus pulling is hard. Use f/2.8 to f/4 for video, not f/1.2.
- Check aperture blades. Lenses with 9+ rounded blades give rounder bokeh balls. Lenses with 5 blades give pentagon shapes when stopped down.
- Try black and white conversion for portraits at f/2. It hides skin color issues and emphasizes sharpness vs blur texture.
FAQs
What is shallow depth of field?
Shallow depth of field is when only a narrow slice of image is sharp and rest is blurred to isolate subject.
What is a shallow depth of field in photography used for?
It is used to isolate subject, blur distracting background, create creamy bokeh, and direct viewer emotion to specific point like eyes or product detail.
Define shallow depth of field in one line?
Define shallow depth of field as narrow zone of sharpness in image with soft foreground and background.
What is opposite of shallow depth of field?
Opposite of shallow depth of field is deep depth of field where everything from close to far is sharp.
How to get shallow depth of field?
How to get shallow depth of field: use wide aperture like f/1.8, use longer lens like 85mm, get closer to subject, and put subject far from background. Full-frame sensor also helps.
What is deep or shallow depth of field difference?
Shallow is thin sharp zone with blur, used for isolation. Deep is large sharp zone, used for landscapes and showing context.
What are good shallow depth of field examples?
Portrait with eyes sharp and background blurred, macro flower with one petal sharp, food with one dish sharp, product hero shot, street person isolated in crowd.
Final Thoughts
Shallow depth of field is not a filter. It’s a decision.
Every time you choose f/1.8 over f/8, you are deciding what matters and what doesn’t. That is the whole job of photographer. To decide.
Start simple. Take your kit lens, go to 55mm, open to f/5.6, get close to a subject, put background far. You will get blur. Then get a 50mm f/1.8 and see how much more you can do. Practice focusing on eyes. Practice bracketing aperture. Shoot same thing at f/1.8, f/2.8, f/4, f/8 and see how story changes.
Once you control it, your shallow depth of field photography will stop looking like accidental blur and start looking intentional. And intentional photos are what clients pay for.