
Key takeaways- In this guide, you’ll learn how to start a photography blog from the ground up—from choosing your niche and finding article ideas to creating useful posts, growing an audience, and eventually turning your blog into part of your photography business.
If you open your Lightroom catalog right now, you will probably find hundreds of photos that never saw the light of day. Not because they are bad. Because you did not know what to say about them
You have the shoots. You have the mistakes, the small wins, the settings you finally figured out, the edit that took you two hours the first time and twenty minutes the second time. Most photographers have all of that. What they do not have is a system to turn it into something useful for someone else.
That is what a good photography blog actually is.
When people search how to start a photography blog, they think the job is to buy a domain and upload pretty pictures. That part is easy. The hard part, and the part that makes your blog worth reading, is different.
A useful photography blog is not a gallery. It is proof plus explanation.
I like to think of it like this:
Photography + Experience + Useful Information + Original Images = Valuable Photography Blog
Your photos are the proof. Your experience is the filter. The useful information is why someone will bookmark you. Put those together consistently and you have a blog that helps people and eventually helps your business too.
This guide covers the whole path. Why you should even bother, what to write about, how to not sound like everyone else, how to set it up without getting lost, and how to grow it without selling your soul.
Table of Contents
Why Start a Photography Blog?
Let me be honest. Blogging is slow. You will not get traffic in a week. You will not get clients overnight. If someone is promising that, they are selling you something.
So why do it?
First, to share what you actually know. You know how to calm a family that has never been in front of a camera. You know how to make a dark rental flat look bright without making it look fake. That knowledge is valuable when you explain it clearly.
Second, to document your own journey. A year from now you will look back and see how your composition changed, how your editing got cleaner. That record keeps you honest. And readers who are just starting love following someone who is a few steps ahead, not ten years ahead.
Third, credibility. Anyone can post one good photo on Instagram. Not everyone can explain how they get consistent results when the light is terrible, the room is tiny, and the client is in a hurry. A blog shows how you think.
Fourth, it shows work in context. A portfolio shows the final image. A blog shows the before, the messy living room before you tidied it, the straight-out-of-camera file, the edit. Clients understand your value better that way.
Fifth, it brings in the right people. When someone Googles how to prepare for a winter family shoot and lands on your detailed post with real examples from your city, they already trust you a little. That is a much warmer lead than a random Instagram DM.
And yes, it can create income later. Presets, guides, affiliate links, more bookings. But that only comes after trust. Think long term. If you are okay with that, blogging is one of the best things you can do for your photography.
Choose Your Photography Blog Niche
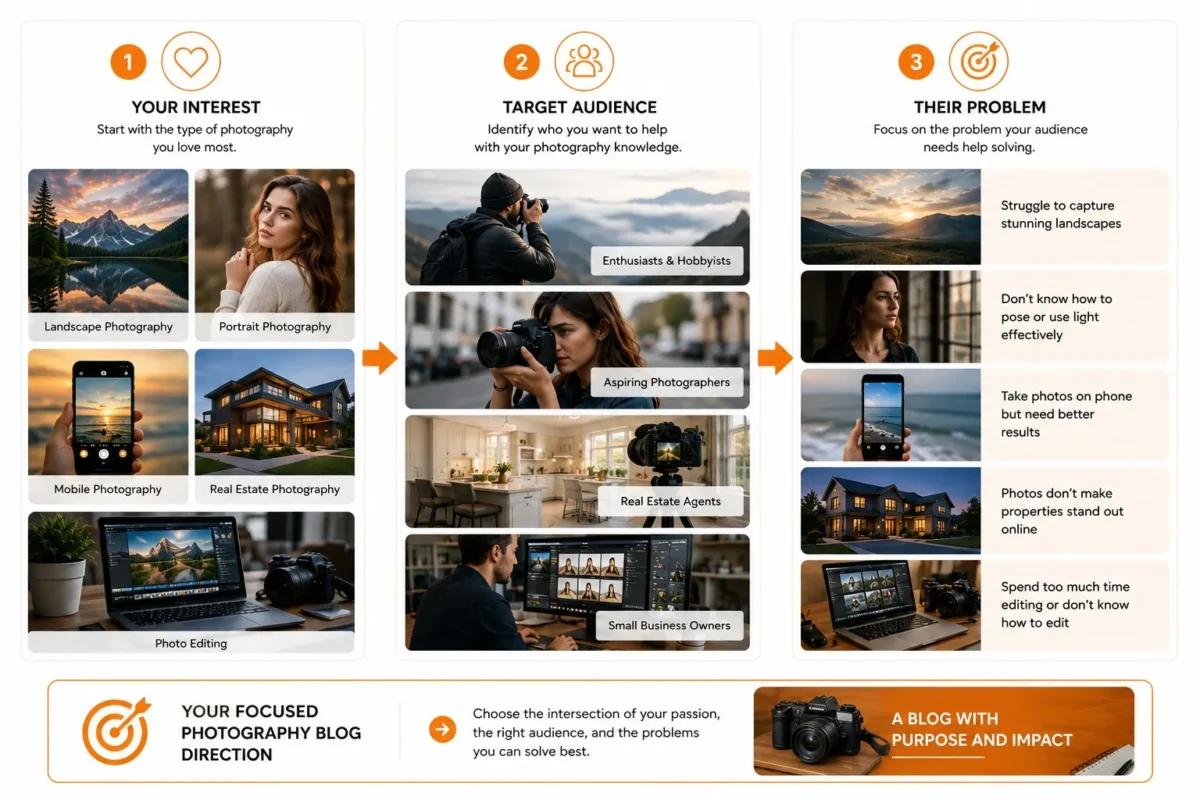
Photography is too big. If you try to write about everything, you will compete with everyone and help no one.
You need a tighter starting point. It is not a jail. You can expand later. But for the first 20 to 30 posts, you need focus so people get you in five seconds.
Use this simple check:
Interest + Audience + Problem = Strong Blog Direction
Interest is what you actually like shooting. Audience is who you want to help. Problem is what keeps them stuck.
Some real examples:
Landscape photography: You like hiking and shooting. Your audience is weekend hikers who only get harsh midday light. Their problem is flat, boring landscapes. Your direction could be practical landscape tips for people who cannot shoot sunrise.
Portrait photography: You love natural light portraits. Audience is new photographers shooting at home. Problem is stiff posing and bad indoor light. Your direction: natural light portraits at home without buying studio lights.
Travel photography: You travel light. Audience is solo travelers. Problem is carrying too much gear. Direction: how to get better travel photos with one camera and one lens.
Mobile photography: You shoot a lot on your phone. Audience is small business owners. Problem is inconsistent product photos. Direction: clean product photos with a phone and window light.
Real estate photography: You shoot interiors. Audience is new real estate photographers and agents trying to DIY. Problem is dark rooms and leaning walls. Direction: how to shoot bright, straight interiors without overdoing it.
Editing: You love post processing. Audience is Lightroom beginners. Problem is orange skin and muddy colors. Direction: natural editing for beginners who want clean color.
Beginner photography: You just learned manual mode yourself. Audience is people who just bought their first camera. Problem is manual mode confusion. Direction: learning manual mode by shooting the same subject every day.
Pick one. You will feel like you are leaving things out. That is the point.
Find Your Unique Angle
Here is the truth. Almost every photography topic has been covered. How to shoot landscapes, how to pose couples, how to edit real estate. All of it exists.
But your version does not exist yet.
That is where this comes in:
Topic + Experience + Perspective = Unique Content
Two photographers can write about the same topic and create completely different posts.
Generic topic: How to Photograph Landscapes
Better: What I Learned Shooting Landscapes at 1 PM for a Month When I Had No Other Choice
Generic: 10 Portrait Tips
Better: How I Stopped Making My Subjects Look Stiff, 5 Posing Fixes That Actually Worked
Generic: Real Estate Photography Lighting
Better: Why I Now Bracket Every Kitchen and How I Blend It
See the difference? The second one has a condition, a decision, and a result. It promises real evidence.
Your angle lives in the small stuff. What time were you there? What went wrong? What did you change on the spot? What would you do again?
That is what makes a post impossible to copy. No one else was on your shoot.
You Don’t Have to Be an Expert
You do not need 10 years of client work to start a blog. In fact, if you are still learning, you have an advantage. You remember what was confusing last week.
You can write about what you are learning, a mistake you made on your last shoot, an experiment you tried, how you improved one thing, a piece of gear you actually tested, or a technique you tried and whether it flopped.
The process is simple and honest:
Learn → Test → Photograph → Compare → Explain
Learn one thing. Test it for real. Photograph the result. Compare the versions side by side. Explain what changed.
Do not pretend to be an expert. Readers can tell. It is far more powerful to say, I tried this for the first time last weekend, here is what happened, than to fake authority. People trust the learning process more than fake perfection.
Your learning curve is content. Use it.
Turn Your Photography Into Blog Content
This is the part that changes everything for most photographers.
You think you need a new idea for every post. You do not. You need to look at what you already have.
One shoot can become three or four posts. One single photograph can become five.
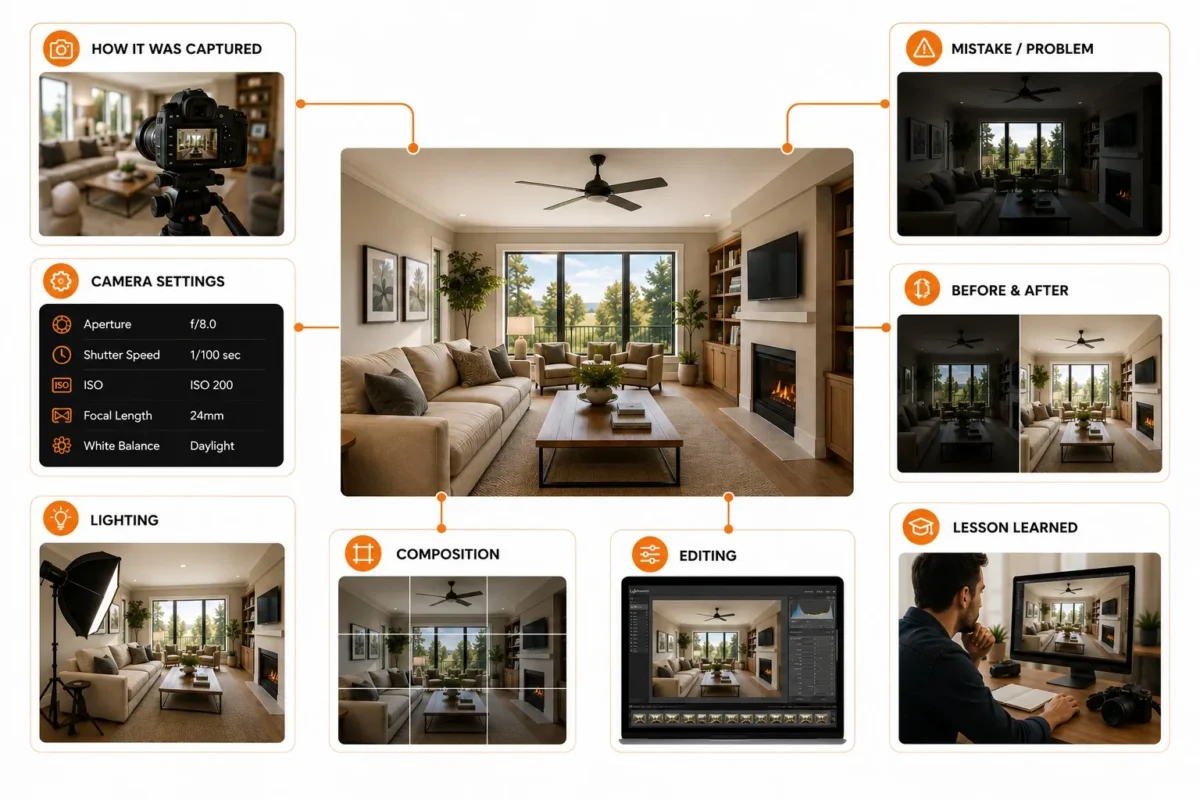
One Photograph → Multiple Content Ideas
Take one image you shot recently. Not your best ever, just one with a story.
Now ask:
How did I capture it? Where was I standing, what time was it, what was the light doing, what was I trying to solve?
What were my camera settings and why? Not just f/8, 1/200, ISO 400. Why did you pick f/8? What would have happened at f/2.8?
What was the light like? Direction, soft or hard, color. Did you move the subject, add a reflector, bounce a flash?
How did I compose it? Why that focal length, why that crop, what did you leave out?
How did I edit it? What did the RAW look like? What did you fix first?
What mistake almost ruined it? Missed focus, cluttered background, blown window? How did you fix it or how will you avoid it next time?
What is the lesson? If you had to reshoot it in 30 seconds, what would you do?
One street portrait can give you: a post on shooting wide open in harsh sun, a post on approaching strangers, a comparison of 35mm vs 50mm, an editing breakdown of skin tone, and a short note on cleaning up backgrounds.
Once you start thinking this way, you stop staring at a blank page. You start asking, which story should I tell first.
Create Your First 20 Blog Topics
Do not pick random topics. Group them. It helps you stay focused and it helps Google understand what you are about.
Here is a starter set you can steal and tweak:
Beginner Photography — for people who just got a camera
- I Shot Manual Mode for 30 Days, Here is What Finally Made Sense
- Why My Photos Were Blurry and the 3 Settings I Was Ignoring
- What I Can and Cannot Do With a Kit 18-55mm Lens
- How I Finally Learned to Read a Histogram On Location
- 5 Simple Exercises That Taught Me to See Light
These help someone who is overwhelmed.
Shooting Techniques — for people who can shoot but want consistency
- Shooting at Noon When You Have No Choice, What Worked for Me
- How I Keep Verticals Straight in Small Rooms
- Natural Light Portraits by a Window, Distance and Reflector Test
- My Handheld Limits, How Slow Can I Go Without Shake
- My Bracketing Workflow for Kitchens With Bright Windows
These are practical, location based.
Editing — for people who get decent shots but struggle in post
- My RAW Looked Flat, Here is My Step by Step to Final
- Fixing Mixed Color Temperature in a Living Room Before and After
- How I Stopped Over-Editing Skin in Lightroom
- Sky Replacement, When It Helps and When It Looks Fake
- Panorama Mistakes I Made and How I Fixed Them
These show process, not just final result.
Photography Business / Experience — for people who want to do this for work
- My Real Estate Shoot Checklist, What I Pack and What I Do First
- How I Prep Families for a Shoot So They Are Not Awkward
- My First Paid Shoot, What I Charged and What I Would Change
- How I Backup Files After Every Shoot So I Sleep Better
- How I Handle Revisions Without Re-Editing Forever
You do not need to write all 20 now. Pick 8 that feel closest to your own experience and start there.
Set Up Your Photography Blog
Keep this part short. You can waste months here if you let yourself.
Platform: If you want full control, WordPress on your own hosting is still the most flexible. If you want simple, Squarespace or Wix is okay to start, just make sure you can export later.
Domain: Short, readable, easy to say on a call. Your name plus photography works fine. Avoid hyphens and clever spellings.
Design: Clean, fast, lots of white space. Readable font. Let photos breathe. Do not install 20 plugins that slow everything down.
Mobile: Check every post on your phone. If images are huge or text is tiny, fix it. Most people will read on mobile.
Pages you need: About, who you are and what you shoot and why you write. Contact, simple form and email. Blog, your main feed. Portfolio, 20 to 30 best images, not 300. Privacy Policy, have it from day one.
Categories: Start with 3 or 4 max. Something like Shooting, Editing, Behind the Scenes, Business Notes. Add more only after 30 posts.
A live site with two useful posts beats a perfect site with zero posts. Get it live and improve as you go.
How to Write a Great Photography Blog Post
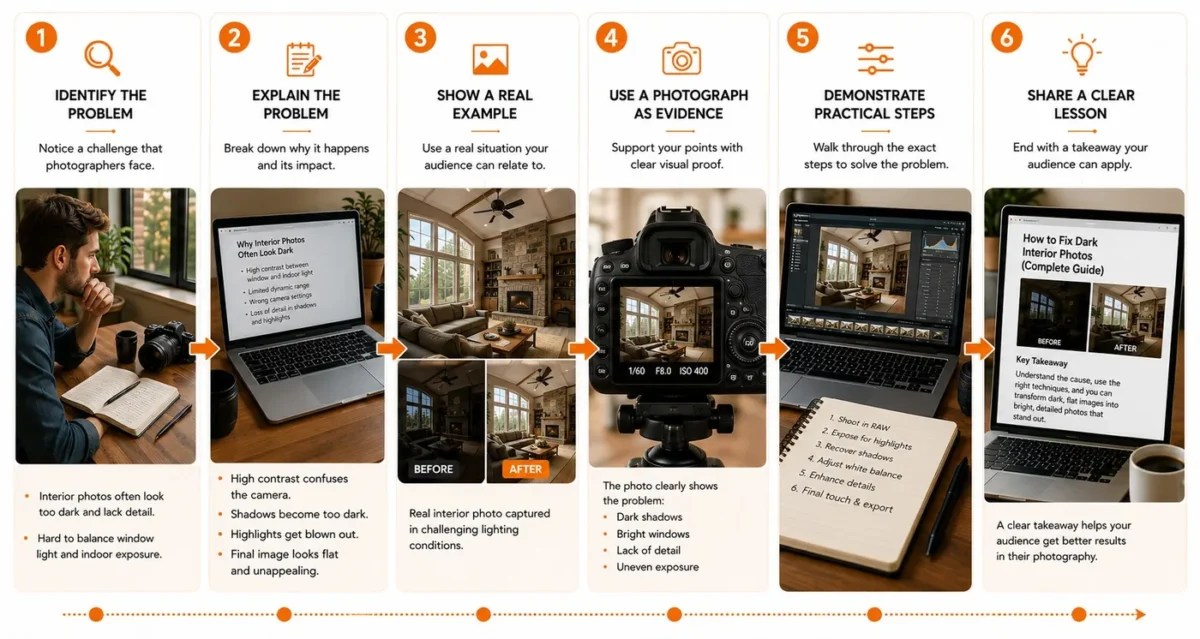
A good photography post has one job. Solve one specific problem and prove it with your own images.
I use this flow:
Problem → Explanation → Example → Photograph → Practical Steps → Lesson
Start with the problem in plain words. Explain why it happens. Show a real example from your shoot. Put the photo right there. Give steps someone can copy. End with what you learned.
And for images, think evidence, not decoration:
Show → Explain → Demonstrate → Teach
Show the final or the problem. Explain what you are seeing. Demonstrate with comparisons. Teach what to do next.
Useful image types:
- Before and after, same crop
- Same scene, different settings, f/2.8 vs f/8
- Different focal lengths, 24mm vs 50mm
- Lighting direction, window left vs window behind
- Editing stages, import to final
- Behind the scenes, where you stood
Caption like a human. Write ISO 800, 1/160s, window camera left, no reflector. That is more useful than beautiful portrait in golden light.
Short paragraphs. Read it out loud. If you would not say it to another photographer over coffee, rewrite it.
How to Make the Blog Feel Human
People are tired of generic content. You can feel it in two seconds when a post was written by someone who never held a camera in that situation.
Human writing comes from specifics.
Talk about real shoots, a date, a place, a client type. Give specific examples, not vague advice. Share the honest mistake, I forgot to check white balance and spent an hour fixing it. Share the observation, I notice kitchens look smaller when I shoot above 5 feet. Have a clear opinion, I prefer to keep verticals straight even if it means a tighter crop.
Use your own photos, even if they are not perfect. Imperfect and real beats perfect and stock every time.
A quick pass through a reverse image finder can confirm the image is genuinely yours to use before it goes live.
Avoid the filler lines we have all seen a thousand times. You know them. Today’s digital world, take your photography to the next level, whether you are a beginner or a pro, let’s dive in. Just cut them. They add nothing.
Ask yourself, could this article only be written by someone who did the shoot? If yes, you are good. If anyone who Googled could have written it, add more of your own proof.
AI vs Human Photography Content
AI can explain what aperture is. It can define HDR. It can list posing ideas. That information is everywhere and it is easy to generate.
What it cannot give is what readers actually come for.
Your original photos. The real conditions, rain, wind, tiny room, nervous client. The experiment you ran that failed. The decision you made under pressure. The before and after with your settings. The lesson you will carry to the next shoot.
That is why this matters:
Information is easy to generate. Real evidence and experience are more valuable.
You do not need to hate AI. You can use it to outline or clean up grammar. But the core of each post has to be your proof. That is what makes your blog worth bookmarking.
How Often Should You Publish?
There is no magic number. The best frequency is the one you can keep for six months without hating it.
One genuinely useful article a week is better than five rushed ones that repeat what everyone else said. If weekly is too much with shoots and editing, publish every two weeks. That is completely fine.
Consistency matters because you get better faster, Google sees fresh helpful content, and readers learn when to check back. But quality comes first. If you need two weeks to create proper comparisons and edit images well, take two weeks.
Keep a small bank of half finished drafts so you are never starting from zero.
How to Grow Your Photography Blog
Growth is not about posting and hoping. It is about making useful content easy to find.
Social: Share the problem you solved, not just the final image. A carousel showing the setup, the RAW, and the final gets more saves than one pretty photo. Tools like Predis.ai can help turn those before/after shots into engaging ads and posts to promote your content and reach more readers.
Communities: Answer real questions in Facebook groups, Reddit, or forums with a short helpful answer. Link to your post only if it truly adds more value. Do not spam.
Email: Start early, even with 10 people. Send one useful tip and one link to your latest post. It is the only channel you fully own.
Video: You do not need a full YouTube channel. One 90 second clip showing your lighting setup can drive people to the full breakdown on your blog.
Collaborations: Co-shoot with another photographer and both write about what you learned. Interview a retoucher about what they need from photographers.
Internal linking: Every new post should link to 2 or 3 older relevant posts. It helps readers and keeps people on your site.
Updating: Every few months, improve your best posts with better images, clearer steps, or new examples.
Useful content is easier to promote than generic content. If it truly solves a problem, people share it without you asking.
Can a Photography Blog Make Money?
Yes, but not the way most YouTube thumbnails claim.
Think of it as:
Audience → Trust → Opportunity → Revenue
You build an audience by being consistently helpful. That builds trust. Trust creates opportunities. Opportunities turn into revenue.
Realistic options:
Photography services, the most direct. Your helpful posts bring inquiries.
Affiliate marketing, recommend gear you actually use with honest pros and cons and a clear disclosure.
Digital products, presets, actions, shot lists, guides, but only if they solve a real problem you have heard from readers.
Ebooks and guides, longer versions of your best series with examples and checklists.
Courses and workshops, once people keep asking the same questions.
Prints, licensing.
Advertising, usually low income unless you have huge traffic. Often not worth the clutter early on.
Do not promise passive income. Help first. Earn later.
When Your Photography Business Grows
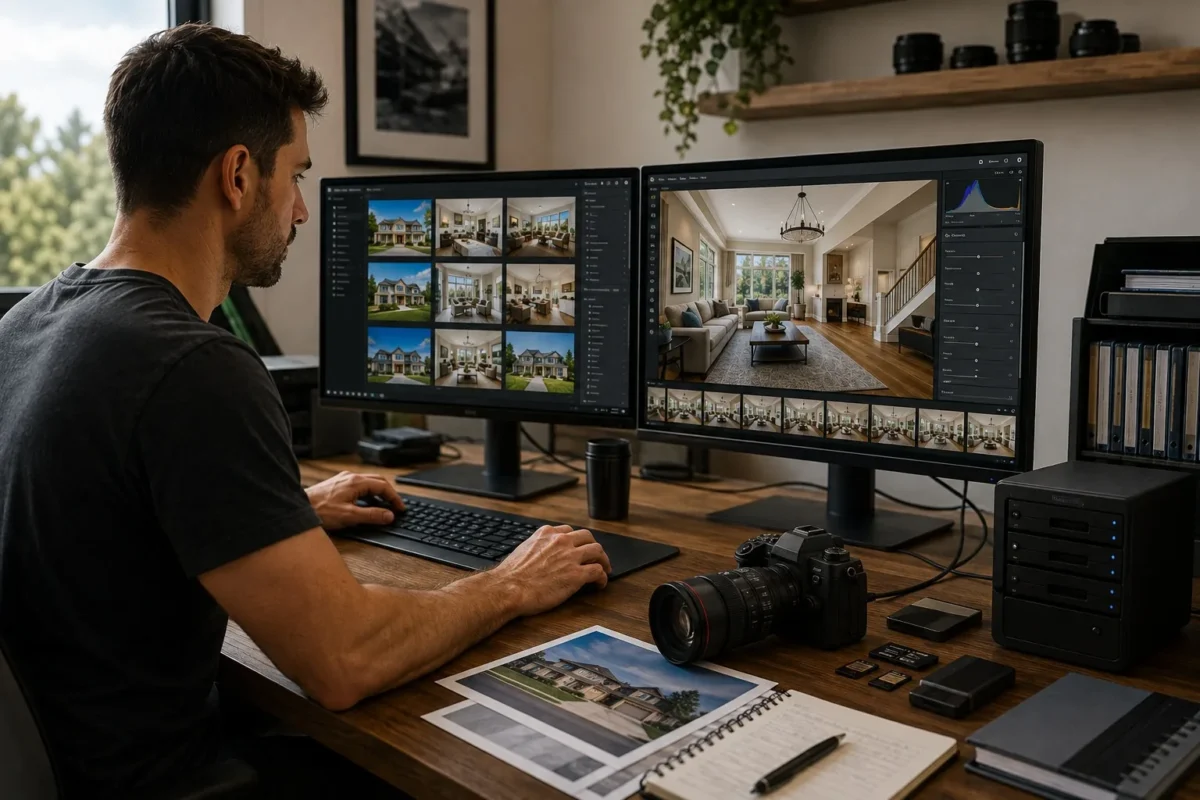
There is a point where more work means less time. More shoots mean more culling, more retouching, more revisions, less time to shoot or write.
Most photographers hit a wall here. They realize they need to improve workflow. Batch similar edits, build better presets, use culling tools carefully, create a clear file handoff.
It also means deciding what to keep and what to let go. Maybe you love shooting and client interaction but you lose six hours removing cords and replacing skies for every property set.
Outsourcing does not mean giving up control. It depends on your workload, deadlines, budget, quality needs, and how much creative control you want to keep. Some photographers outsource only repetitive enhancement during busy weeks and keep everything in house during slow months. The right answer changes as your business changes.
How other photographers handle it
When you start getting consistent real estate work, you feel the editing pressure quickly. A 25 image listing can turn into 75 bracketed frames. A bathroom shoot can involve distracting reflections you did not notice on location. An agent wants a daytime front as a warm twilight.
This is the stage where many photographers start testing external support to stay consistent.
For example, you might have interiors where you bracketed to keep window detail and need HDR editing to balance interior and exterior. Or there are trash bins, cords, or personal items that need object removal before delivery. A daytime exterior that needs to be shown as evening can be handled with day to dusk editing. Drone shots often need aerial photo editing for horizon and color cleanup. Empty living rooms may need virtual staging to help buyers visualize, while wide interiors shot as panoramas benefit from panorama stitching and editing. If you provide layouts you may also need floor plan creation, and common cleanups like sky and grass replacement or virtual renovation come up when a property needs visual help without being misleading.
Services like PixelShouters handle this kind of real estate photo editing work, including real estate photo enhancement, HDR editing, object removal, day to dusk / twilight editing, aerial photo editing, virtual staging, panorama stitching and editing, floor plans, sky and grass replacement, and virtual renovation. Some photographers use that kind of support during busy weeks to keep turnaround consistent while keeping final creative decisions themselves.
Common Mistakes
- Too broad. Writing about photography for everyone. Fix: Pick Interest + Audience + Problem and stick to it for 20 posts.
- Writing for everyone. You end up helping no one. Fix: Picture one reader and write to them.
- Copying. Rewriting top results with no new proof. Fix: Add your own test, settings, before and after.
- Only portfolio. Pretty but not helpful. Fix: For every portfolio image, publish a post explaining how you made it.
- Stock heavy. Readers came for your work. Fix: Use your own images, even imperfect ones.
- Generic AI style. Long intro, empty definitions, no evidence. Fix: Start with a real problem from your last shoot.
- Keyword stuffing. Repeating how to start a photography blog in every sentence. Fix: Use it naturally, then use related phrases.
- Too much gear talk. Specs get clicks but rarely build trust. Fix: Talk about decisions and light, not just specs.
- Inconsistent. Five posts one week, none for two months. Fix: Choose a sustainable cadence, biweekly is fine.
- Trying to monetize too early. Ads before trust. Fix: Publish 15 to 20 truly helpful posts first.
- No internal links. Each post lives alone. Fix: Link to 2 or 3 older relevant posts in every new article.
- Never updating. Old Lightroom UI, broken images. Fix: Quarterly, refresh your top 5 posts with new images and steps.
FAQ
How do I start a photography blog as a beginner?
Pick one audience and one problem you understand. Document your learning with Learn → Test → Photograph → Compare → Explain. Publish two helpful posts with your own images before worrying about design.
Do I need to be a professional photographer?
No. You need to be helpful and honest. Beginners can teach other beginners what they just figured out, with proof.
What should I write about?
Write from your shoots. Turn one shoot into a tutorial, a settings breakdown, an edit before and after, and a lessons learned note.
How do I choose a photography niche?
Use Interest + Audience + Problem. Pick what you like shooting, who you want to help, and a specific frustration they have. Test it for 20 posts.
How much does it cost?
You can start for the cost of hosting and a domain, usually 50 to 150 dollars per year, plus your time.
How often should I publish?
As often as you can maintain without losing quality. For most photographers, one quality post every week or every two weeks works.
Can a photography blog make money?
Yes, but indirectly at first. Most income comes from client inquiries, then from affiliates, presets, guides, and courses once you have trust.
Should I use my own photographs?
Whenever possible, yes. Original images are your proof and differentiator.
Can a photography blog help attract clients?
Yes. When you explain how you solve real problems with examples, clients see how you think and work.
When should I outsource photo editing?
When editing consistently eats into shooting or client communication and deadlines are at risk. Start with repetitive tasks, keep creative control.
Conclusion
You do not need expensive equipment, thousands of followers, hundreds of articles, or perfect writing.
You need a clear audience, useful knowledge you actually tested, real photographs that prove it, consistency, and patience.
A photography blog is just a record of how you see and solve problems behind the camera. If you share what you learn, show how you work, and teach what you wish someone had taught you earlier, people will find it useful.
If you have been waiting for the right time to figure out how to start a photography blog, use the next 30 days to build the foundation. One direction, one reader, two helpful posts. That small start is enough to build on for the next year.