
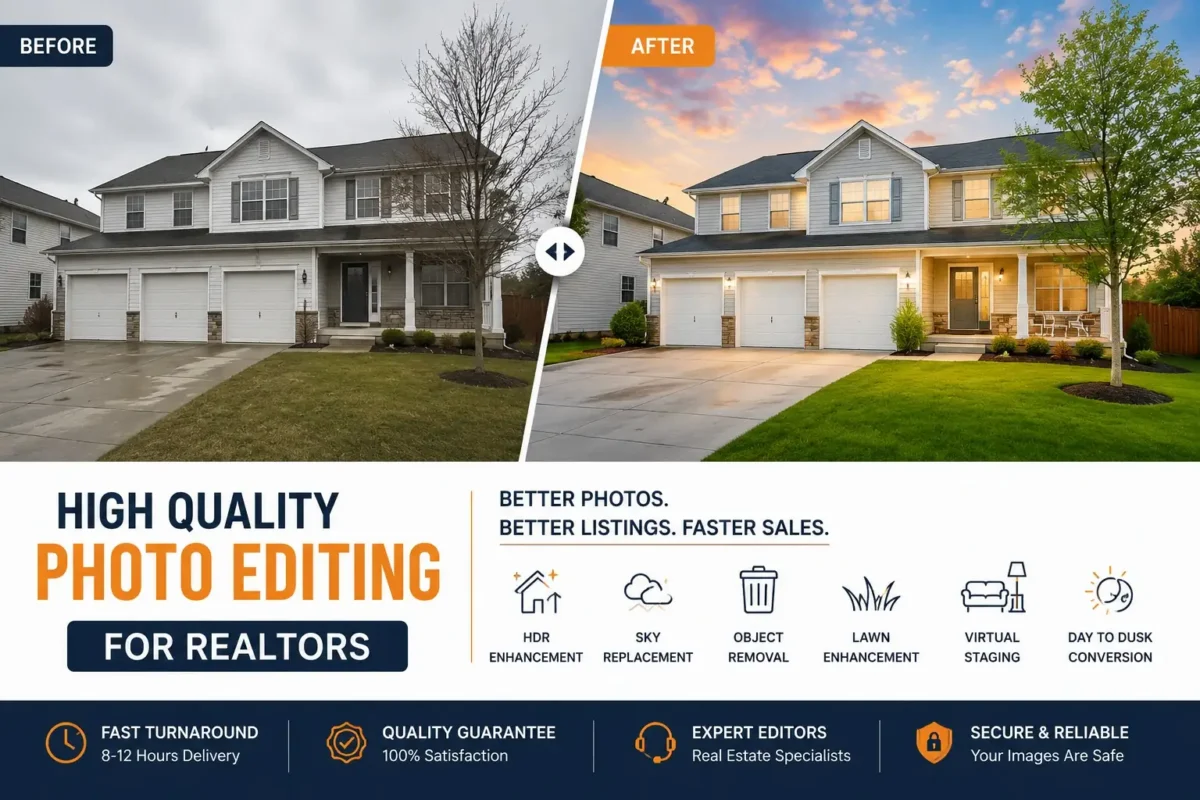
Quick Answer- Photo editing for realtors is the professional process of enhancing property photos after the shoot to correct light, color, perspective, and distractions while keeping the home truthful. It includes HDR blending, sky replacement, lawn enhancement, object removal, and MLS optimization to help listing photos look clean, bright, and buyer-ready.
I have seen $1.2 million homes get ignored online. Not because the kitchen was dated. Not because the location was wrong. Because the photos looked dull, dark, and a little messy. Buyers scrolled past in half a second.
Photo editing for realtors is what stops that scroll. It is the step between pressing the shutter and publishing to MLS that makes a home feel bright, spacious, and worth a showing. A good edit does not fake anything. It fixes what the camera got wrong. It cleans distractions. It balances light so every room feels like you are standing in it at the best time of day.
After editing 15,000 living rooms last year alone, I can tell you this. Two listings can have the same photographer, same lens, same house. The one with careful, honest editing gets more saves, more clicks, and faster inquiries. This guide shows you exactly how that happens, step by step.
Table of Contents
What Is Photo Editing for Realtors?
Photo editing for realtors is the post-shoot process of making listing photos look the way your eyes saw the house. Cameras compress light. They shift colors. They bend straight lines. Editing corrects those flaws.
It is different from photography. Photography captures the raw scene. Real estate photo editing shapes that raw file into a clear, market-ready image. Think of it like this. The photographer collects the ingredients. The editor cooks the meal.
In modern real estate marketing, editing is standard. MLS photo editing is expected by every major portal. Buyers browse on phones with high brightness. If your image looks gray or yellow, they move on. Editing keeps you competitive.
Common misconceptions
- Editing means fake. No. Professional real estate editing keeps structure and size truthful. We remove a trash can, not a wall.
- One filter fixes everything. No. Each room needs its own white balance, exposure, and perspective work.
- More saturated is better. No. Overdone HDR real estate editing looks crunchy and cheap. Good editing looks natural.
Benefits for different roles
- Agents: Cleaner real estate marketing photos, stronger first impression, more showing requests.
- Brokers: Consistent brand across listings, higher quality control for MLS.
- Photographers: Faster real estate photography workflow, more shoots per week, less time at the desk.
Editor Insight: After editing 15,000 living rooms, the fastest win is white balance. Most interiors are shot with warm bulbs and cool window light mixing. Fix that first, and everything else gets easier. If you only learn one thing about realtor photo editing, learn to neutralize mixed light without making skin or wood look gray.
Why Realtors Should Never Skip Editing
Buyers do not read the description first. They scan photos. If the first three look dark, they never scroll to photo four.
Here is the psychology. Bright images feel larger and cleaner. Warm, accurate white balance feels welcoming. Straight vertical lines feel solid and well built. These small cues add up to trust. Trust leads to a click. A click leads to a showing.

- First impressions happen on mobile. High quality listing photos hold attention in a tiny feed.
- Online listings reward quality. Portals push listings with better engagement.
- Emotional impact sells. A sky replacement with soft blue sky makes a backyard feel usable today.
- Click-through rate matters. Clean real estate image editing means more taps from search to detail page.
- Showing requests follow confidence. When windows show detail and lawns look healthy, buyers picture moving in.
- Branding compounds. Consistent property photo editing across your listings makes you look like a premium agent.
Skipping editing does not save money. It costs attention. And attention is what sells homes.
Before vs After Editing: What Actually Changes
The camera sees light in a narrow range. Your eyes see much more. Editing bridges that gap. Here is what changes in a real real estate image retouching pass.
Complete Editing Workflow for Real Estate Photography
This is the full stack I use after 20 years of editing. Every step has a reason. Skip one and the final image feels slightly off. Follow them in order and you get high quality listing photos that hold up on MLS, Instagram, and print.
1. Exposure Correction
Every real estate shoot starts with mixed light. You have a bright window and a dim hallway in one frame. Exposure correction balances those extremes. I start by lifting shadows just enough to show floor texture, then pulling highlights so trim around windows does not blow out.
The goal is not to make everything equally bright. That looks fake. The goal is to guide the eye. Keep the subject, like the kitchen island or fireplace, slightly brighter than the edges.
- Use exposure blending, not a single slider push, to keep depth.
- Watch histogram. Avoid clipping both ends.
- Check skin tones if a person is in a reflection. They should not go gray.
Good exposure correction is invisible. Buyers just feel the room is bright and welcoming, not edited.
2. HDR Blending
HDR real estate editing merges 3 to 5 brackets into one balanced image. One frame holds window detail. One holds interior light. One holds shadows. Blending them gives you both a bright room and a view outside.
After 500,000 frames, I have learned that the blend method matters more than the number of brackets. Enfuse and manual luminosity masking look cleaner than heavy tone mapping. Tone mapping often adds halos around door frames. Natural blending does not.
- Align brackets to fix micro camera shake.
- Mask window frames separately to avoid glow.
- Keep contrast. HDR should not flatten the image.
3. White Balance
White balance is where many listing photos fail. You have warm tungsten, neutral LED, and cool daylight all mixing. Auto white balance picks an average that makes everything look slightly off. Whites go yellow. Grays go blue.
Professional real estate photography editing fixes this with local corrections. I neutralize the ceiling, then correct walls separately from window light spill. Wood should stay warm, not orange. Marble should stay white, not blue.
- Use eyedropper on a known white, then refine by eye.
- Split toning helps, but keep it subtle.
- Match white balance across a room set for color consistency.
4. Perspective Correction
Perspective correction is non negotiable for high quality listing photos. When you tilt the camera up, verticals lean. That leaning makes rooms feel unstable and cheap.
The fix is to pull verticals straight and keep horizontal lines level. But do not over correct. If you make every wall perfectly vertical and crop too tight, you lose sense of space. I leave a tiny bit of natural perspective, just enough to feel real. Editors call this the 95 percent rule.
- Correct verticals first, then horizontal.
- Keep door frames straight, not walls only.
- Watch for over stretching corners after correction.
5. Window Pull / Window Masking
Window pull is the heart of interior real estate image editing. Buyers want to see outside. A white rectangle feels like a missing tooth. A clean view with trees and sky feels open.
I mask each window and replace the blown area with the darker bracket that holds outside detail. Then I balance color so outside does not go too blue. I also reduce glare on glass and keep muntins crisp. If the outside view is ugly, I use a neutral soft sky, not a fake mountain.
- Feather 1-2 pixels only, otherwise you get a glow.
- Match exposure of view to interior light level.
- Keep window frames dark and clean, no halo.
6. Sky Replacement
Sky replacement is one of the highest ROI edits for exteriors. A gray sky makes even a new build look tired. A natural blue sky with soft clouds makes lawn and paint pop.
The trick is to match light direction. If shadows fall left, the clouds should be lit from left. I also keep a few real clouds from the original if possible, to keep it honest. For MLS, I never add a sunset sky to a midday shot. That misleads.
After replacement, I reflect a bit of blue into the scene, on windows and light siding, so the new sky feels integrated. That small step separates amateur sky replacement from professional real estate editing.
7. Grass Enhancement / Lawn Enhancement
Lawn enhancement is not painting the grass neon. It is evening out tone, fixing brown patches, and removing leaves and hoses. A healthy lawn tells buyers the home is cared for.
My method is to select grass, lift vibrance, not saturation, and clone small dead spots. I keep texture. If the lawn is dirt in winter, I add realistic green but keep the seasonal feel. Buyers in snowy markets know when grass is fake. Honesty matters more than perfect green.
- Do not overdo. MLS can flag unnatural lawns.
- Clean edges along driveways and sidewalks.
- Remove lawn signs and temporary items.
8. Object Removal
Object removal is decluttering in post. Cords, trash cans, toiletries, pet bowls, cars in driveway, garden hoses. These pull attention away from the house.
Professional photo retouching for real estate removes them cleanly. I rebuild texture underneath, like tile or grass, so there is no smudge. I keep anything structural. I never remove cracks, stains that indicate damage, or permanent fixtures. That would be misleading and risky.
9. Twilight Conversion / Day to Dusk
Twilight conversion, also called day to dusk, turns a daytime exterior into an evening shot. It is powerful for real estate marketing photos because evening light feels emotional and premium.
This is not a simple filter. True twilight conversion changes sky to deep blue with sunset glow, turns on interior lights, adds warm window glows, and reflects evening colors in windows and driveway. I also add subtle exterior lights if fixtures are visible. Done well, it looks like you waited for golden hour.
Use it as one hero image, not for every exterior. Label it as twilight or virtually staged dusk if your MLS requires disclosure. Buyers love the mood, but honesty comes first.
10. MLS Optimization
MLS optimization is technical but critical. MLS compresses hard. If you upload a huge file with no sharpening, it looks soft. If you upload too small, it pixelates.
I export at MLS recommended long edge, usually 2048 to 3000 pixels, sRGB, 80-90 quality JPEG, with output sharpening for screen. I strip location data if required, keep copyright minimal, and check file size limits. Then I view on a phone to confirm listing photos still pop in a small feed.
Which Editing Services Matter Most?
Not every photo needs every edit. But some edits move the needle more than others. After editing for agents in 30 states, here is what I see actually helps listings.
Quick Win: If you have budget for only three edits, pick HDR blending, window masking, and sky replacement. Those three fix the biggest camera mistakes and make editing property photos worth it even on small condos. I have seen agents double their inquiry rate just by fixing windows and sky.
Common Mistakes Realtors Make
- Mistake: Crooked verticals.
Solution: Add perspective correction to every interior. Buyers feel uneasy when walls lean, even if they cannot name why. - Mistake: Blown windows.
Solution: Demand window pull in your editing package. No buyer wants a white void where a view should be. - Mistake: Leaving clutter.
Solution: Use object removal for cords, bins, and toiletries. If it does not help sell, remove it. - Mistake: Inconsistent color across set.
Solution: Ask for color consistency. One warm living room and one cool bedroom breaks trust. - Mistake: Using heavy HDR that looks crunchy.
Solution: Choose natural HDR real estate editing. No halos, no grunge. Clean beats dramatic. - Mistake: Fake twilight with no interior lights.
Solution: Real twilight conversion adds window glow and matches light direction. Otherwise it looks pasted. - Mistake: Ignoring MLS size rules.
Solution: Export for MLS optimization. Wrong size gets over compressed and looks soft. - Mistake: Thinking editing can fix bad composition.
Solution: Shoot with editing in mind. Level tripod, good height, brackets. Editing property photos cannot fix a bad angle.
DIY vs Professional Editing
AI Editing vs Human Editing
I use AI daily. It is great. But it is not magic. Here is the honest breakdown after testing every major real estate AI tool.
Where AI works well: Auto HDR blending for simple rooms, initial white balance, sky replacement on clear edges, object removal of small items, lawn enhancement on easy grass. It is fast and cheap.
Where humans are essential: Tricky window masking with trees outside, color consistency across a whole house, fireplace and pool enhancement that stays realistic, reflection control in mirrors, judgment on what not to remove. AI still guesses. Humans decide.
Hybrid workflow is the future: AI does first pass in seconds, human editor refines and QCs. You get speed and taste. That is what most pro photo editing service for real estate agents now offers.
Editor Insight: Future of Real Estate Image Retouching
The best results I see now are 70 percent AI, 30 percent human. AI does heavy lifting, human does taste. Clients who demand 100 percent AI to save a few cents often pay more later in re edits. Hybrid gives you both fast turnaround and clean final QC.
How Edited Photos Influence Buyers
Buyers do not buy houses. They buy a feeling of home. Photos are the first place that feeling forms.
- Attention: Bright, sharp high quality listing photos stop thumbs. Dull images get skipped, even if the house is great.
- Trust: Straight lines, neutral whites, and clean windows signal that the listing is professional and the home is well cared for.
- Perceived value: Professional real estate editing makes finishes look more expensive. Clean light makes a laminate look less plastic and a quartz look more luminous.
- Luxury perception: Twilight conversion, pool enhancement, and fire glow add emotional premium. They turn a house into an evening retreat.
- Decision making: When photos answer questions quickly, like how big is this room, what is outside that window, buyers move to showing faster.
- Emotional response: Sky replacement with soft clouds makes a backyard feel like a weekend. Lawn enhancement makes it feel usable now. Virtual staging helps empty rooms feel like a future living room, not a box.
After editing thousands of properties, I can spot the difference in engagement by looking at the set. If windows are clean, lawn is even, and color matches across rooms, the listing feels ready. Ready listings get inquiries.
What Affects Pricing
I do not list exact prices here because markets change. But here is what drives cost for a photo editing service for real estate agents.
- Property size: Larger homes have more rooms and more brackets. More time, more editing.
- Number of images: Per image is standard. Volume discounts are common for 30 plus images.
- Complexity: Basic image enhancement is faster than virtual staging, virtual renovation, or floor plan redraw.
- Turnaround: Overnight is standard. Same day rush costs more because it jumps queue.
- Editing style: Natural, bright MLS style is faster than heavy creative retouching.
- Add ons: Drone photo editing, panorama stitching, twilight conversion, and lawn enhancement can be add ons.
- Volume: Teams shooting 50 plus listings a month usually get tiered pricing.
When comparing quotes, ask what is included. Some services include window pull and sky replacement. Some charge extra. Look at total cost for a typical 35 image listing, not just base rate.
Future Trends in Real Estate Photo Editing
Editing property photos has changed a lot in 20 years. The next five will change even faster.
- AI-assisted editing: Faster culling, auto masking, and first pass HDR. Humans still do final taste and QC.
- Automation: Upload from camera to cloud, auto deliver to MLS folders, auto social crops. Less manual work.
- Virtual staging evolution: More realistic fabrics, better shadows, and style matching to listing price point.
- 3D visualization: From flat photos to interactive floor plans and 3D dollhouse linked to edited stills.
- Drone editing: Better sky and haze removal, auto horizon fix, and location context overlays.
- HDR improvements: Cleaner blending with less ghosting, especially for moving trees and curtains.
- Personalized marketing visuals: Same property, different crops and moods for first time buyers versus luxury buyers.
Pro Tip: Start building a style guide now. Save 5 reference images that show your ideal brightness, sky, lawn, and wood tone. Share it with your editor. In two years, when AI handles more, your style guide will be your brand. It keeps real estate photography editing consistent even as tools change.
Frequently Asked Questions
1. What is photo editing for realtors?
Photo editing for realtors is the professional enhancement of listing photos to fix light, color, perspective, and distractions while keeping the home truthful. It includes HDR blending, white balance, window pull, sky replacement, and MLS optimization so photos look bright, clean, and buyer ready.
2. Is sky replacement allowed on MLS?
Most MLS allow sky replacement if it is natural and does not mislead. A blue sky for a gray day is generally okay. Adding a sunset that was not there should be disclosed or labeled as enhanced.
3. What is HDR real estate editing?
HDR merges multiple exposures of the same scene. One holds window view, one holds interior brightness. Blending gives you both, so rooms look bright and windows still show outside.
4. Do I need lawn enhancement in winter?
Yes, but keep it honest. You can even out brown patches and remove leaves. Avoid painting snow covered yards neon green. Buyers know the season.
5. What is window pull or window masking?
It is the technique of recovering outside detail in blown windows. Editors mask windows and blend in a darker exposure so you see trees and sky, not white rectangles.
6. What is twilight conversion?
Day to dusk editing that turns a daytime exterior into evening. It adds deep blue sky, warm window glows, and exterior light. Used as one hero image, it creates emotional appeal.
7. What file size should I upload to MLS?
Most MLS want sRGB JPEG, long edge 2048 to 3000 pixels, 80 to 90 quality. Check your local MLS rules. Over large files get crushed and look soft.
8. DIY or outsource?
If you shoot more than two listings a week, outsource. You gain hours for clients and get consistent high quality listing photos. Keep DIY for personal projects.
9. Is AI editing good enough?
AI is good for first pass on simple rooms. For tricky light, reflections, and color matching across a house, human editors still produce cleaner, more trustworthy results. Hybrid is best.
10. How do I choose a photo editing service for real estate agents?
Look for a full set portfolio, clear revision policy, real turnaround data, and services beyond basics like virtual staging and floor plan redraw. Consistency beats lowest price.
Conclusion
Great homes deserve great photos. And great photos do not happen by accident. They happen because someone took time to correct light, straighten lines, clean distractions, and match colors across the whole set.
Photo editing for realtors is not about tricking buyers. It is about showing the home honestly and at its best. When you fix what the camera got wrong, buyers can see what you see on site. That clarity builds trust. Trust brings showings.
Start with the basics. Shoot brackets. Fix white balance first. Demand window pull and perspective correction. Keep lawn and sky natural. Then build a checklist so every listing gets the same care.
If you do that, your listings will stand out. Not because they are louder, but because they are clearer, brighter, and more welcoming than the scroll of dull, cluttered photos around them. Invest in high quality editing. Your sellers will notice. Buyers will feel it. And your brand will grow with every clean, consistent set you publish.